• Skip to main content
  • Skip to secondary menu
  • Skip to primary sidebar
The Blog of Jorge de la Cruz

The Blog of Jorge de la Cruz

Everything about VMware, Veeam, InfluxData, Grafana, Zimbra, etc.

  • Home
  • VMWARE
  • VEEAM
    • Veeam Content Recap 2021
    • Veeam v11a
      • Veeam Backup and Replication v11a
    • Veeam Backup for AWS
      • Veeam Backup for AWS v4
    • Veeam Backup for Azure
      • Veeam Backup for Azure v3
    • VeeamON 2021
      • Veeam Announces Support for Red Hat Enterprise Virtualization (RHEV/KVM)
      • Veeam announces enhancements for new versions of Veeam Backup for AWS v4/Azure v3/GVP v2
      • VBO v6 – Self-Service Portal and Native Integration with Azure Archive and AWS S3 Glacier
  • Grafana
    • Part I (Installing InfluxDB, Telegraf and Grafana on Ubuntu 20.04 LTS)
    • Part VIII (Monitoring Veeam using Veeam Enterprise Manager)
    • Part XII (Native Telegraf Plugin for vSphere)
    • Part XIII – Veeam Backup for Microsoft Office 365 v4
    • Part XIV – Veeam Availability Console
    • Part XV – IPMI Monitoring of our ESXi Hosts
    • Part XVI – Performance and Advanced Security of Veeam Backup for Microsoft Office 365
    • Part XVII – Showing Dashboards on Two Monitors Using Raspberry Pi 4
    • Part XIX (Monitoring Veeam with Enterprise Manager) Shell Script
    • Part XXII (Monitoring Cloudflare, include beautiful Maps)
    • Part XXIII (Monitoring WordPress with Jetpack RESTful API)
    • Part XXIV (Monitoring Veeam Backup for Microsoft Azure)
    • Part XXV (Monitoring Power Consumption)
    • Part XXVI (Monitoring Veeam Backup for Nutanix)
    • Part XXVII (Monitoring ReFS and XFS (block-cloning and reflink)
    • Part XXVIII (Monitoring HPE StoreOnce)
    • Part XXIX (Monitoring Pi-hole)
    • Part XXXI (Monitoring Unifi Protect)
    • Part XXXII (Monitoring Veeam ONE – experimental)
    • Part XXXIII (Monitoring NetApp ONTAP)
    • Part XXXIV (Monitoring Runecast)
  • Nutanix
  • ZIMBRA
  • PRTG
  • LINUX
  • MICROSOFT

Veeam: How to install a valid SSL Certificate (Let’s Encrypt) for the new Restore Portal on Veeam Backup for Microsoft 365 v6

18th March 2022 - Written in: veeam

Greetings friends, another day, another blog entry which I hope could be useful for you. I have already told you everything you need to know about What’s New in Veeam Backup for Microsoft 365 v6, and How-to Enable the new Restore Portal as well.

Hoping those two blog entries are helpful for you, today I am moving a step forward, as I have mentioned the new Restore Portal (Self-Service) is an HTML5 web application that will be exposed to End-Users, or to Restore Operators, no matter if it is exposed under a VPN, or through normal, and the public Internet, it will be end-user facing.

This means that as fewer warnings, browser errors, or things that might scare those end-users, the better. Hence, I am here today to tell you about how to install a valid SSL Certificate, using Let’s Encrypt, for Veeam Backup for Microsoft 365 Restore Portal.

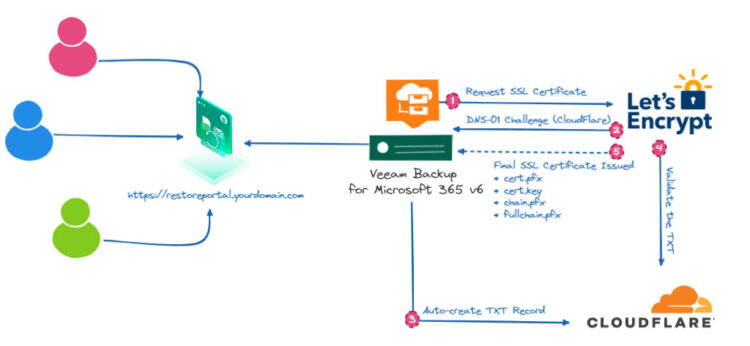
Quick Diagram of the Solution

As a quick example of how all of this works, please find the next diagram with the Let’s Encrypt validation method, etc:

How-to Install, configure, and run ACME on PowerShell plus SSL Certificate creation

Everything has been so much automated already by the Community, that hopefully this will take just a few seconds, let’s check the security for your ExecutionPolicy on PowerShell:

Plain text
Copy to clipboard
Open code in new window
EnlighterJS 3 Syntax Highlighter
Get-ExecutionPolicy
RemoteSigned
Get-ExecutionPolicy RemoteSigned
Get-ExecutionPolicy
RemoteSigned

If it says RemoteSigned, we are good to go, otherwise, please change it so we can install the next package, etc.

Plain text
Copy to clipboard
Open code in new window
EnlighterJS 3 Syntax Highlighter
Set-ExecutionPolicy RemoteSigned

Once we have passed that little system requirement, let’s now move to the ACME Client installation, as simple as running:

Plain text
Copy to clipboard
Open code in new window
EnlighterJS 3 Syntax Highlighter
Install-Module -Name Posh-ACME

Let’s select yes to accept the warning about the package:

That’s great, now we have the simple ACME Client, and Library that can help us to start creating SSL certificates. As you already know, Let’s Encrypt needs to validate that we own the Domain for what we are producing SSL Certificates, there are a few different options, but one of my favorites is using the DNS method. This specific method can be automated if you are using DNS providers like Cloudflare, GoDaddy, and so many others, full list here.

How-to create a Cloudflare API token

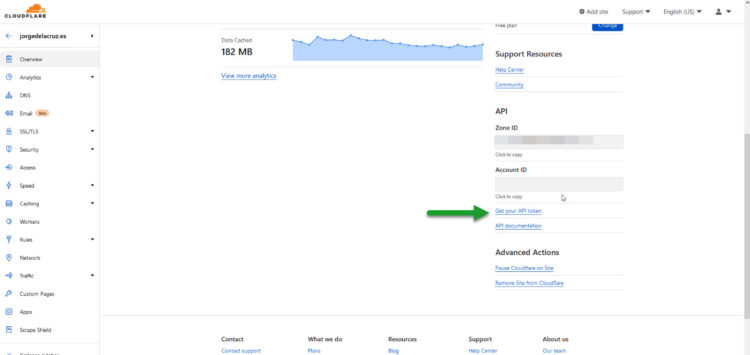
The ACME client would need a Cloudflare API Token, you can use the admin one, but I would totally not recommend that, and just create a new one on the go for this purpose, it is really simple, on your Cloudflare, go to the domain you want to create the SSL Certificate, scroll a bit, API – Get your API Token

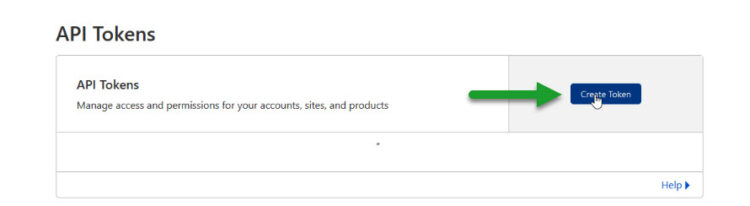
Now we will click on the big blue button to generate a new Token:

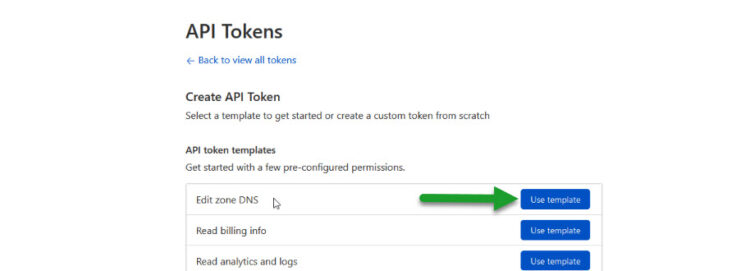
We can quickly use one of the Templates that Cloudflare has, select the Edit zone DNS one:

We need to add an additional permission, the Zone:Zone:Read, and then we should apply to either all our Zones, or just to the one we want to product the SSL Certificate:

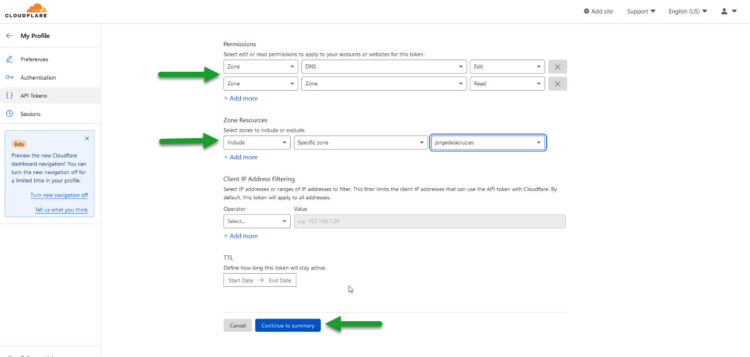
That’s it, the next step will give us the API Token, keep it safe, and please do not share it.

How-to Create a new valid SSL Certificate within seconds, using Cloudflare DNS as Let’s Encrypt Validation

Using a bit of code from Anthony Spiteri, with a single line we will be able to produce a new SSL Certificate. But first, let’s introduce securely our API Token into the PowerShell session:

Plain text
Copy to clipboard
Open code in new window
EnlighterJS 3 Syntax Highlighter
Set-PAServer "LE_Prod"
$secureToken = Read-Host -AsSecureString -Prompt 'API Token Cloudflare'
Set-PAServer "LE_Prod" $secureToken = Read-Host -AsSecureString -Prompt 'API Token Cloudflare'
Set-PAServer "LE_Prod"
$secureToken = Read-Host -AsSecureString -Prompt 'API Token Cloudflare'

That will ask us to introduce the Cloudflare API Key, which we can do securely, as it will be hidden, like this:

Plain text
Copy to clipboard
Open code in new window
EnlighterJS 3 Syntax Highlighter
API Token Cloudflare: ****************************************

Now, let’s prepare this Token on a format and a variable we can use on the following commands:

Plain text
Copy to clipboard
Open code in new window
EnlighterJS 3 Syntax Highlighter
$CloudFlareToken = @{ CFToken = $secureToken }

Finally, it is the time we were waiting for, the SSL Certificate creation, leaving you here the full line, with the following explanation table:

Plain text
Copy to clipboard
Open code in new window
EnlighterJS 3 Syntax Highlighter
New-PACertificate veeamvbo3.jorgedelacruz.es -FriendlyName veeamvbo3.jorgedelacruz.es -PfxPass Veeam12 -AcceptTOS -Contact jorgedlcruz@gmail.com -DnsPlugin Cloudflare -PluginArgs $CloudFlareToken

As promised, here is a table with what does it mean every parameter, so you can adjust it to your needs:

veeamvbo3.jorgedelacruz.es The name you want on the certificate. You can add additional comma-separated names if you like. And it can be a wildcard (not recommended)
FriendlyName This friendly name will be injected into the SSL as well, some browsers like to check this as well (optional)
PfxPass Password for your SSL Certificate, it will be required later on when Importing it (recommended)
AcceptTOS Indicates that you accept the Let’s Encrypt Terms of Service (see https://letsencrypt.org/documents/LE-SA-v1.2-November-15-2017.pdf)
Contact Email for expiration notification (optional)
DnsPlugin Which DNS plugin should be used for automatic domain ownership validation. I am using Cloudflare, but you could use different ones. Here is a list of DNS providers supported by Posh-ACME: https://github.com/rmbolger/Posh-ACME/wiki/List-of-Supported-DNS-Providers
PluginArgs Options that depend on chosen DNSPlugin. In my case, as you could see, does include the Cloudflare API Token

We should allow a few minutes for the ACME Posh to inject the DNS into Cloudflare, and verify the DNS propagation, but if all goes well, just a few seconds after we will see the next:

Plain text
Copy to clipboard
Open code in new window
EnlighterJS 3 Syntax Highlighter
Subject NotAfter KeyLength Thumbprint AllSANs
------- -------- --------- ---------- -------
CN=veeamvbo3.jorgedelacruz.es 6/16/2022 10:00:59 AM 2048 D60BD8462E389AD752CFF7FC97DB8754D3302597 {veeamvbo3.jorgedelacruz.es}
Subject NotAfter KeyLength Thumbprint AllSANs ------- -------- --------- ---------- ------- CN=veeamvbo3.jorgedelacruz.es 6/16/2022 10:00:59 AM 2048 D60BD8462E389AD752CFF7FC97DB8754D3302597 {veeamvbo3.jorgedelacruz.es}
Subject                       NotAfter              KeyLength Thumbprint                               AllSANs
-------                       --------              --------- ----------                               -------
CN=veeamvbo3.jorgedelacruz.es 6/16/2022 10:00:59 AM 2048      D60BD8462E389AD752CFF7FC97DB8754D3302597 {veeamvbo3.jorgedelacruz.es}

This means, great news! Let’s take a quick look at all the files that it has been generated, with the next command, we will see the path and files. We should usually utilize the fullchain.pfx.

Plain text
Copy to clipboard
Open code in new window
EnlighterJS 3 Syntax Highlighter
PS C:\Users\Administrator> Get-PACertificate | Format-List
Subject : CN=veeamvbo3.jorgedelacruz.es
NotBefore : 3/18/2022 9:01:00 AM
NotAfter : 6/16/2022 10:00:59 AM
KeyLength : 2048
Thumbprint : D60BD8462E389AD752CFF7FC97DB8754D3302597
AllSANs : {veeamvbo3.jorgedelacruz.es}
CertFile : C:\Users\Administrator\AppData\Local\Posh-ACME\LE_PROD\456851980\veeamvbo3.jorgedelacruz.es\cert.cer
KeyFile : C:\Users\Administrator\AppData\Local\Posh-ACME\LE_PROD\456851980\veeamvbo3.jorgedelacruz.es\cert.key
ChainFile : C:\Users\Administrator\AppData\Local\Posh-ACME\LE_PROD\456851980\veeamvbo3.jorgedelacruz.es\chain.cer
FullChainFile : C:\Users\Administrator\AppData\Local\Posh-ACME\LE_PROD\456851980\veeamvbo3.jorgedelacruz.es\fullchain.cer
PfxFile : C:\Users\Administrator\AppData\Local\Posh-ACME\LE_PROD\456851980\veeamvbo3.jorgedelacruz.es\cert.pfx
PfxFullChain : C:\Users\Administrator\AppData\Local\Posh-ACME\LE_PROD\456851980\veeamvbo3.jorgedelacruz.es\fullchain.pfx
PfxPass : System.Security.SecureString
PS C:\Users\Administrator> Get-PACertificate | Format-List Subject : CN=veeamvbo3.jorgedelacruz.es NotBefore : 3/18/2022 9:01:00 AM NotAfter : 6/16/2022 10:00:59 AM KeyLength : 2048 Thumbprint : D60BD8462E389AD752CFF7FC97DB8754D3302597 AllSANs : {veeamvbo3.jorgedelacruz.es} CertFile : C:\Users\Administrator\AppData\Local\Posh-ACME\LE_PROD\456851980\veeamvbo3.jorgedelacruz.es\cert.cer KeyFile : C:\Users\Administrator\AppData\Local\Posh-ACME\LE_PROD\456851980\veeamvbo3.jorgedelacruz.es\cert.key ChainFile : C:\Users\Administrator\AppData\Local\Posh-ACME\LE_PROD\456851980\veeamvbo3.jorgedelacruz.es\chain.cer FullChainFile : C:\Users\Administrator\AppData\Local\Posh-ACME\LE_PROD\456851980\veeamvbo3.jorgedelacruz.es\fullchain.cer PfxFile : C:\Users\Administrator\AppData\Local\Posh-ACME\LE_PROD\456851980\veeamvbo3.jorgedelacruz.es\cert.pfx PfxFullChain : C:\Users\Administrator\AppData\Local\Posh-ACME\LE_PROD\456851980\veeamvbo3.jorgedelacruz.es\fullchain.pfx PfxPass : System.Security.SecureString
PS C:\Users\Administrator> Get-PACertificate | Format-List

Subject       : CN=veeamvbo3.jorgedelacruz.es
NotBefore     : 3/18/2022 9:01:00 AM
NotAfter      : 6/16/2022 10:00:59 AM
KeyLength     : 2048
Thumbprint    : D60BD8462E389AD752CFF7FC97DB8754D3302597
AllSANs       : {veeamvbo3.jorgedelacruz.es}
CertFile      : C:\Users\Administrator\AppData\Local\Posh-ACME\LE_PROD\456851980\veeamvbo3.jorgedelacruz.es\cert.cer
KeyFile       : C:\Users\Administrator\AppData\Local\Posh-ACME\LE_PROD\456851980\veeamvbo3.jorgedelacruz.es\cert.key
ChainFile     : C:\Users\Administrator\AppData\Local\Posh-ACME\LE_PROD\456851980\veeamvbo3.jorgedelacruz.es\chain.cer
FullChainFile : C:\Users\Administrator\AppData\Local\Posh-ACME\LE_PROD\456851980\veeamvbo3.jorgedelacruz.es\fullchain.cer
PfxFile       : C:\Users\Administrator\AppData\Local\Posh-ACME\LE_PROD\456851980\veeamvbo3.jorgedelacruz.es\cert.pfx
PfxFullChain  : C:\Users\Administrator\AppData\Local\Posh-ACME\LE_PROD\456851980\veeamvbo3.jorgedelacruz.es\fullchain.pfx
PfxPass       : System.Security.SecureString

Fantastic, we are ready to install this new shiny SSL Certificate to our Restore Portal.

How-to Apply a new SSL Certificate to the VBM365 Restore Portal

You can automate this step if you like with either PowerShell or the RESTful API. But as that might add a few more steps on PowerShell, I will demonstrate the few steps you need to do. I am assuming that you have the Restore Portal properly enabled already.

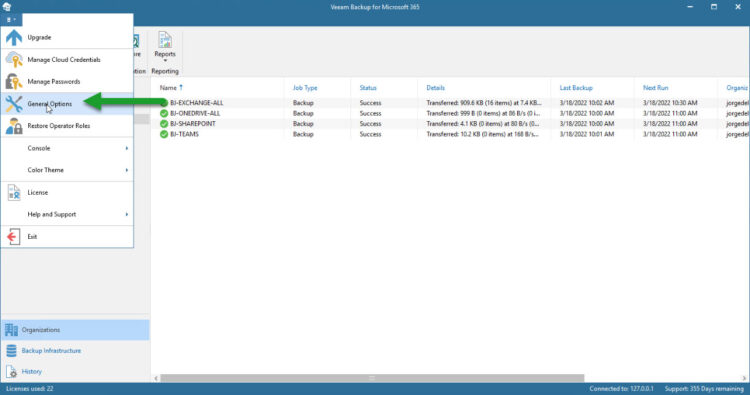
Let’s navigate now under the Main Menu – General Options:

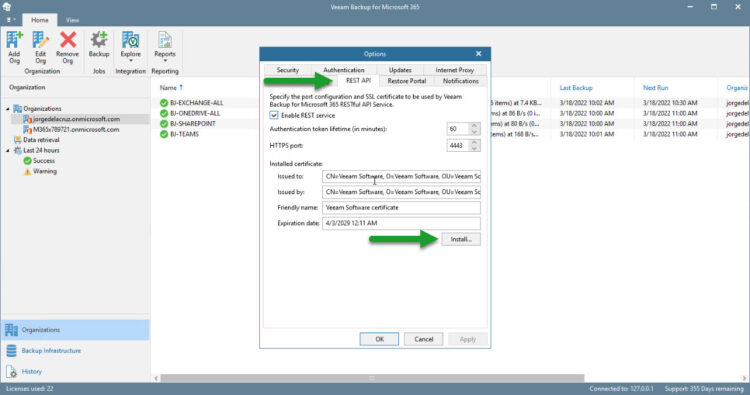
Please select now the REST API Tab, and click Install where it says Installed Certificate:

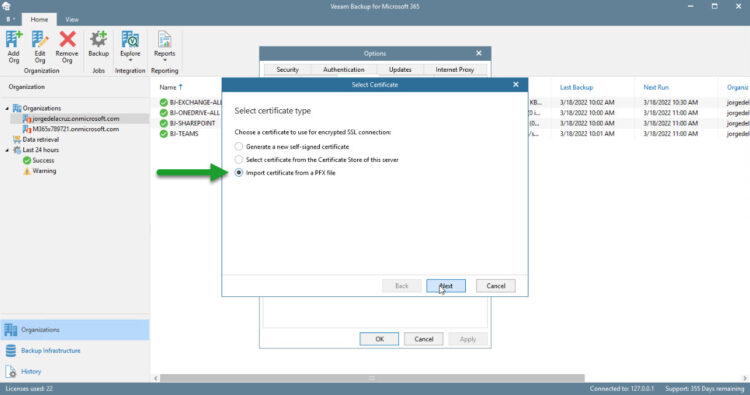
Select now the third option, Import certificate from a PFX file:

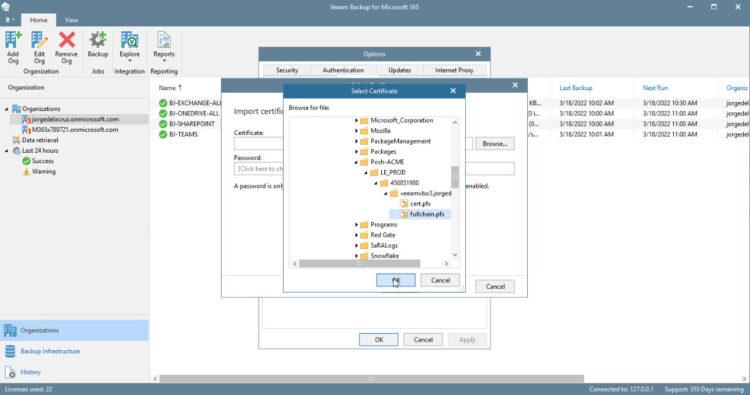
Browse for the files that the ACME Posh have generated, remember that we ran a command that shows the specific path:

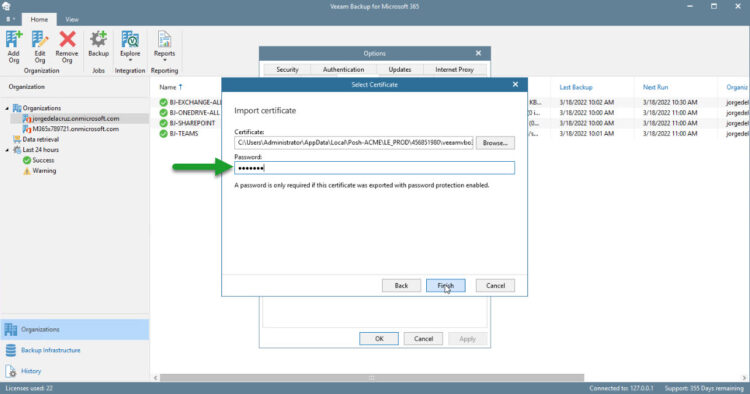
As we have selected a PFX Password when generating it, please introduce that password now:

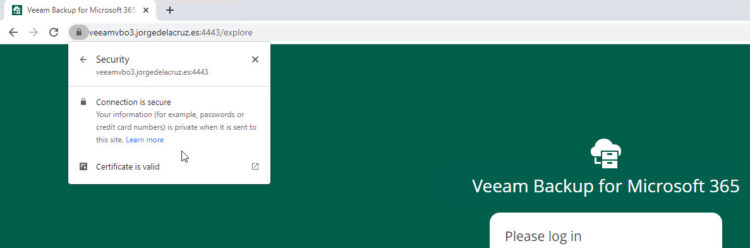
After clicking on Finish on the previous window. The last thing is to go to a web browser, navigate to the valid FQDN, and voila! A valid SSL Certificate so our users would not call us when opening the Restore Portal, plus giving that extra security feeling:

Great work, guys!

[Troubleshooting] System Requirements on the Microsoft Windows Server – How to Fix “Unable to download from URI … “

This is a bit odd, but I was having so many troubles trying to install the new NuGet, or even the Posh-ACME, well anything new. As I am using Microsoft Windows Server 2016, I needed to do these extra steps.

Problems I was seeing when running the installation of the components:

Plain text
Copy to clipboard
Open code in new window
EnlighterJS 3 Syntax Highlighter
WARNING: Unable to download from URI 'https://go.microsoft.com/fwlink/?LinkID=627338&clcid=0x409' to ''.
WARNING: Unable to download the list of available providers. Check your internet connection.
PackageManagement\Install-PackageProvider : No match was found for the specified search criteria for the provider 'NuGet'. The package provider requires 'PackageManagement' and 'Provider' tags. Please check if the specified package has the
tags.
At C:\Program Files\WindowsPowerShell\Modules\PowerShellGet\1.0.0.1\PSModule.psm1:7405 char:21
+ ... $null = PackageManagement\Install-PackageProvider -Name $script:N ...
+ ~~~~~~~~~~~~~~~~~~~~~~~~~~~~~~~~~~~~~~~~~~~~~~~~~~~~~~~~~
+ CategoryInfo : InvalidArgument: (Microsoft.Power...PackageProvider:InstallPackageProvider) [Install-PackageProvider], Exception
+ FullyQualifiedErrorId : NoMatchFoundForProvider,Microsoft.PowerShell.PackageManagement.Cmdlets.InstallPackageProvider
PackageManagement\Import-PackageProvider : No match was found for the specified search criteria and provider name 'NuGet'. Try 'Get-PackageProvider -ListAvailable' to see if the provider exists on the system.
At C:\Program Files\WindowsPowerShell\Modules\PowerShellGet\1.0.0.1\PSModule.psm1:7411 char:21
+ ... $null = PackageManagement\Import-PackageProvider -Name $script:Nu ...
+ ~~~~~~~~~~~~~~~~~~~~~~~~~~~~~~~~~~~~~~~~~~~~~~~~~~~~~~~~~
+ CategoryInfo : InvalidData: (NuGet:String) [Import-PackageProvider], Exception
+ FullyQualifiedErrorId : NoMatchFoundForCriteria,Microsoft.PowerShell.PackageManagement.Cmdlets.ImportPackageProvider
WARNING: Unable to download from URI 'https://go.microsoft.com/fwlink/?LinkID=627338&clcid=0x409' to ''.
WARNING: Unable to download the list of available providers. Check your internet connection.
PackageManagement\Get-PackageProvider : Unable to find package provider 'NuGet'. It may not be imported yet. Try 'Get-PackageProvider -ListAvailable'.
At C:\Program Files\WindowsPowerShell\Modules\PowerShellGet\1.0.0.1\PSModule.psm1:7415 char:30
+ ... tProvider = PackageManagement\Get-PackageProvider -Name $script:NuGet ...
+ ~~~~~~~~~~~~~~~~~~~~~~~~~~~~~~~~~~~~~~~~~~~~~~~~~~~~~~~~~
+ CategoryInfo : ObjectNotFound: (Microsoft.Power...PackageProvider:GetPackageProvider) [Get-PackageProvider], Exception
+ FullyQualifiedErrorId : UnknownProviderFromActivatedList,Microsoft.PowerShell.PackageManagement.Cmdlets.GetPackageProvider
Install-Module : NuGet provider is required to interact with NuGet-based repositories. Please ensure that '2.8.5.201' or newer version of NuGet provider is installed.
At line:1 char:1
+ Install-Module PowershellGet -Force
+ ~~~~~~~~~~~~~~~~~~~~~~~~~~~~~~~~~~~
+ CategoryInfo : InvalidOperation: (:) [Install-Module], InvalidOperationException
+ FullyQualifiedErrorId : CouldNotInstallNuGetProvider,Install-Module
WARNING: Unable to download from URI 'https://go.microsoft.com/fwlink/?LinkID=627338&clcid=0x409' to ''. WARNING: Unable to download the list of available providers. Check your internet connection. PackageManagement\Install-PackageProvider : No match was found for the specified search criteria for the provider 'NuGet'. The package provider requires 'PackageManagement' and 'Provider' tags. Please check if the specified package has the tags. At C:\Program Files\WindowsPowerShell\Modules\PowerShellGet\1.0.0.1\PSModule.psm1:7405 char:21 + ... $null = PackageManagement\Install-PackageProvider -Name $script:N ... + ~~~~~~~~~~~~~~~~~~~~~~~~~~~~~~~~~~~~~~~~~~~~~~~~~~~~~~~~~ + CategoryInfo : InvalidArgument: (Microsoft.Power...PackageProvider:InstallPackageProvider) [Install-PackageProvider], Exception + FullyQualifiedErrorId : NoMatchFoundForProvider,Microsoft.PowerShell.PackageManagement.Cmdlets.InstallPackageProvider PackageManagement\Import-PackageProvider : No match was found for the specified search criteria and provider name 'NuGet'. Try 'Get-PackageProvider -ListAvailable' to see if the provider exists on the system. At C:\Program Files\WindowsPowerShell\Modules\PowerShellGet\1.0.0.1\PSModule.psm1:7411 char:21 + ... $null = PackageManagement\Import-PackageProvider -Name $script:Nu ... + ~~~~~~~~~~~~~~~~~~~~~~~~~~~~~~~~~~~~~~~~~~~~~~~~~~~~~~~~~ + CategoryInfo : InvalidData: (NuGet:String) [Import-PackageProvider], Exception + FullyQualifiedErrorId : NoMatchFoundForCriteria,Microsoft.PowerShell.PackageManagement.Cmdlets.ImportPackageProvider WARNING: Unable to download from URI 'https://go.microsoft.com/fwlink/?LinkID=627338&clcid=0x409' to ''. WARNING: Unable to download the list of available providers. Check your internet connection. PackageManagement\Get-PackageProvider : Unable to find package provider 'NuGet'. It may not be imported yet. Try 'Get-PackageProvider -ListAvailable'. At C:\Program Files\WindowsPowerShell\Modules\PowerShellGet\1.0.0.1\PSModule.psm1:7415 char:30 + ... tProvider = PackageManagement\Get-PackageProvider -Name $script:NuGet ... + ~~~~~~~~~~~~~~~~~~~~~~~~~~~~~~~~~~~~~~~~~~~~~~~~~~~~~~~~~ + CategoryInfo : ObjectNotFound: (Microsoft.Power...PackageProvider:GetPackageProvider) [Get-PackageProvider], Exception + FullyQualifiedErrorId : UnknownProviderFromActivatedList,Microsoft.PowerShell.PackageManagement.Cmdlets.GetPackageProvider Install-Module : NuGet provider is required to interact with NuGet-based repositories. Please ensure that '2.8.5.201' or newer version of NuGet provider is installed. At line:1 char:1 + Install-Module PowershellGet -Force + ~~~~~~~~~~~~~~~~~~~~~~~~~~~~~~~~~~~ + CategoryInfo : InvalidOperation: (:) [Install-Module], InvalidOperationException + FullyQualifiedErrorId : CouldNotInstallNuGetProvider,Install-Module
WARNING: Unable to download from URI 'https://go.microsoft.com/fwlink/?LinkID=627338&clcid=0x409' to ''.
WARNING: Unable to download the list of available providers. Check your internet connection.
PackageManagement\Install-PackageProvider : No match was found for the specified search criteria for the provider 'NuGet'. The package provider requires 'PackageManagement' and 'Provider' tags. Please check if the specified package has the
tags.
At C:\Program Files\WindowsPowerShell\Modules\PowerShellGet\1.0.0.1\PSModule.psm1:7405 char:21
+ ...     $null = PackageManagement\Install-PackageProvider -Name $script:N ...
+                 ~~~~~~~~~~~~~~~~~~~~~~~~~~~~~~~~~~~~~~~~~~~~~~~~~~~~~~~~~
    + CategoryInfo          : InvalidArgument: (Microsoft.Power...PackageProvider:InstallPackageProvider) [Install-PackageProvider], Exception
    + FullyQualifiedErrorId : NoMatchFoundForProvider,Microsoft.PowerShell.PackageManagement.Cmdlets.InstallPackageProvider

PackageManagement\Import-PackageProvider : No match was found for the specified search criteria and provider name 'NuGet'. Try 'Get-PackageProvider -ListAvailable' to see if the provider exists on the system.
At C:\Program Files\WindowsPowerShell\Modules\PowerShellGet\1.0.0.1\PSModule.psm1:7411 char:21
+ ...     $null = PackageManagement\Import-PackageProvider -Name $script:Nu ...
+                 ~~~~~~~~~~~~~~~~~~~~~~~~~~~~~~~~~~~~~~~~~~~~~~~~~~~~~~~~~
    + CategoryInfo          : InvalidData: (NuGet:String) [Import-PackageProvider], Exception
    + FullyQualifiedErrorId : NoMatchFoundForCriteria,Microsoft.PowerShell.PackageManagement.Cmdlets.ImportPackageProvider

WARNING: Unable to download from URI 'https://go.microsoft.com/fwlink/?LinkID=627338&clcid=0x409' to ''.
WARNING: Unable to download the list of available providers. Check your internet connection.
PackageManagement\Get-PackageProvider : Unable to find package provider 'NuGet'. It may not be imported yet. Try 'Get-PackageProvider -ListAvailable'.
At C:\Program Files\WindowsPowerShell\Modules\PowerShellGet\1.0.0.1\PSModule.psm1:7415 char:30
+ ... tProvider = PackageManagement\Get-PackageProvider -Name $script:NuGet ...
+                 ~~~~~~~~~~~~~~~~~~~~~~~~~~~~~~~~~~~~~~~~~~~~~~~~~~~~~~~~~
    + CategoryInfo          : ObjectNotFound: (Microsoft.Power...PackageProvider:GetPackageProvider) [Get-PackageProvider], Exception
    + FullyQualifiedErrorId : UnknownProviderFromActivatedList,Microsoft.PowerShell.PackageManagement.Cmdlets.GetPackageProvider

Install-Module : NuGet provider is required to interact with NuGet-based repositories. Please ensure that '2.8.5.201' or newer version of NuGet provider is installed.
At line:1 char:1
+ Install-Module PowershellGet -Force
+ ~~~~~~~~~~~~~~~~~~~~~~~~~~~~~~~~~~~
    + CategoryInfo          : InvalidOperation: (:) [Install-Module], InvalidOperationException
    + FullyQualifiedErrorId : CouldNotInstallNuGetProvider,Install-Module

So, to quickly fix these issues, first check the PowerShell version you are running:

Plain text
Copy to clipboard
Open code in new window
EnlighterJS 3 Syntax Highlighter
Get-Host | Select-Object Version

In my case, as you can see, I am on a really old 5.1.x

Plain text
Copy to clipboard
Open code in new window
EnlighterJS 3 Syntax Highlighter
Version
-------
5.1.14393.4583
Version ------- 5.1.14393.4583
Version
-------
5.1.14393.4583

This means that SSL 3.0, and TLS 1.0 for HTTPS are enabled by default, we can quickly check it with the next command:

Plain text
Copy to clipboard
Open code in new window
EnlighterJS 3 Syntax Highlighter
[Net.ServicePointManager]::SecurityProtocol
Ssl3, Tls
[Net.ServicePointManager]::SecurityProtocol Ssl3, Tls
[Net.ServicePointManager]::SecurityProtocol
Ssl3, Tls

Do not panic, it is really simple to fix.

Solution to disable legacy, and insecure Protocols for our PowerShell cmdlets

Let’s go and edit the first one, we could always do it manually on Regedit, or I am leaving you here the copy-paste option. This command will set strong cryptography on the 64 bit .Net Framework:

Plain text
Copy to clipboard
Open code in new window
EnlighterJS 3 Syntax Highlighter
Set-ItemProperty -Path 'HKLM:\SOFTWARE\Wow6432Node\Microsoft\.NetFramework\v4.0.30319' -Name 'SchUseStrongCrypto' -Value '1' -Type DWord

Another change we should do is the same but for the 32 bit .Net Framework, let’s force to use only strong cryptography protocols:

Plain text
Copy to clipboard
Open code in new window
EnlighterJS 3 Syntax Highlighter
Set-ItemProperty -Path 'HKLM:\SOFTWARE\Microsoft\.NetFramework\v4.0.30319' -Name 'SchUseStrongCrypto' -Value '1' -Type DWord

Let’s close now the PowerShell Console, open it again, re-run the first command, and we should see the next:

Plain text
Copy to clipboard
Open code in new window
EnlighterJS 3 Syntax Highlighter
[Net.ServicePointManager]::SecurityProtocol
Ssl3, Tls
[Net.ServicePointManager]::SecurityProtocol Ssl3, Tls
[Net.ServicePointManager]::SecurityProtocol
Ssl3, Tls

We are so ready now! Great work. I have not tried on Windows Server 2019, or 2022, but I hope these settings come by default so you do not need all of this drama.

Filed Under: veeam Tagged With: veeam microsoft 365, veeam portal, veeam restore portal, veeam v6

Reader Interactions

Comments

  1. Electrodealz IT Solutions says

    2nd February 2023 at 4:14 pm

    #before applying the certificate
    step 1) change the line “Get-PACertificate | Format-List” to “$acmecert=Get-PACertificate | Format-List”

    #now we don’t have to dive into the GUI because the created certificate is in a variable
    step 2) define some variables to use in the command to update the API certificate

    $plainpassword = “Password1234plain” (or use the PFX password used in acquiring the LE certificate)

    $securepassword = $plainpassword | ConvertTo-SecureString -AsPlainText -Force (converting it to a usefull powershell password)

    #update the certificate using powershell
    step 3) use the VBO Powershell commands to update the API certificate

    Set-VBORestAPISettings -EnableService -CertificateFilePath $($acmecert.pfxfullchain) -CertificatePassword $securepassword

    don’t forget to import the VBO module first!

    cheers!

Leave a Reply

Your email address will not be published. Required fields are marked *

This site uses Akismet to reduce spam. Learn how your comment data is processed.

Primary Sidebar

  • E-mail
  • GitHub
  • LinkedIn
  • RSS
  • Twitter
  • YouTube

Posts Calendar

March 2022
M T W T F S S
 123456
78910111213
14151617181920
21222324252627
28293031  
« Feb   Apr »

Disclaimer

All opinions expressed on this site are my own and do not represent the opinions of any company I have worked with, am working with, or will be working with.

Copyright © 2025 · The Blog of Jorge de la Cruz