 Greetings friends, following on the great series of blogs about Veeam Backup for Microsoft 365, today I am happy to announce another blog post, let’s take a look at previous Blogs:
- Veeam: How to install a valid SSL Certificate (Let’ Encrypt) for the new Restore Portal on Veeam Backup for Microsoft 365 v6
- Veeam: How to Enable the new Restore Portal (self-service) for Veeam Backup for Microsoft 365 v6
- Veeam: Veeam Backup for Microsoft 365 v6 – New, and Enhanced API Endpoints around Security
- Veeam: What’s New in Veeam Backup for Microsoft 365 v6
Today’s blog was requested by a few of you in the comments, and actually, it does make total sense of course. I am talking about the ability to enable the Restore Portal for multi-tenant, meaning for the different Microsoft 365 Organizations we are protecting under the same Veeam Backup for Microsoft 365 Server.
Quick Diagram of the Solution
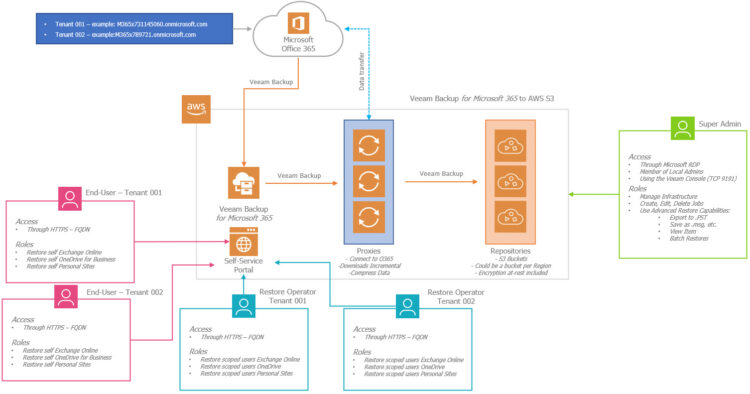
As a quick diagram, something similar to what we have seen already, but just using more boxes (it is a diagram with all the services on AWS), I think the concept of multi-tenant is not difficult to understand, but let’s put all what we want to achieve on a bullet point list:
- Different Microsoft 365 Tenants, that are protected by Veeam Backup for Microsoft 365
- The Users, or Restore Operators, of a few, or all, tenants require Restore Portal
- We follow these steps to enable one by one, the Portal per organization
- All the Tenants will need to connect through the same FQDN, like https://restoreportal.PROVIDER.co.uk:4443 or similar, but it should be the very same URL we configured the Restore Portal with
How-to install AzureAD PowerShell cmdlet
In order to perform these steps, we will need the AzureAD PowerShell cmdlet, nothing difficult, just run the next command:
Install-Module -Name AzureAD
In a few seconds, we will be ready, we will need this, later on, to create the Enterprise Application for the different tenants.
How-to enable the Veeam Backup for Microsoft 365 Restore Portal to another Tenant
There are a few things we need to prepare before we enable the Restore Portal on different tenants. As you can see on the diagram, Veeam Backup for Microsoft 365 should be already protecting the tenant where we want to enable the Restore Portal, I think this is obvious.
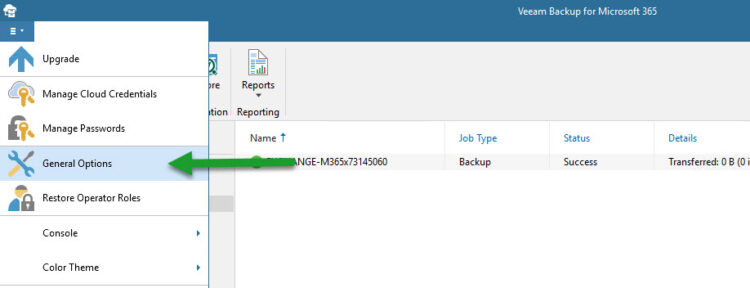
Second, we should know the Restore Portal Application ID, we can find this under the main menu – general options:
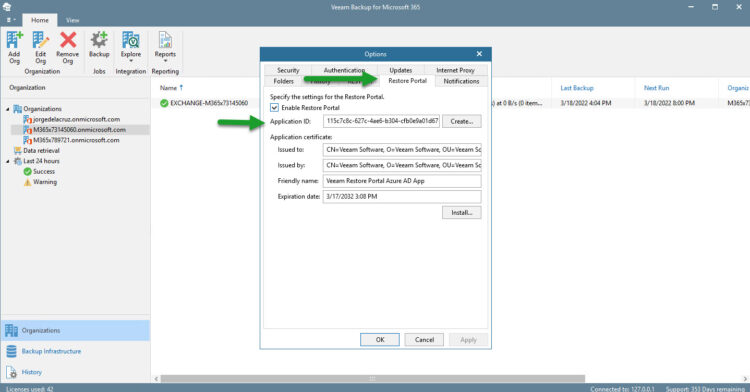
Let’s now navigate to the Restore Portal tab, and there we can find the Application ID, let’s copy that so we can use it on the next steps:
Enabling the Restore Portal to a different tenant
Still on PowerShell, let’s grab the credentials of a Service Account from the Tenant, with enough rights to perform an Enterprise Application install on Azure AD, so, as said, let´s grab the credentials:
$Credential = Get-Credential
This will open a traditional User and password Microsoft Popup:
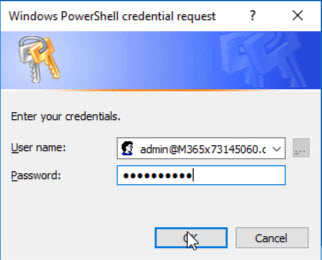
The next commando will connect our PowerShell to AzureAD using the credentials we introduced before:
Connect-AzureAD -Credential $Credential
We should see something like this if everything worked smoothly:

And the final magic trick, a single command which brings everything together:
New-AzureADServicePrincipal -AppId "THEIDFROMYOURRESTOREPORTAL"
If everything worked as expected, the output should show something similar to this:

Last-Step: Give permissions to the new Application on Azure AD (Tenant side)
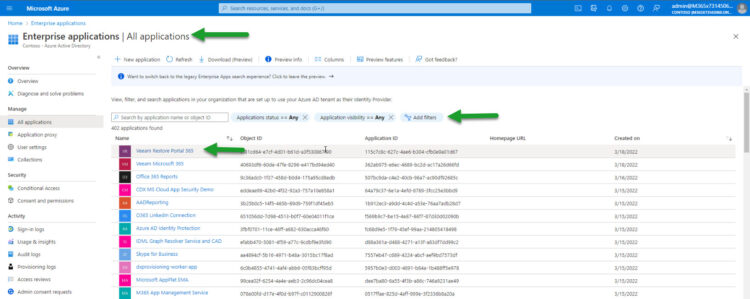
I guess that if you are running these steps, you have already access to the Tenant Azure AD, etc. But in the case that the previous steps have been executed by the Tenant, they still need to do one last thing. Login to Azure AD, please move under Enterprise Applications, on the filter remove the enterprise applications filter, and order them by date, you should quickly see a new application (which will be the name how the Restore Portal was created, so it can say something Veeam, or no, it just depends). If you order by Application ID, you can also double-check it is the very same ID that we introduced on PowerShell:
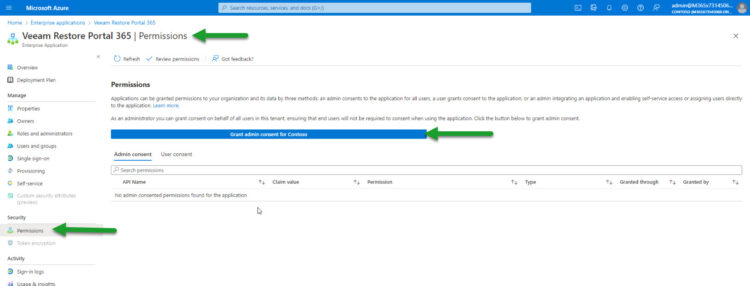
Once we are already on the Enterprise Application, we can move under Permissions, and press “Grant admin consent for”
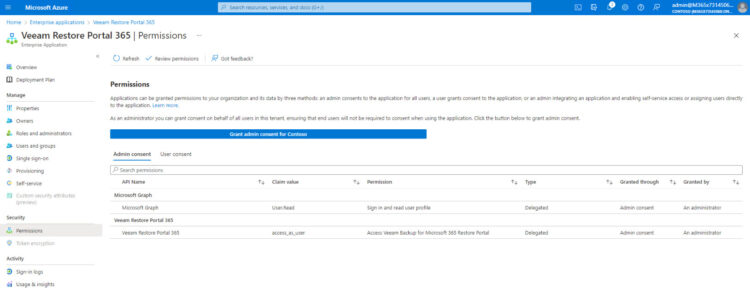
That process will ask us again for an authorized account to allow the step, etc. That’s it! We should see something like this:
How-to login to the Restore Portal with different tenants
This remains important, as mentioned before, we should use ONLY the same FQDN we used to create the Restore Portal, perhaps we need to ask the Service Provider, etc. If we try another FQDN, the login will fail. In my case, I am accessing with https://veeamvbo3.jorgdelacruz.es:4443 which is my valid FQDN, this can reply to an internal IP, or external IP, etc.
Login with tenant M365x731145060.onmicrosoft.com

Login with tenant M365x789721.onmicrosoft.com, which is a Restore Operator so it can restore multiple, different objects from different Users:

As you can see, all works like a charm, with a valid SSL Certificate, and with different tenants. Superb work!
Special thanks
This post would not be possible without the incredible, always available to help, and the person with more knowledge of Microsoft 365 than I know, Polina Vasileyva.
Another great post that inspired me, is the one from my fellow VeeamMVP, Baptiste Tellier – https://baptistetellier.fr/index.php/2022/03/14/vbo-v6-configuration-du-portail-en-libre-service/
The official steps can be found as a tiny box on the next URL – https://helpcenter.veeam.com/docs/vbo365/guide/ssp_configuration.html?zoom_highlight=new-azureadserviceprincipal&ver=60

Thank you Jorge, this is exactly what we were looking for.
Working 100% after following your guide