
 Greetings friends, I have been experimenting a bit and found an interesting way to add more URLs to the new Veeam Restore Portal, but before we jump straight to it, let’s take a look at previous blog entries regarding the new Veeam Restore Portal on Veeam Backup for Microsoft 365:
- Veeam: How to enable multi-tenant on the new Restore Portal on Veeam Backup for Microsoft 365 v6
- Veeam: How to install a valid SSL Certificate (Let’s Encrypt) for the new Restore Portal on Veeam Backup for Microsoft 365 v6
- Veeam: How to Enable the new Restore Portal (self-service) for Veeam Backup for Microsoft 365 v6
- Veeam: Veeam Backup for Microsoft 365 v6 – New, and Enhanced API Endpoints around Security
- Veeam: What’s New in Veeam Backup for Microsoft 365 v6
These steps have not been officially certified or tested by Veeam, so please run them with precaution, and under your own responsibility.
Quick Diagram of the Solution
As a quick diagram, something similar to what we have seen already, but today, I am adding the part of the different URLs:
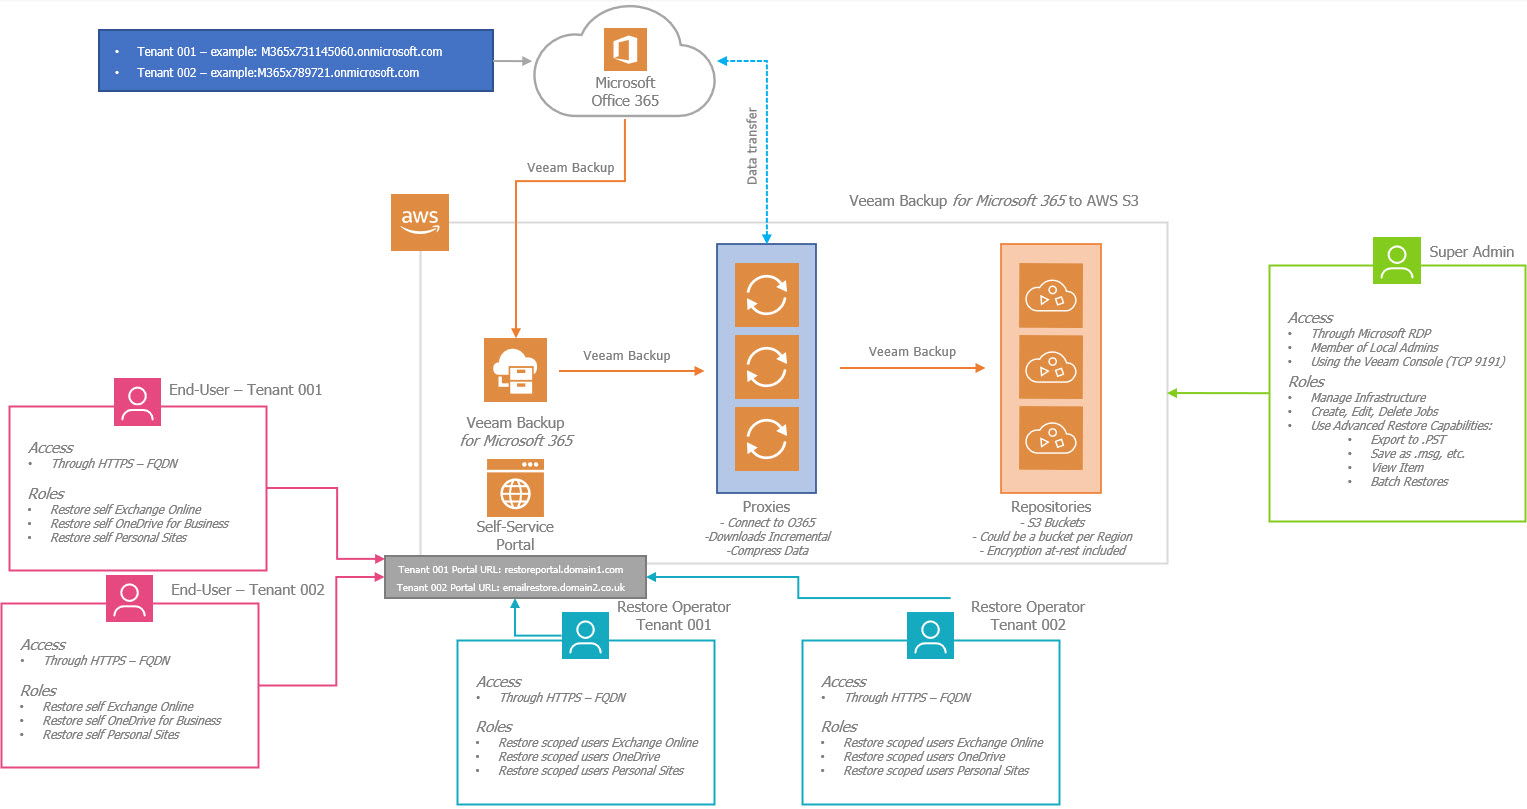
As you can see, the Restore Portal (Self-Service), will expose and accept now a few different URLs, so this will be perfect in case the Portal is being used for different Tenants, so they can log in to a familiar address within their domain.
Quick comments regarding SSL Certificate, and DNS for Restore Portal
I had this conversation a few times already over the last few days, so as a quick consideration if you are going to offer the Restore Portal to different Tenants, please bear in mind:
SSL Certificate Quick Notes
The Restore Portal uses the RESTFul API SSL Certificate, which I already demonstrate how to quickly install a Let’s Encrypt SSL Certificate. The RESTful API Service supports only one single SSL Certificate, meaning that the SSL certificate you will present, should contain the different SAN (Subject Alt Names). This means the SSL certificate should have (from my example on the image:
-
- restoreportal.domain1.com
- emailrestore.domain2.co.uk
- whatever extra domain you want to add
Usually, you can edit the SSL SAN at any given point with your provider, including quickly on Let’s Encrypt of course. The only caveat, please remember, is that after you add the new SAN to your SSL, you need to Import that new SSL certificate to your VBM365, following these steps.
DNS for Restore Portal Quick Notes
Let’s talk DNS for a minute, so on the scenario which I am demonstrating, the Restore Portal. I am expecting to be exposed to the Internet, meaning having both: an IPv4, and an IPv6 perhaps.
So, what every tenant should do on their DNS Zones, whether public or private, is create a DNS entry pointing to that Public IPv4, or IPv6, like:

Knowing this, we need to match the FQDN/URL to an IP that points to the Restore Portal, this can be a VM with a NAT IP, or an EC2, or AzureVM with Public IP, etc.
Step-by-Step how to add additional IPs to the Veeam Backup for Microsoft 365 Restore Portal
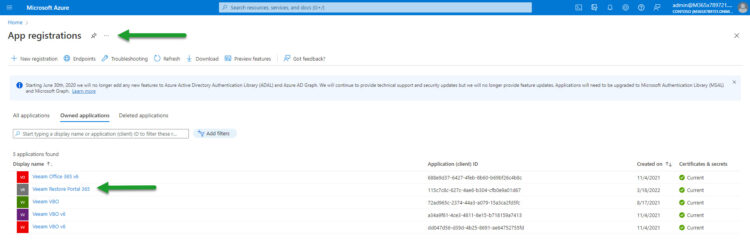
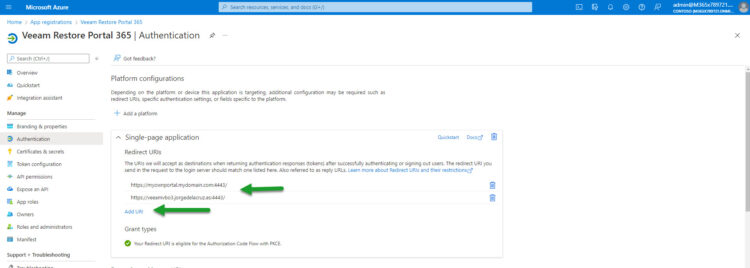
These steps can be done only on the Azure AD Organization that the original Restore Portal was released, meaning the tenants can not perform these steps. As said, on the Service Provider Azure AD, or on the Azure AD where it was deployed, log in with an account with admin rights, navigate to App Registrations, you should see the Restore Portal Application, double-check the ID if you like, it will be the same as on the Veeam Backup for Microsoft 365 Console:
Inside the Application itself, you can either go to Authentication or click on the URL on the right where it says Redirect URLs:
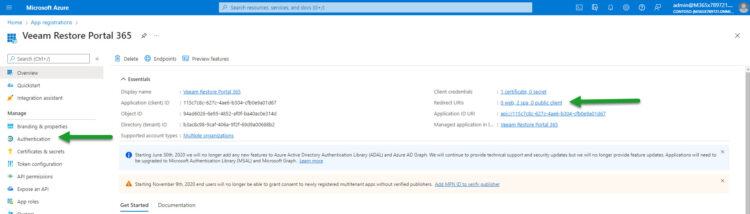
And there you go, you will see your current URLs where your Users will be authenticated, remember you need to make DNS available, etc. You can delete some in the future if a tenant contract ends, etc.
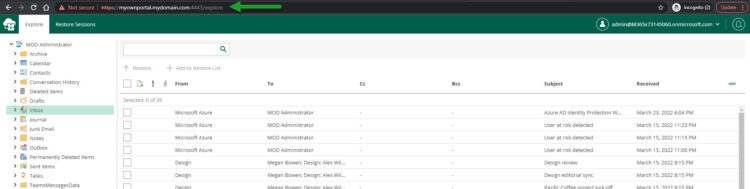
Look at my example, a completely made-up domain, which of course I put on my host’s file so I can access it, but of course, it is an example, I go to the portal, authenticate, and there you go, no error whatsoever:
Automate this process, PowerShell, and Azure CLI
I am using the demo tenant accounts, and I could not make this work with those accounts, but with normal Domains, with valid subscriptions, this should work, let’s go.
PowerShell
Allow me to share with you a quick, and dirty, PowerShell script to do this much faster. Remember that you will need the AzureAD PowerShell cmdlet, as easy as:
Install-Module -Name AzureAD
Then this is the script:
$Credential = Get-Credential
Connect-AzureAD -Credential $Credential
$AppId = "115c7c8c-627c-4ae6-b304-cfb0e9a01d67"
$replyUrls = $app.ReplyUrls;
$newURLtoAdd = "https://mysecondtenant.domain.com:4443/"
$replyUrls.Add($newURLtoAdd)
Set-AzureADApplication -ObjectId $app.ObjectId -ReplyUrls $replyUrls
If we took a look at the script, quite simple:
- First two lines we ask for credentials, and we use them to connect to AzureAD
- We map the Veeam Restore Portal App ID to a variable – You can see this ID on the Console under the Menu – Options – Restore Portal
- We grab the actual ReplyURLs we might have, one, two, ten, it will just add as many as we have into a variable
- Then we add the new URL we want to add for our tenant, imagine in this case https://mysecondtenant.domain.com:4443/
- We add the new URL to the list of URLs we had before
- We finally push the changes, so the new URL should be added
If you face problems let me know, as said, with my Contoso demo accounts it is not working, so you need to use the manual way through the Azure Web Console.
Azure CLI
Another great way is using AzureCLI, I think it is faster, and more modern than PowerShell, I have found it more universal as well, as this works on Linux, or really anywhere. Please download Azure CLI from here:
After the installation is done, the commands are quite similar to the ones before, let’s take a look, let’s login, and see the actual URLS we have on our Restore Portal App:
az login --username [email protected] --allow-no-subscription
az ad app show --id api://115c7c8c-627c-4ae6-b304-cfb0e9a01d67 --query replyUrls
This should show you something like this:
[
  "https://myownportal.mydomain.com:4443/",
  "https://veeamvbo3.jorgedelacruz.es:4443/"
]
Nice, now we need to put this together on a single line, and commit, like this:
az ad app update --id api://115c7c8c-627c-4ae6-b304-cfb0e9a01d67 --reply-urls https://myownportal.mydomain.com:4443/ https://veeamvbo3.jorgedelacruz.es:4443/ https://mysecondtenant.domain.com:4443/
You can play a bit with the current URLs and save them to a variable, and add your new URL into that with some magic like:
$AzAddUrls = az ad app show --id api://115c7c8c-627c-4ae6-b304-cfb0e9a01d67 --query replyUrls | ConvertFrom-Json
$newURLtoAdd = "https://mysecondtenant.domain.com:4443/"
$AzAddUrls += $newURLtoAdd
az ad app update --id api://115c7c8c-627c-4ae6-b304-cfb0e9a01d67 --reply-urls $AzAddUrls
But as said, I could not test it very well I think due to my limited accounts. So for now, if getting troubles, use the Azure Web Console.
Hope you like this blog post, and you find it useful. Thanks to Polina Vasilyeva once again.
Leave a Reply