
 Greetings friends, since the release of this great funcionality in Veeam Backup for Microsoft 365 v6, back in March 2022. I have been discussing with a few Enterprises, and large organizations that are leveraging the new Veeam Backup for Microsoft 365 Restore Portal. One question that arise was about how-to secure a bit more this very own portal.
Other examples around security were:
- How to restrict the login to certain users to the Restore Portal
- How to install a valid SSL Certificate (Let’s Encrypt) for the new Restore Portal
- How to enable multi-tenant on the new Restore Portal
- How to add new URLs to be able to log in
All of those were already covered, but the main question remained, how could somebody expose the Restore Portal on https://restoreportal:4443 but not the https://restoreportal:4443/swagger, /api or others.
Currently there is no funcionality within the product to separate, or limit this. But as per every technology, there are always ways around it, specially on web servers. One way could be to proxy it using Cloudflare or similars, and apply filters to those specific URLs (/swagger /api, etc.). And another one could be using NGINX.
These solutions have not been officially tested, so treat these steps as purely lab information.
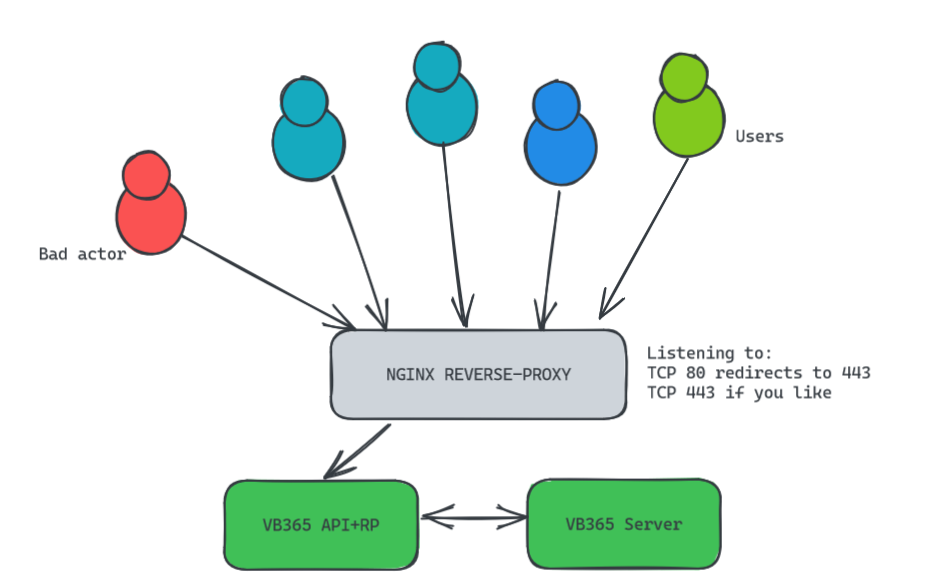
Quick topology of the solution with NGINX
As said, we are going to introduce the #1 Web Server technology, the always versatile and elastic, NGINX. This topology has many benefits.
- Access to something more familiar, like https://vb365.jorgedelacruz.es, which gets picked up by the NGINX Reverse Proxy. If somebody types HTTP gets redirected to HTTPS < Users are everywhere, and we know they do not type things properly.
- The NGINX reads the config and pass the petition to the backend, https://VB365APIandRPServer:4443 or whatever port you have configured.
- If a bad actor tries any other cheeky thing, like /swagger /api queries to the public NGINX it fails with forbidden, and gets logged in of course.
- EXTRA: I have left an IP whitelist for things like Veeam ONE, VSPC, or your own monitoring tools, which of course will need to bypass this and access directly to the swagger and API.
How To Configure Nginx with SSL as a Reverse Proxy for Veeam Backup for Microsoft 365 Restore Portal
On the topology, you might notice too many moving parts. In case you have the Veeam Backup for Microsoft 365 Server, and the API/Restore Portal on a single server, and you even want to add NGINX on the same server, because reasons. Keep reading, as these steps are meant to be to installing NGINX on Microsoft Windows, will worm the same on Linux of course.
Initial steps and system requirements
SSL Certificate
We will require a SSL certificate, and private key. In case you have your own CA, use that. If not, you most likely will require to follow the other blog post to install a Let’s Encrypt SSL Certificate. Or any SSL of your like:
Additional URLs into our Microsoft Azure App Registration
Please remember what we are doing, we are creating a new URL, different than what the Restore portal has. The public one on port 443, and the restore portal on 4443, on my specific case. Yours could be similar, so once again, refering to another article you should follow to have both urls on Microsoft Azure Enterprise Application:
How-to Download and Configure NGINX
We are ready! I am using the very same VB365 Server with all the components, so as said, let’s go to the official NGINX website and download the Microsoft version:
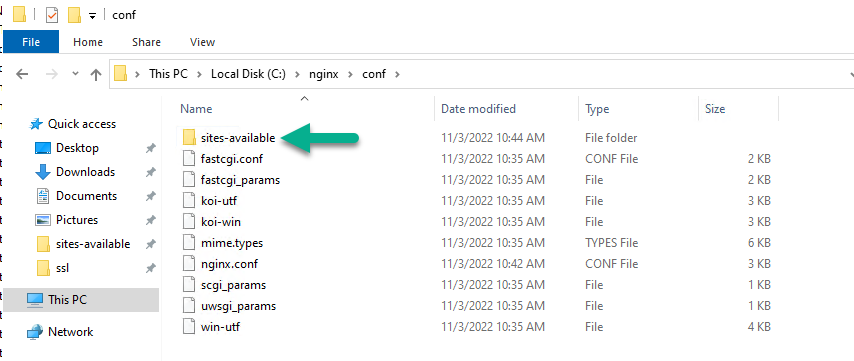
 I have extracted all the files under C:/nginx, and I have created a new folder called sites-available under the path conf, so it looks like this:
 Now, let’s edit the basic nfinx.conf, look for the http { section and include the new path with the extra parameter to read configs from that folder:
http {
    include       mime.types;
    include "C:/nginx/conf/sites-available/*.conf";
That is all done, NGINX is ready, and configured.
Final configuration for your NGINX reverse-proxy for Veeam Backup for Microsoft 365
One more step, the final configuration, which I created inside the new path, on my case C:\nginx\conf\sites-available\vb365.jorgedelacruz.es.conf And it has all the next details, please change the next with your own:
- The first part is to redirect from HTTP to HTTPS, up to you if you want it, or need it. I do because I know how users are. replace the server_name with your own FQDN
- The second part, server {}, is where we will do all the magic for the HTTPS part. Please adjust:
- server_name – With your very own FQDN
- ssl_certificate and ssl_certificate_key, use the ones you have, or generate ones with Let’s Encrypt
- access_log up to you where to put these, but important to keep without a doubt to catch all of those errors, and problems
- under location / { proxy_pass introduce the URL if your Restore Portal, on my case, as it is all-in-one I went crazy and just redirected to https://localhost:4443 perfect latency I guess
- Restrict or permit IPs under the swagger, or other paths uncommenting the allow
server {
listen 80;
server_name vb365.jorgedelacruz.es;
rewrite ^ https://$host$request_uri permanent;
}

server {
listen 443 ssl;

server_name vb365.jorgedelacruz.es;
ssl_certificate "C:/nginx/ssl/fullchain.cer";
ssl_certificate_key "C:/nginx/ssl/cert.key";

ssl_session_cache builtin:1000 shared:SSL:10m;
ssl_protocols TLSv1 TLSv1.1 TLSv1.2;
ssl_ciphers HIGH:!aNULL:!eNULL:!EXPORT:!CAMELLIA:!DES:!MD5:!PSK:!RC4;
ssl_prefer_server_ciphers on;

access_log "C:/nginx/logs";

  location / {
    proxy_set_header Host $host;
    proxy_set_header X-Real-IP $remote_addr;
    proxy_set_header X-Forwarded-For $proxy_add_x_forwarded_for;
    proxy_set_header X-Forwarded-Proto $scheme;
    proxy_pass https://localhost:4443;
    proxy_read_timeout 90;
    allow all;

    location /swagger {
        	#allow 1.2.3.4;
        	deny all;
    }

  }
}
Quick NGINX check that we have all perfectly fine
Let’s open a CMD, navigate to where our NGINX executable is, and run nginx -t to see if we have not missed a ; or perhaps the SSL is wrong, etc:
C:\nginx>nginx -t
nginx: the configuration file C:\nginx/conf/nginx.conf syntax is ok
nginx: configuration file C:\nginx/conf/nginx.conf test is successful
That looks neat! Last thing is to run nginx. and perhaps even block all the traffic on port 4443 on Windows Firewall.
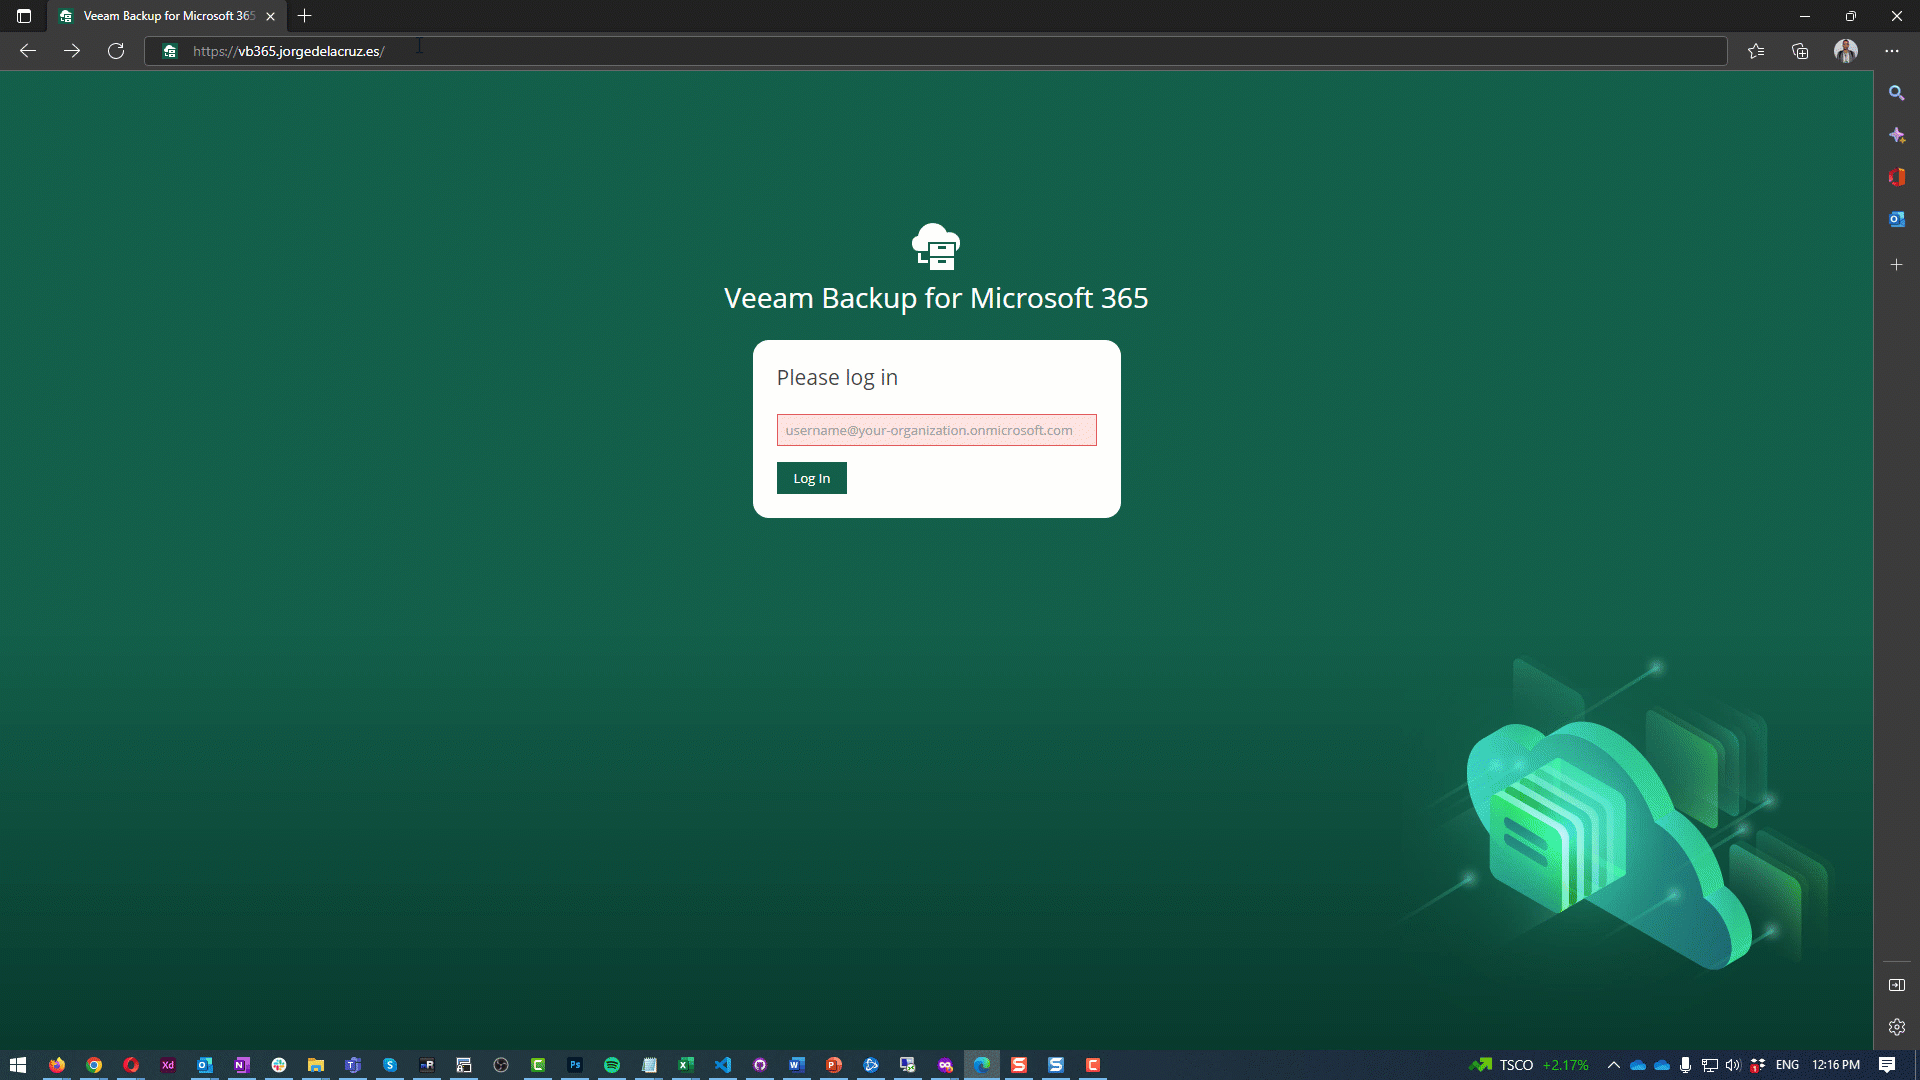
Last check as an User. Valid FQDN, port 443, all works and invisible!
A quick GIF walkthorugh with how pleasant the experience from an end-user is using a reverse-proxy with NGINX:
Somebody is trying to do nasty things, it gets logged
As said, everything that will happen, errors, access, stats, well anything will be logged at NGINX side, so for example that forbidden access that I encountered on the GIF, will be in the log super plain and simple to digest:
ERROR LOG - 2022/11/03 12:16:55 [error] 1858768#1858376: *60 access forbidden by rule, client: 192.168.1.250, server: vb365.jorgedelacruz.es, request: "GET /swagger/ HTTP/1.1", host: "vb365.jorgedelacruz.es"
Final Note
Shall I use this method? Entirely up to you. The good thing is that you are not editing anything at VB365 side, so the impact on the product is zero. You should use it if you are confident with NGINX, and understanding what you are doing. If not, perhaps look at Cloudflare, or similar services, and worse case scenario, perhaps wait until something more elegant comes to the product.
Until then, I truly hope this blog entry, and the research of this solution makes you happy, and even resolves that problem you were having with the /swagger been exposed. Thanks a lot for the reading!
Hi Jorge,
I understand that you need to modify the Azure AD Enterprise application, changing the reply URL to directly https://fqdnslfportal.xxx ?
Regards,
Hello,
You need to change the Azure AD, yes, as per the link, but not edit, just add a new URL. Like here – https://jorgedelacruz.uk/2022/03/24/veeam-how-to-add-new-urls-to-be-able-to-login-on-the-new-restore-portal-from-veeam-backup-for-microsoft-365-v6/