
 Greetings friends, back in March 2020 I was telling you that Veeam had taken a very important step by announcing Linux Proxies, a component that certainly makes all the sense in the world to select Linux for it, as it just moves information from one place to another.
Now with Veeam Backup and Replication v11, Veeam takes a leap forward and includes many improvements for Linux-based Proxies, for example, we can now use other backup methods, such as DirectSAN, DirectNFS, and Fibre Channel. And save on Windows licenses, and increase security.
In this fantastic post, we are going to see the step-by-step to use an Ubuntu 20.04 LTS in DirectSAN mode, to some disk arrays I have. This way the backup is going to fly, as well as freeing up the workload to the hypervisor.
Diagram of Linux Proxy operation using Direct-SAN
To recover VM data blocks from a SAN LUN during backup, the backup proxy uses metadata about the layout of VM disks on the SAN.
Backing up data in direct SAN access transport mode includes the following steps:
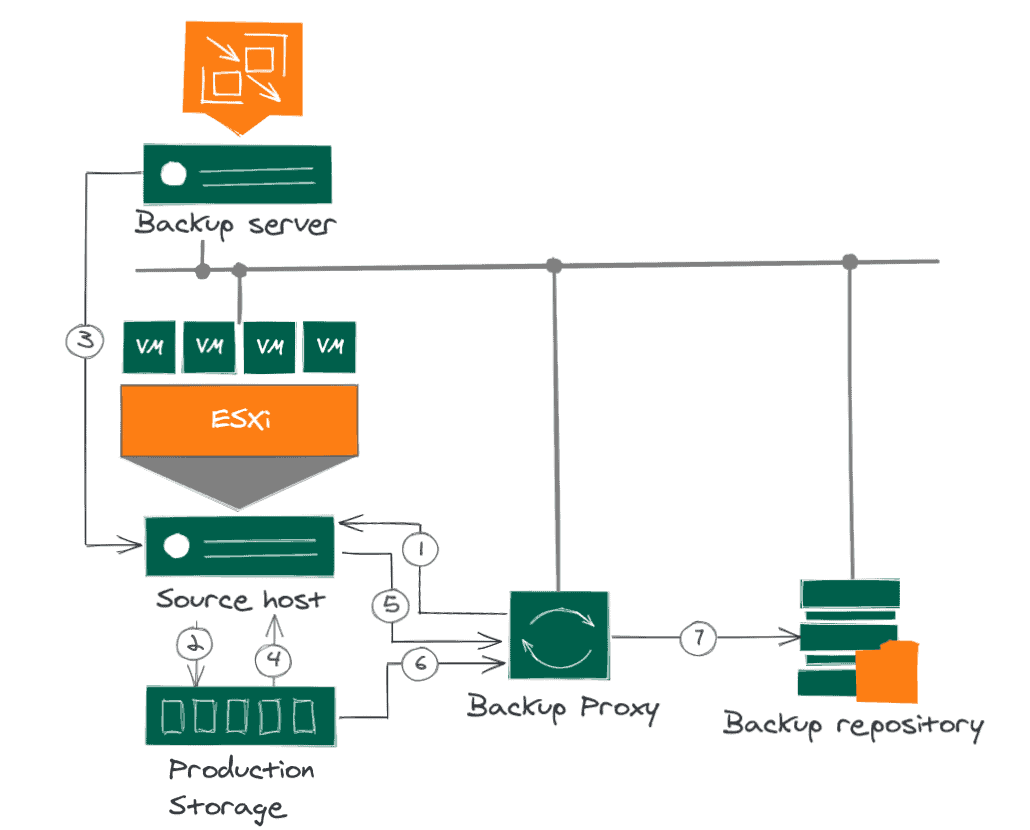
- The backup proxy sends a request to the ESXi host to locate the required VM in the datastore.
- The backup proxy sends a request to the ESXi host to locate the required VM in the datastore.
- The ESXi host locates the VM.
- Veeam Backup & Replication activates VMware vSphere to create a snapshot of the VM.
- The ESXi host retrieves metadata about the VM’s disk layout in storage (physical addresses of the data blocks).
- Veeam Backup & Replication triggers VMware vSphere to create a snapshot of the VM.
- The ESXi host sends the metadata to the backup proxy.
- The backup proxy uses the metadata to copy the VM data blocks directly from the source storage across the SAN.
- The backup proxy uses the metadata to copy the data blocks of the VM directly from the source storage across the SAN.
- The backup proxy processes the copied data blocks and sends them to the target.
Fantastic, now that we know how it works and how it sends information from one location to another, let’s look at the steps to get our Linux Proxies up to speed.
I assume you are using dedicated networks. For example, all my iSCSI traffic goes over the 192.168.100.0 range, with a dedicated cable. Since my proxies are virtual, I have added a second network card that sees this network.
Configuring our iSCSI Client (iSCSI Initiator)
The steps are very simple, and although they may vary a little if you have RedHat or others, sure the steps are similar, the first thing is to install the open-iscsi package (that you probably have)
sudo apt-get update
sudo apt-get install open-iscsi
Once we have the package installed, let’s add it to boot:
sudo systemctl enable iscsid
This will show us something similar to this:
Synchronizing state of iscsid.service with SysV service script with /lib/systemd/systemd-sysv-install.
Executing: /lib/systemd/systemd/systemd-sysv-install enable iscsid
Let’s now create, or check, our InitiatorName, we will edit the following file:
sudo vi /etc/iscsi/initiatorname.iscsi
sudo vi /etc/iscsi/initiatorname.iscsi
In my case, it already has one created, retro with its 1993 and everything. The name is the least important, as long as it is unique, I have left it by default, but if we are going to deploy several proxies, it is better to edit the name a little:
## DO NOT EDIT OR REMOVE THIS FILE!
## If you remove this file, the iSCSI daemon will not start.
## If you change the InitiatorName, existing access control lists
## may reject this initiator.  The InitiatorName must be unique
## for each iSCSI initiator.  Do NOT duplicate iSCSI InitiatorNames.
InitiatorName=iqn.1993-08.org.debian:01:af5bf2af245
To make the session to future LUNs connect automatically, most likely you want this, edit the file named /etc/iscsi/iscsid.conf and make sure that the Startup settings section looks like this:
#*****************
# Startup settings
#*****************

# To request that the iscsi initd scripts startup a session set to "automatic".
 node.startup = automatic
#
# To manually startup the session set to "manual". The default is manual.
# node.startup = manual

# For "automatic" startup nodes, setting this to "Yes" will try logins on each
# available iface until one succeeds, and then stop.  The default "No" will try
# logins on all available ifaces simultaneously.
node.leading_login = No
As you can see I have uncommented node.startup, and commented out node.startup = manual, simple.
Let’s do a restart of the service just in case:
service open-iscsi restart
Presenting our NetApp LUN to our Linux Proxies
Generally, in NetApp and any decent manufacturer, we will have to add the iSCSI Initiators on the web, as a security measure to keep everyone from connecting to some LUNs that are critical, such as the ones we present to VMware.
Within our ONTAP, under Storage – LUN, we will click on the Mapped to Initiators: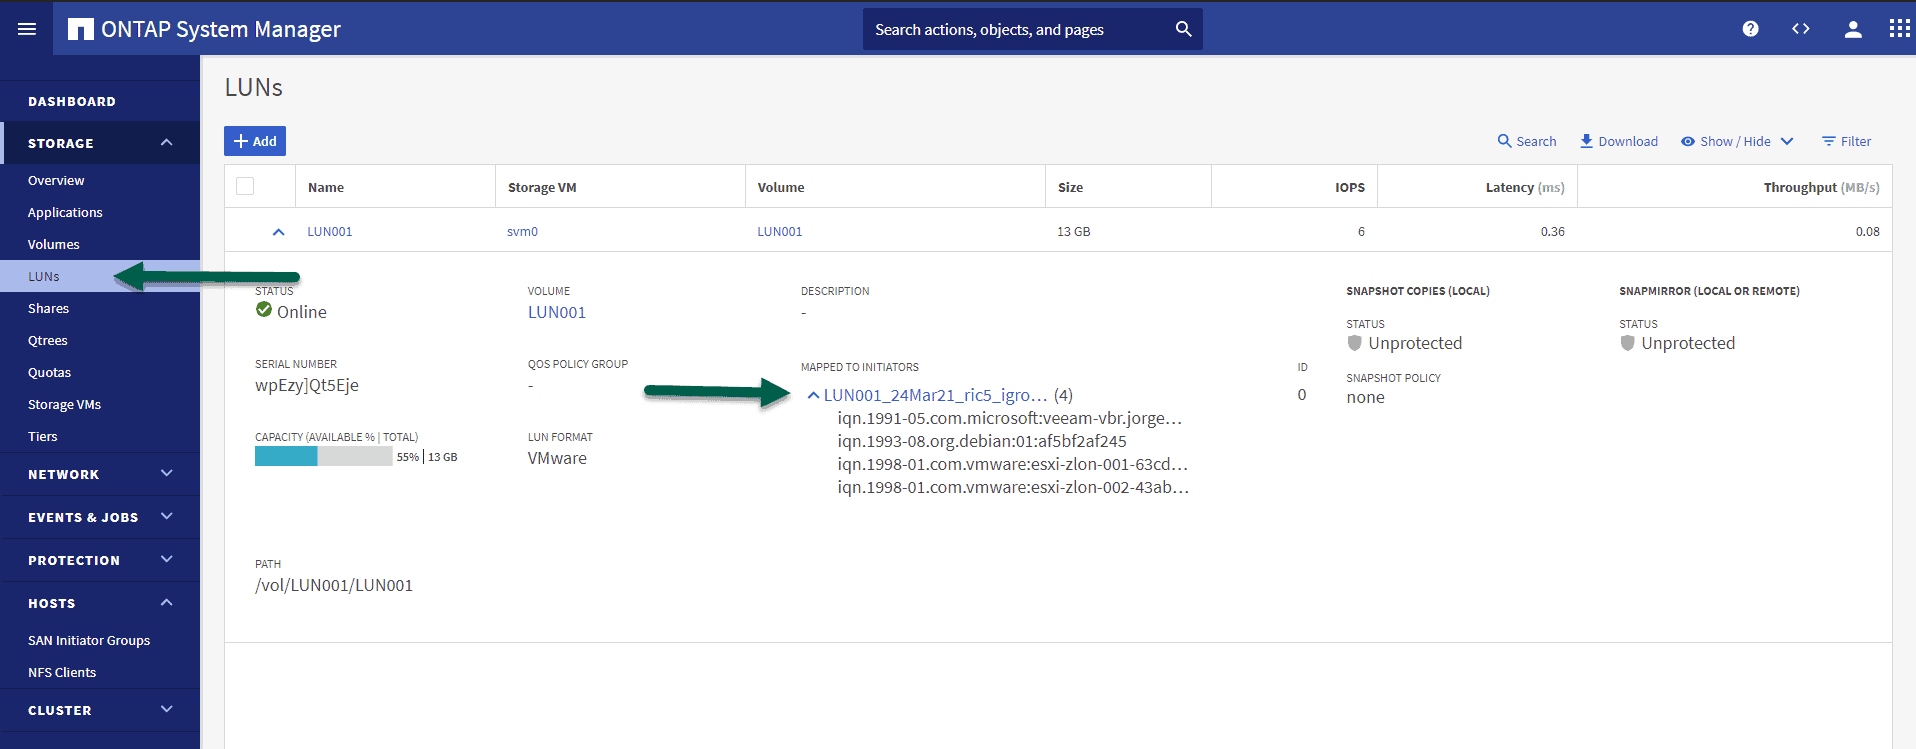
We will click on Edit: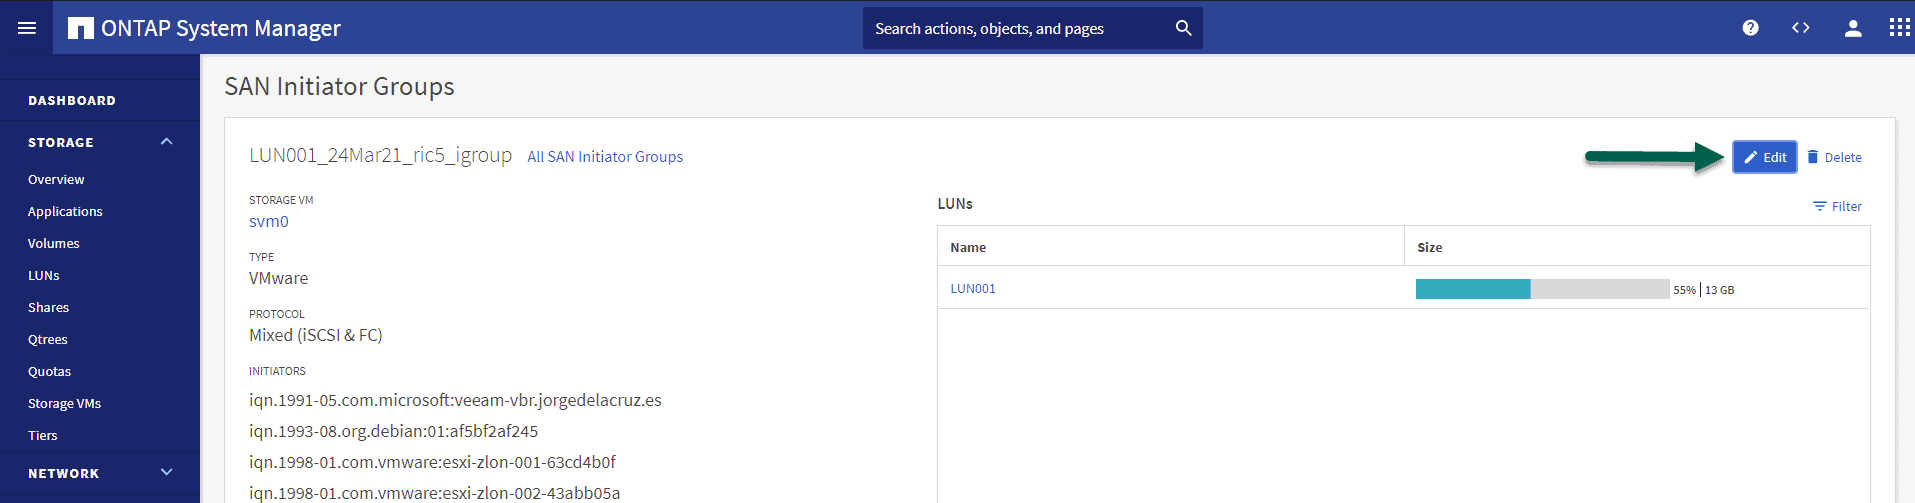
And we will add the iSCSI Initiator that we were so happy with before, the one that was 1993, and so on. You would be left with something like this, click Save: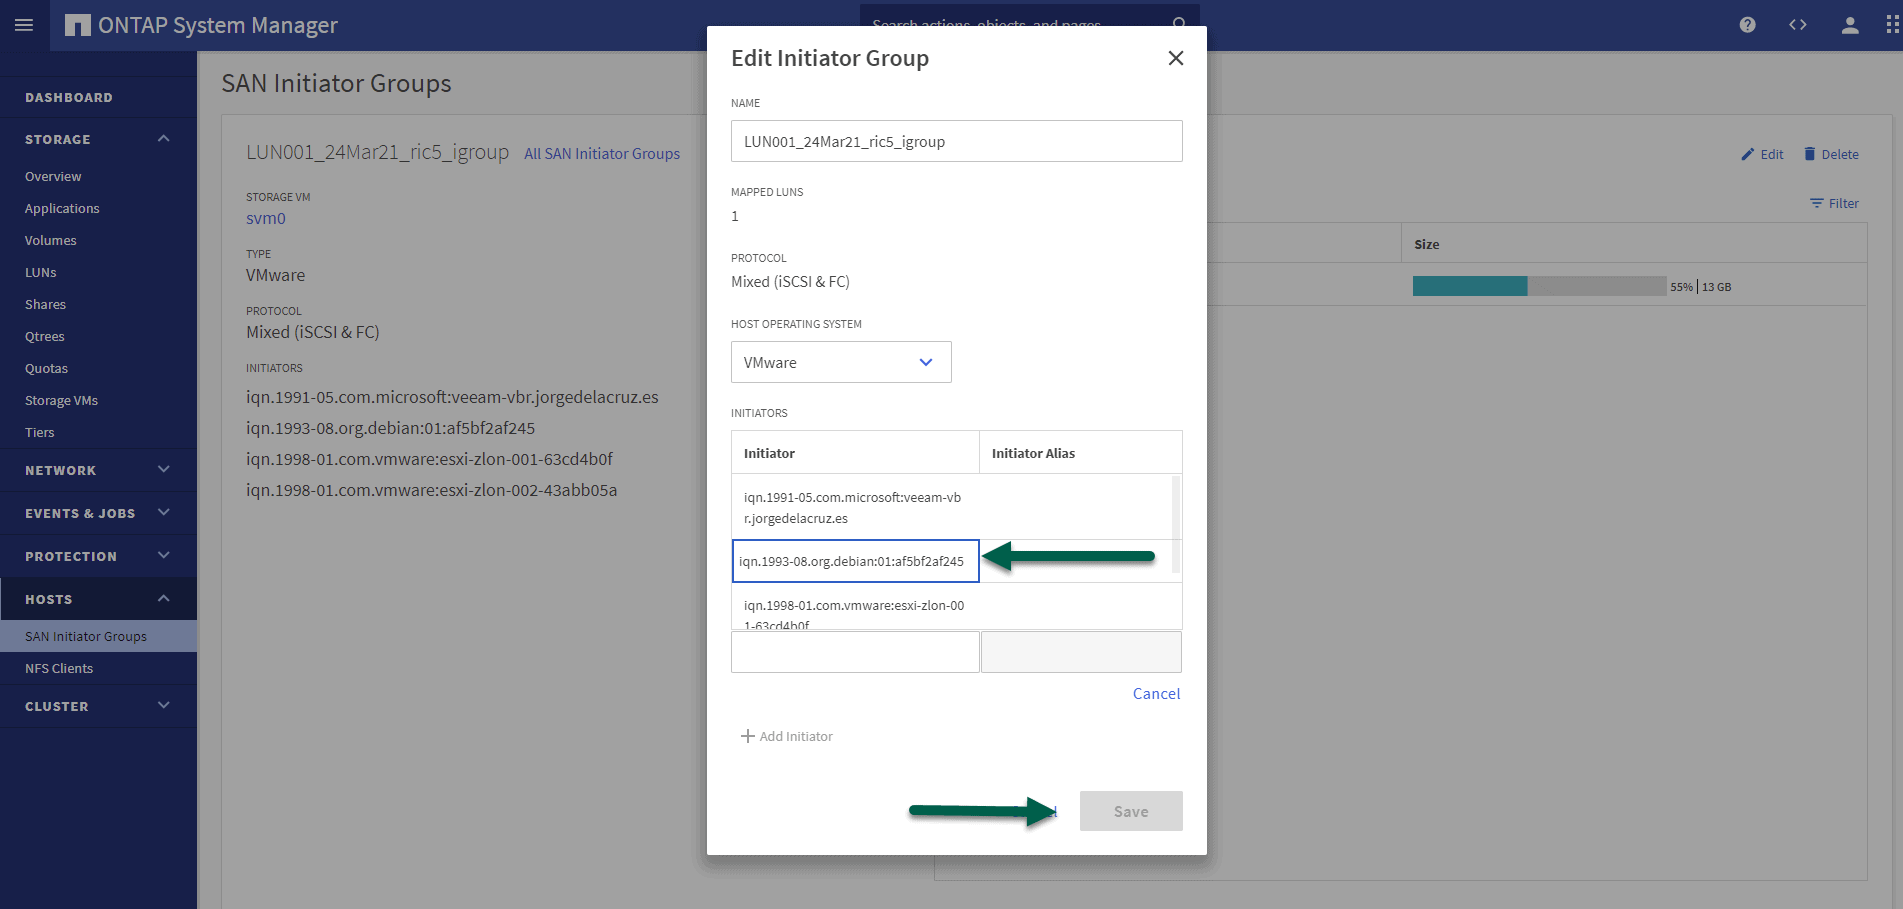
We have this part ready, let’s go to our Linux again. If we had more Proxies, it’s time to add them all, of course.
Add our NetApp LUNs to the Proxy
Back to our Ubuntu 20.04, it’s time to connect those fantastic LUNs to our OS, remember not to format them, or start them, or anything, just the commands that I show you here, no more no less 🙂
With the following command, we will be able to see all the LUNs that the NetApp system is presenting. Change the IP to yours:
iscsiadm -m discovery -t st -p 192.168.100.236
This returned a LUN for me:
192.168.100.236:3260,1026 iqn.1992-08.com.netapp:sn.812793a88c8611eb8a040050569080ec:vs.2
Fantastic, if I had more LUNs, here they would all show up for me. Now that we know the LUN, or LUNS we want, let’s connect to them, the command very simple, mix a little of the above, look how easy:
sudo iscsiadm -m node -p 192.168.100.236 -T iqn.1992-08.com.netapp:sn.812793a88c8611eb8a040050569080ec:vs.2 --login
As you can see, I used the IP of my NetApp, as well as the LUN I want to connect to. If you had a bunch of LUNs and want to connect to all of them, use this:
sudo iscsiadm -m node -p 192.168.100.236 --login
The result of the operation looks something similar to this:
Logging in to [iface: default, target: iqn.1992-08.com.netapp:sn.812793a88c8611eb8a04005050569080ec:vs.2, portal: 192.168.100.236,3260] (multiple)
Login to [iface: default, target: iqn.1992-08.com.netapp:sn.812793a88c8611eb8a04005050569080ec:vs.2, portal: 192.168.100.236,3260] successful.
We can check the new disks with a typical fdisk -l , I get a new disk in sdb:
Disk /dev/sdb: 13 GiB, 13958643712 bytes, 27262976 sectors.
Disk model: LUN C-Mode
Units: sectors of 1 * 512 = 512 bytes
Sector size (logical/physical): 512 bytes / 4096 bytes
I/O size (minimum/optimal): 4096 bytes / 65536 bytes
Disklabel type: gpt
Disk identifier: 46D2AF85-985C-4998-B4C2-99970CAEE8D8
Also with a nicer command, sudo lsblk -e7, would show you this: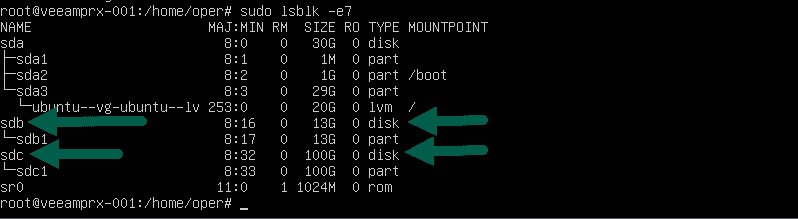
Whatever you do, do not touch these sdb, sdc, and the like, as they are your VMFS.
Final configuration in Veeam Backup and Replication
We have something else to do, to force that the traffic goes through DirectSAN, I like to change the transport mode and launch the job, in the proxy, or proxies that we have configured we will do the following: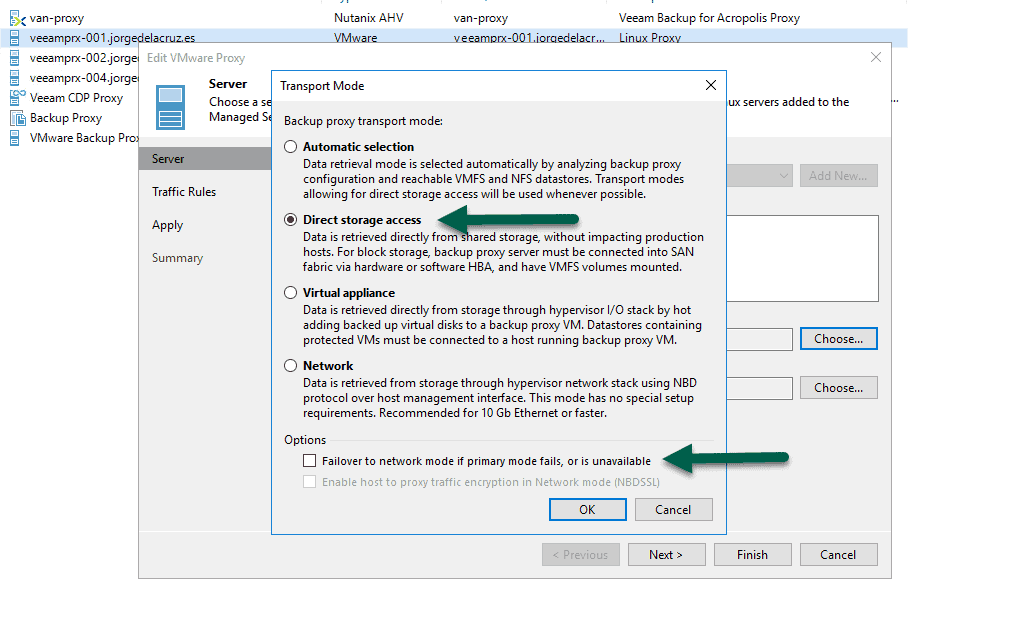
If we want to, optionally, we can also tell it to only process VMs that are in the datastores we want, this would be perfect if we have some dedicated proxies for these workloads that we know only process VMs from certain datastores: 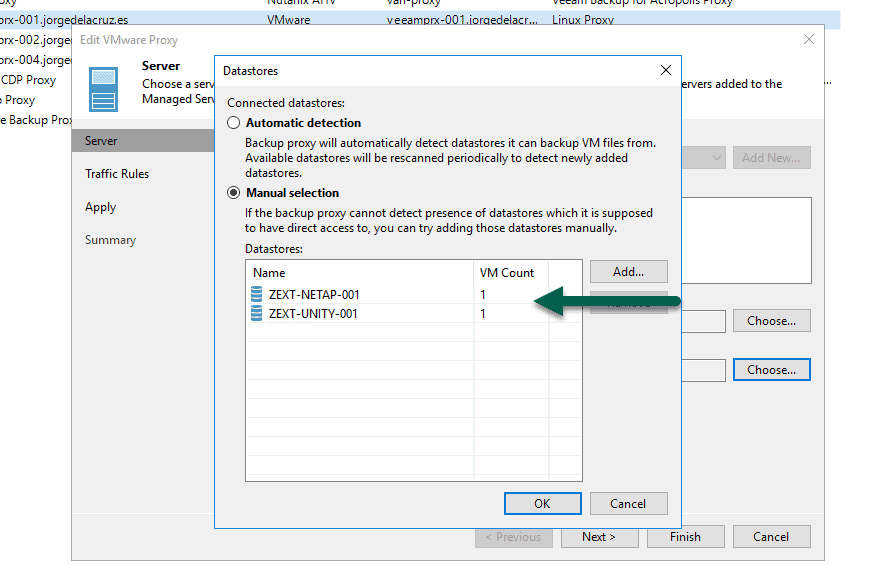 We launch the job and see that it uses [san], and generally, the speed would have to be very good:
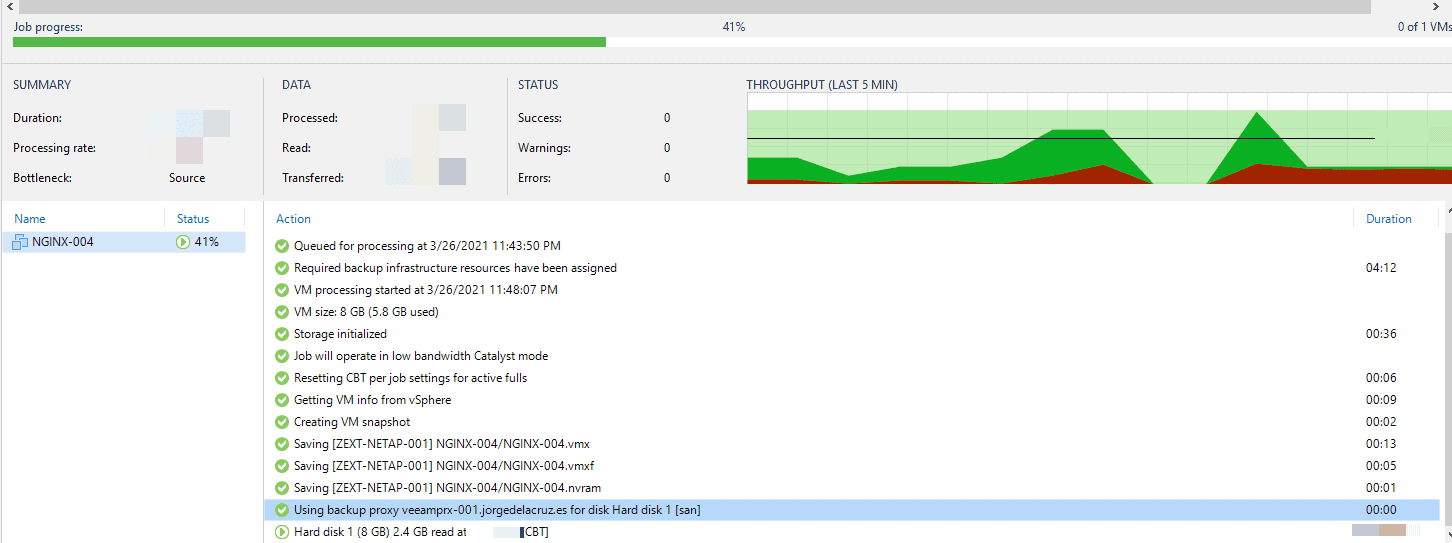 That’s all folks, take a look at the post on how to create the linux repository, which has a video also in Spanish and much more information to get started. I hope you like it.
Hey sir,
If you have time, would you mind taking a look at your perfect dashboard scripts for Veeam B&R and making them Veeam v11 friendly? I had your fantastic scripts and Grafana dashboard working in v10, but v11 moved things around in the Get-VBRBackupRepository cmdlet so the scripts no longer work.
I’m working on reverse engineering it, but so far I’ve been wrought with repeated failures. The stuff I used was located here: https://github.com/jorgedlcruz/veeam_grafana
Thanks for hearing me out – have a good one!
~Lefty
Hello William,
Thanks for the subscription, and for reaching out, I need to invest some time on that, yes. As it is based on the PowerShell, and a lot has changed since then, and better, my knowledge went up as well on it.
I have shifted all my work by using Enterprise Manager, if using Enterprise Plus or VUL licensing, the work can be found here – https://github.com/jorgedlcruz/veeam-enterprise_manager-grafana
Is that something you can use?
Best regards