
 Greetings everyone, as you might know by now, I am a big fan of open-source projects, especially those around Messaging, Collaboration. If you are a user of the Zimbra Community Edition, you might have been suffering all the unfortunate news that has been happening over the last few years:
- No more binaries for Zimbra 9 Open Source Edition
- Partners tried to create their own Zimbra 9 versions, like Zextras, INTALIO, Beezim, and others. But Zimbra started to mess around with the Repositories and builds ended up broken, incomplete, or impossible to know on which version they are – http://forums.zimbra.org/viewtopic.php?f=15&t=68097&sid=4347d2a7c27772d926942c6c638b6b96&start=90#p303711
- At the same time, and due to these strange changes, the Security Patches for Zimbra 9 that the Network Edition include, were difficult or not possible to apply on the Open Source Edition of Zimbra 9 built by the Community
I mean, I do not have many words to describe all of these changes, that affect millions of users of Zimbra on Open Source Edition, just read the Zimbra forums to get a sense of what the community is saying.
In the middle of this situation, the most obvious choice was a fork.
Introducing Zextras Carbonio CE:
Learn more about Zextras Carbonio at fosdem – https://fosdem.org/2022/schedule/event/collabcarbonio/
How-to Download, and install Zextras Carbonio CE on Ubuntu 20.04 (Includes dnsmasq configuration)
The above YouTube covers everything you need to know, plus the whole installation from scratch, however, I am aware that you guys like the copy-paste to achieve the goal quicker, and have your server up and running within minutes, so here we go.
Preparation of the Operating System for Carbonio CE
The first thing we have to do is to change the normal user to root
sudo su
[sudo] password for oper:
root@carbonio:/home/oper#
Once we are root, if we have not set the network in the wizard or we have been given an IP address by DHCP, we will have to edit the following file if we are using Ubuntu 20.04, as it comes with the new netplan network configuration:
vi /etc/netplan/50-cloud-init.yaml
We will have to enter the following:
 This file is generated from information provided by
# the datasource.  Changes to it will not persist across an instance.
# To disable cloud-init's network configuration capabilities, write a file
# /etc/cloud/cloud.cfg.d/99-disable-network-config.cfg with the following:
# network: {config: disabled}
network:
    ethernets:
        ens192:
            addresses:
            - 192.168.1.11/24
            gateway4: 192.168.1.1
            nameservers:
                addresses:
                - [1.1.1.1]
    version: 2
Where it says addresses we will have to change it to the IP we want to put and the gateway the address of the router we have in that network, and DNS Server we must put or the Carbonio CE server itself if we are going to use it as DNS, or an external DNS.
Once we have this, we will apply the config:
sudo netplan apply
If we wanted to debug, we would do the following:
sudo netplan --debug apply
** (generate:1962): DEBUG: 00:03:23.322: Processing input file /etc/netplan/50-cloud-init.yaml..
** (generate:1962): DEBUG: 00:03:23.322: starting new processing pass
** (generate:1962): DEBUG: 00:03:23.323: ens192: setting default backend to 1
** (generate:1962): DEBUG: 00:03:23.323: Configuration is valid
** (generate:1962): DEBUG: 00:03:23.323: Generating output files..
** (generate:1962): DEBUG: 00:03:23.323: NetworkManager: definition ens192 is not for us (backend 1)
DEBUG:netplan generated networkd configuration changed, restarting networkd
DEBUG:no netplan generated NM configuration exists
DEBUG:ens192 not found in {}
DEBUG:Merged config:
network:
  bonds: {}
  bridges: {}
  ethernets:
    ens192:
      addresses:
      - 192.168.1.11/24
      gateway4: 192.168.1.1
      nameservers:
        addresses:
        - [1.1.1.1]
  vlans: {}
  wifis: {}

DEBUG:Skipping non-physical interface: lo
DEBUG:device ens192 operstate is up, not changing
DEBUG:{}
DEBUG:netplan triggering .link rules for lo
DEBUG:netplan triggering .link rules for ens192
We must also verify that our Hosts file is correctly configured:
vim /etc/hosts
I am assuming that you have already configured properly the hostname, just in case, run the next line:
sudo hostnamectl set-hostname carbonio
We should have something like the following, where it is important that we have our local IP, with the hostname+domain and then the hostname
127.0.0.1       localhost
192.168.1.11    carbonio.jorgedelacruz.es     carbonio

# The following lines are desirable for IPv6 capable hosts
::1     localhost ip6-localhost ip6-loopback
ff02::1 ip6-allnodes
ff02::2 ip6-allrouters
We will restart the equipment with a simple reboot in the console:
reboot
DNS server installation
We install the DNS server dnsmasq, which is quite simple and very convenient for labs or small environments.
The first command we will run will be the package installation command, where we will click on Y when it asks:
apt-get install dnsmasq
We will now edit the dnsmasq configuration to add the necessary entries:
server=8.8.8.8
domain=jorgedelacruz.es
mx-host=jorgedelacruz.es,carbonio.jorgedelacruz.es,0
address=/carbonio.jorgedelacruz.es/192.168.1.11
host-record=jorgedelacruz.es,192.168.1.11
host-record=carbonio.jorgedelacruz.es,192.168.1.11
Once the file is saved, we will have to disable the DNS caching service that comes by default in Ubuntu 20.04:
sudo systemctl disable systemd-resolved
sudo systemctl stop systemd-resolved
And now, activate, and start our dnsmasq:
sudo systemctl enable dnsmasq
sudo systemctl start dnsmasq
Tests to check DNS
Two basic tests that we must do before installing Carbonio is to check that the MX resolves well, and also that our DNS entry of type A resolves, we can check it with the dig tool:
Checking the MX:
dig mx jorgedelacruz.es

; <<>> DiG 9.11.3-1ubuntu1.9-Ubuntu <<>> mx jorgedelacruz.es
;; global options: +cmd
;; Got answer:
;; ->>HEADER<<- opcode: QUERY, status: NOERROR, id: 8778
;; flags: qr rd ra; QUERY: 1, ANSWER: 1, AUTHORITY: 0, ADDITIONAL: 1

;; OPT PSEUDOSECTION:
; EDNS: version: 0, flags:; udp: 65494
;; QUESTION SECTION:
;jorgedelacruz.es.              IN      MX

;; ANSWER SECTION:
jorgedelacruz.es.       0       IN      MX      0 carbonio.jorgedelacruz.es.

;; Query time: 0 msec
;; SERVER: 127.0.0.53#53(127.0.0.53)
;; WHEN: Thu Sep 19 00:03:36 UTC 2019
;; MSG SIZE  rcvd: 65
Checking Host A:
dig carbonio.jorgedelacruz.es

; <<>> DiG 9.11.3-1ubuntu1.9-Ubuntu <<>> carbonio.jorgedelacruz.es
;; global options: +cmd
;; Got answer:
;; ->>HEADER<<- opcode: QUERY, status: NOERROR, id: 48780
;; flags: qr rd ra; QUERY: 1, ANSWER: 1, AUTHORITY: 0, ADDITIONAL: 1

;; OPT PSEUDOSECTION:
; EDNS: version: 0, flags:; udp: 65494
;; QUESTION SECTION:
;carbonio.jorgedelacruz.es.          IN      A

;; ANSWER SECTION:
carbonio.jorgedelacruz.es.   0       IN      A       192.168.1.11

;; Query time: 0 msec
;; SERVER: 127.0.0.53#53(127.0.0.53)
;; WHEN: Thu Sep 19 00:04:31 UTC 2019
;; MSG SIZE  rcvd: 65
We can see in the previous test that we launch a query and it returns an answer and that the Server that is in charge of answering is 127.0.0.1, the local IP 192.168.1.11 would also work, if you do not have these results, please check the configuration, or leave a comment so that I can help you.
Installing Carbonio CE for Ubuntu 20.04 LTS
It’s time to install the new Carbonio CE software, which can be found at the following link.
That will send us an email with the instructions, once we have added the proper Zextras repository, it will be as simple as
sudo apt-get update && sudo apt-get upgrade
We shall see the new repository of Zextras updating as well, once that finishes, let’s run the installation:
apt-get install carbonio-ce
This will take around 2-5 minutes, and when it finishes, we need to start the configuration, and the last step of the process:
carbonio-bootstrap
This will ask us the usual question about the domain, and if we want to change it, let’s say yes, and introduce our own domain as per in this image:
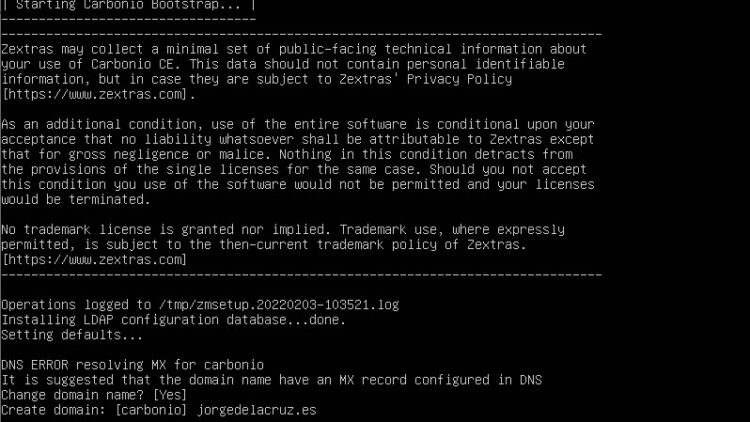
The installation process will remind you a lot of the Zimbra one, with Zimlets, and everything, because in the end, it is a fork of the Zimbra packages, right? Let’s give it a good 5 minutes, and after it finishes, perform the next commands in order to assign a password to the user [email protected]
su - zextras
zmprov setpassword [email protected] YOURPASSWORD
That’s it! Now you can go to the usual URLs in order to see the webmail and the Admin Console:
- User interface: https://carbonio.jorgedelacruz.es, or https://192.168.1.11 – Remember to use your own fqdn or IP
- Admin Interface: https://carbonio.jorgedelacruz.es:7071/carbonioAdmin, or https://192.168.1.11:7071/carbonioAdmin – Remember to use your own fqdn or IP

Beautiful. Thanks. I needed some easy to follow Zimbra instructions.
Nice! Wanna give it a try for your personal accounts? Let me know how it works.
Cheers!
Thanks!
Do you have suggestions with regards to migration of user accounts from Zimbra9?
For instance, with the use of Zextras Suite / Backup tool?
Hello,
Not at the moment, as Zextras has not published anything. But I guess as soon as it is ready, will have a simple tool to migrate from one system to another.
Stay tuned, early days of a new era.
Thank you for the reply.
Sounds great!
Thanks, It worked but the carbonio installed does not have:
-briefcase
-files and folders
-two auth factor
-Chat.
There is no info on how setup let’s encrypt
Hello,
The Carbonio CE should have now Files after the last update a few days ago, the rest will come. Also, some might land only on Carbonio paid edition, need a comparison table soon.
Will ask for one.
Let me update my Carbonio CE and will let you know.
it have files now but no docs tool. can not create or edit documents.
Hello Zeeshan,
Everything else might come in future releases, I do not think is fully GA just yet. Cheers
Does anyone have a “edition comparison” for Carbonio? And other things that differ between Zimbra 9 Network Edition and the various Carbonio editions?
Hello Joaquim,
Not me, not yet. Let me ask the Zextras team.
Thank you!
Hi Jorge,
Could you tell me please how can I delete Carbonio totally from Ubuntu 20.04 LTS?
Many thanks
Alex