
 Greetings friends, I already showed you a quick unboxing of this fantastic unit. One of the things we can do is to expand the storage, so we can add more LLM models (we are going to see it in future blogs), or also we can move the docker directory to this new storage, so all the tests we are going to do will never compromise the microSD card, which usually has lower life-span if we tend to write/read a lot from them.
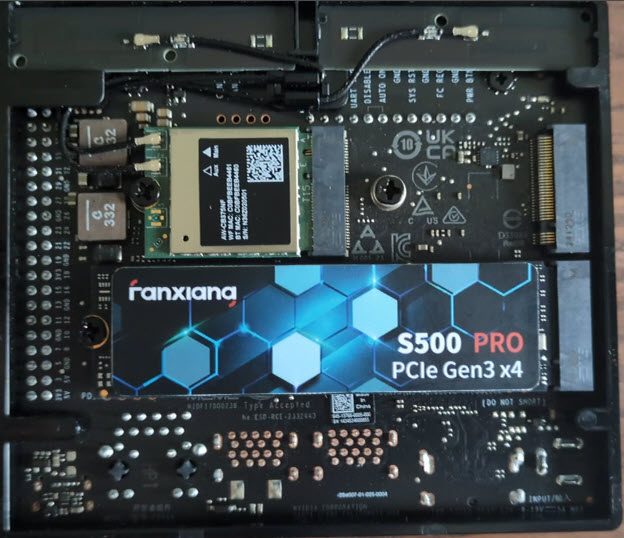
Image of the back of the unit and BOM
This unit is great and features two different NVMe, to be precise: one M.2 Key M, and one M.2 Key E. On my case I just went for the cheapest NVMe SSD on the market, leaving the list of items here:
- Jetson Orin Nano 8GB NVMe: https://amzn.to/4fXLvXv and https://amzn.to/3WgNb7D Jetson Orin Nano 8GB from NVIDIA directly: https://amzn.to/4fS2VER
- SanDisk 256GB SD card: https://amzn.to/3WcAV7W
- MicroSD/SD card reader: https://amzn.to/3WiA71h
- Cheapest NVMe SSD: https://amzn.to/3Pzv0pN
All of this would look like this:
 Now that we are ready, and the NVMe SSD is connected, let’s move to the next steps.
How-to check the hardware is connected
Let’s boot up the NVIDIA Jetson Nano, and open the console, let’s now run the command lspci (a command to see information about what is connected to our PCI buses) to see if it has detected the hardware:
lspci
0001:00:00.0 PCI bridge: NVIDIA Corporation Device 229e (rev a1)
0001:01:00.0 Network controller: Realtek Semiconductor Co., Ltd. RTL8822CE 802.11ac PCIe Wireless Network Adapter
0004:00:00.0 PCI bridge: NVIDIA Corporation Device 229c (rev a1)
0004:01:00.0 Non-Volatile memory controller: MAXIO Technology (Hangzhou) Ltd. NVMe SSD Controller MAP1202 (rev 01)
0008:00:00.0 PCI bridge: NVIDIA Corporation Device 229c (rev a1)
0008:01:00.0 Ethernet controller: Realtek Semiconductor Co., Ltd. RTL8111/8168/8411 PCI Express Gigabit Ethernet Controller (rev 15)
We can quickly see the non-volatile memory controller, the NVMe SSD, which is good news, we can continue 🙂
How-to check the NVMe SSD as a block device, creating a partition, and mount-point
Let’s now see if we can see the NVMe SSD as a block device, to do that, we will run the command lsblk
lsblk
NAME MAJ:MIN RM SIZE RO TYPE MOUNTPOINTS
mmcblk0 179:0 0 238,4G 0 disk
├─mmcblk0p1 179:1 0 237G 0 part /
├─mmcblk0p2 179:2 0 128M 0 part
├─mmcblk0p3 179:3 0 768K 0 part
├─mmcblk0p4 179:4 0 31,6M 0 part
├─mmcblk0p5 179:5 0 128M 0 part
├─mmcblk0p6 179:6 0 768K 0 part
├─mmcblk0p7 179:7 0 31,6M 0 part
├─mmcblk0p8 179:8 0 80M 0 part
├─mmcblk0p9 179:9 0 512K 0 part
├─mmcblk0p10 179:10 0 64M 0 part /boot/efi
├─mmcblk0p11 179:11 0 80M 0 part
├─mmcblk0p12 179:12 0 512K 0 part
├─mmcblk0p13 179:13 0 64M 0 part
├─mmcblk0p14 179:14 0 400M 0 part
└─mmcblk0p15 179:15 0 479,5M 0 part
zram0 252:0 0 635M 0 disk [SWAP]
zram1 252:1 0 635M 0 disk [SWAP]
zram2 252:2 0 635M 0 disk [SWAP]
zram3 252:3 0 635M 0 disk [SWAP]
zram4 252:4 0 635M 0 disk [SWAP]
zram5 252:5 0 635M 0 disk [SWAP]
nvme0n1 259:0 0 476,9G 0 disk
Among many other partitions, especially of course on the main SD card, we can see at the very end a new block device called nvme0n1, so we are ready to follow the next steps.
I am going to create a new disk, formatted with EXT4, but you are free to use any other file-system, like for example XFS but for that you would need additional libraries, so I preferred to use just what it comes natively:
sudo mkfs.ext4 /dev/nvme0n1
mke2fs 1.46.5 (30-Dec-2021)
Discarding device blocks: done
Creating filesystem with 125026902 4k blocks and 31260672 inodes
Filesystem UUID: 5d7d39c8-5729-46e7-b0d3-9c0f7d22379d
Superblock backups stored on blocks:
32768, 98304, 163840, 229376, 294912, 819200, 884736, 1605632, 2654208,
4096000, 7962624, 11239424, 20480000, 23887872, 71663616, 78675968,
102400000

Allocating group tables: done
Writing inode tables: done
Creating journal (262144 blocks): done
Writing superblocks and filesystem accounting information: done
Now it is time to mount this new partition to an specific mountpoint, on my case I am going to create /ssd01 and this name is important as we are going to use it later, so whatever name you decide if different, mind to change the other commands 🙂
root@orin-nano:/home/oper# sudo mkdir /ssd01
root@orin-nano:/home/oper# sudo mount /dev/nvme0n1 /ssd01
We can as well change the permissions of the new mount-point, I am using root, but if you were using another user, let’s do this:
sudo chown ${USER}:${USER} /ssd
How-to make the mount-point persistent
To keep this mountpoint forever, or at least to keep it so it does not dissapear when we reboot, we need to add it to fstab, but before we do it, we need to know the uuid of the block device, let’s run the same command as before, lsblk but with the -f flag:
lsblk -f
NAME FSTYPE FSVER LABEL UUID FSAVAIL FSUSE% MOUNTPOINTS
mmcblk0
├─mmcblk0p1 ext4 1.0 844c8dd9-0a7a-42ea-82ba-502f304c6640 202,2G 9% /
├─mmcblk0p2
├─mmcblk0p3
├─mmcblk0p4
├─mmcblk0p5
├─mmcblk0p6
├─mmcblk0p7
├─mmcblk0p8
├─mmcblk0p9
├─mmcblk0p10 vfat FAT32 C9E0-89A2 62,9M 0% /boot/efi
├─mmcblk0p11
├─mmcblk0p12
├─mmcblk0p13
├─mmcblk0p14
└─mmcblk0p15
zram0 [SWAP]
zram1 [SWAP]
zram2 [SWAP]
zram3 [SWAP]
zram4 [SWAP]
zram5 [SWAP]
nvme0n1 ext4 1.0 5d7d39c8-5729-46e7-b0d3-9c0f7d22379d 444,5G 0% /ssd01
We can see the uuid of my nvme0n1, and that is currently mounted to ssd01. Let’s use all of that information to add a new line to our fstab, you can use nano or vim to modify the file:
sudo vi /etc/fstab
Your file should look similar to this, but using your uuid of course, mind the last line, that is what we are adding, then just save the file and exit the editor:
# /etc/fstab: static file system information.
#
# These are the filesystems that are always mounted on boot, you can
# override any of these by copying the appropriate line from this file into
# /etc/fstab and tweaking it as you see fit. See fstab(5).
#
# <file system> <mount point> <type> <options> <dump> <pass>
/dev/root / ext4 defaults 0 1
UUID=C9E0-89A2 /boot/efi vfat defaults 0 1
UUID=5d7d39c8-5729-46e7-b0d3-9c0f7d22379d /ssd01/ ext4 defaults 0 2
How-to install Docker
You might have this already, but in any case, let me show you the steps I followed. Remember that I had the official NVIDIA SD card, link here, it is very easy, let’s start with small update of the packages and installing nvidia-container:
sudo apt update
sudo apt install -y nvidia-container
We are going to see something similar to this:
Building dependency tree... Done
Reading state information... Done
The following NEW packages will be installed:
nvidia-container
0 upgraded, 1 newly installed, 0 to remove and 3 not upgraded.
Need to get 29,6 kB of archives.
After this operation, 200 kB of additional disk space will be used.
Get:1 https://repo.download.nvidia.com/jetson/common r36.4/main arm64 nvidia-container arm64 6.1+b123 [29,6 kB]
Fetched 29,6 kB in 0s (223 kB/s)
debconf: delaying package configuration, since apt-utils is not installed
Selecting previously unselected package nvidia-container.
(Reading database ... 200163 files and directories currently installed.)
Preparing to unpack .../nvidia-container_6.1+b123_arm64.deb ...
Unpacking nvidia-container (6.1+b123) ...
Setting up nvidia-container (6.1+b123) ...
INFO[0000] Loading config from /etc/docker/daemon.json
INFO[0000] Wrote updated config to /etc/docker/daemon.json
INFO[0000] It is recommended that docker daemon be restarted.
Let’s restart the service, and assign the correct permissions:
sudo systemctl restart docker
sudo usermod -aG docker $USER
newgrp docker
Now, we will need to edit the configuration of our docker, so it has the proper runtime, with your nano or vim, let’s edit it:
sudo vi /etc/docker/daemon.json
It needs to be exactly like this, remove what you had, add this, save and exit the file:
{
    "runtimes": {
        "nvidia": {
            "path": "nvidia-container-runtime",
            "runtimeArgs": []
        }
    },
    "default-runtime": "nvidia"
}
Let’s restart now the system daemon and docker:
sudo systemctl daemon-reload && sudo systemctl restart docker
I hope you do not get any error, if that is the case, let’s move to the next step.
How-to move Docker containers partition to a new location
We are on the final steps of this tutorial, let’s stop docker to make sure nothing will be affected while we execute these commands:
sudo systemctl stop docker
Now, it is time to move the existing docker folder to our new location, please remember to edit the path if it is different, as explained above:
sudo du -csh /var/lib/docker/ && \
sudo mkdir /ssd01/docker && \
sudo rsync -axPS /var/lib/docker/ /ssd01/docker/ && \
sudo du -csh /ssd01/docker/
We will need to edit the docker daemon, so use your vim or nano once again and add the data-root, please mind the path:
{
    "runtimes": {
        "nvidia": {
            "path": "nvidia-container-runtime",
            "runtimeArgs": []
        }
    },
    "default-runtime": "nvidia",
    "data-root": "/ssd01/docker"
}
Now we can safely remove the old path from our system:
sudo mv /var/lib/docker /var/lib/docker.old
And finally restart Docker, and check the journal so all looks good:
sudo systemctl daemon-reload && \
sudo systemctl restart docker && \
sudo journalctl -u docker
If everything goes as expected, you should see something similar to this:
jan 10 18:43:15 orin-nano systemd[1]: Starting Docker Application Container Engine...
jan 10 18:43:15 orin-nano dockerd[82589]: time="2025-01-10T18:43:15.948058761Z" level=info msg="Starting up"
jan 10 18:43:15 orin-nano dockerd[82589]: time="2025-01-10T18:43:15.949542921Z" level=info msg="OTEL tracing is not configured, using no-op tracer provider"
jan 10 18:43:15 orin-nano dockerd[82589]: time="2025-01-10T18:43:15.949739790Z" level=info msg="detected 127.0.0.53 nameserver, assuming systemd-resolved, so using resolv.conf: /r>
jan 10 18:43:16 orin-nano dockerd[82589]: time="2025-01-10T18:43:16.152375352Z" level=info msg="Loading containers: start."
jan 10 18:43:16 orin-nano dockerd[82589]: time="2025-01-10T18:43:16.318609570Z" level=warning msg="Could not load necessary modules for IPSEC rules: protocol not supported"
jan 10 18:43:16 orin-nano dockerd[82589]: time="2025-01-10T18:43:16.319127341Z" level=info msg="Default bridge (docker0) is assigned with an IP address 172.17.0.0/16. Daemon optio>
jan 10 18:43:16 orin-nano dockerd[82589]: time="2025-01-10T18:43:16.412112683Z" level=info msg="Loading containers: done."
jan 10 18:43:16 orin-nano dockerd[82589]: time="2025-01-10T18:43:16.476648471Z" level=info msg="Docker daemon" commit=c710b88 containerd-snapshotter=false storage-driver=overlay2 >
jan 10 18:43:16 orin-nano dockerd[82589]: time="2025-01-10T18:43:16.477052800Z" level=info msg="Daemon has completed initialization"
jan 10 18:43:16 orin-nano dockerd[82589]: time="2025-01-10T18:43:16.576050595Z" level=info msg="API listen on /run/docker.sock"
jan 10 18:43:16 orin-nano systemd[1]: Started Docker Application Container Engine.
Final tests to check that everything is working as expected
Let’s open two different shells sessions to our NVIDIA Jetson Nano, on the first one we can run the next:
watch -n1 df
We are going to see something similar to this:
Filesystem 1K-blocks Used Available Use% Mounted on
/dev/mmcblk0p1 244382672 22151964 212056924 10% /
tmpfs 3901356 113940 3787416 3% /dev/shm
tmpfs 1560544 27200 1533344 2% /run
tmpfs 5120 4 5116 1% /run/lock
/dev/mmcblk0p10 64511 110 64401 1% /boot/efi
tmpfs 780268 144 780124 1% /run/user/1000
/dev/nvme0n1 491135216 280 466113172 1% /ssd01
On the second terminal, let’s run any container, for example the next one:
docker pull nvcr.io/nvidia/l4t-base:r35.2.1
If everything is alright, we are going to see on shell 1 how our ssd01 keeps growing on the Used column:
Filesystem 1K-blocks Used Available Use% Mounted on
/dev/mmcblk0p1 244382672 22151796 212057092 10% /
tmpfs 3901356 113940 3787416 3% /dev/shm
tmpfs 1560544 27200 1533344 2% /run
tmpfs 5120 4 5116 1% /run/lock
/dev/mmcblk0p10 64511 110 64401 1% /boot/efi
tmpfs 780268 144 780124 1% /run/user/1000
/dev/nvme0n1 491135216 769116 465344336 1% /ssd01
That’s it, I hope you like the blog post, it truly helped me to remember some of the commands, and certainly I faced a few challenges along the road, but all fine in the end.
Leave a Reply