 Greetings friends, the first strong post of September, today I bring you a very entertaining post about Veeam Backup and Replication on a Repository based on AWS Storage Gateway, and as it has stayed a little long I want to leave here the menu to move you faster:
- AWS Storage Gateway – quick overview
- Deploying the AWS Storage Gateway Virtual Appliance on vSphere
- Configuring AWS Storage Gateway
- How to create a File Share on Amazon S3
- How to create a Repository on Veeam Backup and Replication
- Backup Copy job – quick overview
- Backup job – quick overview
- How to monitoring with Cloud Watch
Note: This procedure is not officially supported by Veeam, and it will only work as expected if the Storage Gateway is properly sized, in terms of disk, RAM/CPU, and fastest disk. More information on the official Helpcenter Information link.
AWS Storage Gateway – quick overview
AWS Storage Gateway allows us to consume certain Amazon Web Services resources locally through a virtual appliance that we deploy in our Infrastructure, so our VMs view the resources as if they were local, while the information is replicated in an encrypted and compressed way to the Amazon Cloud.
 AWS Storage Gateway allows us to create different resources:
- File Share: Which is nothing more or less than an NFS where we can connect computers that will see a traditional network drive and store files there.
- Volumes: Where we can consume by iSCSI, volumes that we can connect to Windows, Linux, etc., and that will be replicated later.
- Tapes: Virtual tape drives with which we can launch backups with Veeam for example, as if a real tape was involved, and thus get a more durable storage such as tapes, but in Cloud.
We can store the information in three different types of Amazon storage:
- Amazon S3, recommended for files or volumes that we use frequently.
- Amazon Glacier, if what we are saving is not accessed frequently.
- Amazon EBS Snapshots.
This is how our Veeam Backup and Replication Infrastructure with AWS Storage Gateway would look like.
Deploying the AWS Storage Gateway Virtual Appliance on vSphere
The first thing we’ll do is go to the AWS Storage Gateway website, select the region at the top right and press Get started.
 Then select the option called File gateway.
 We will select the platform where we want to deploy the virtual appliance, in my case VMware ESXi. Before pressing Next, let’s continue with the deployment in vSphere.
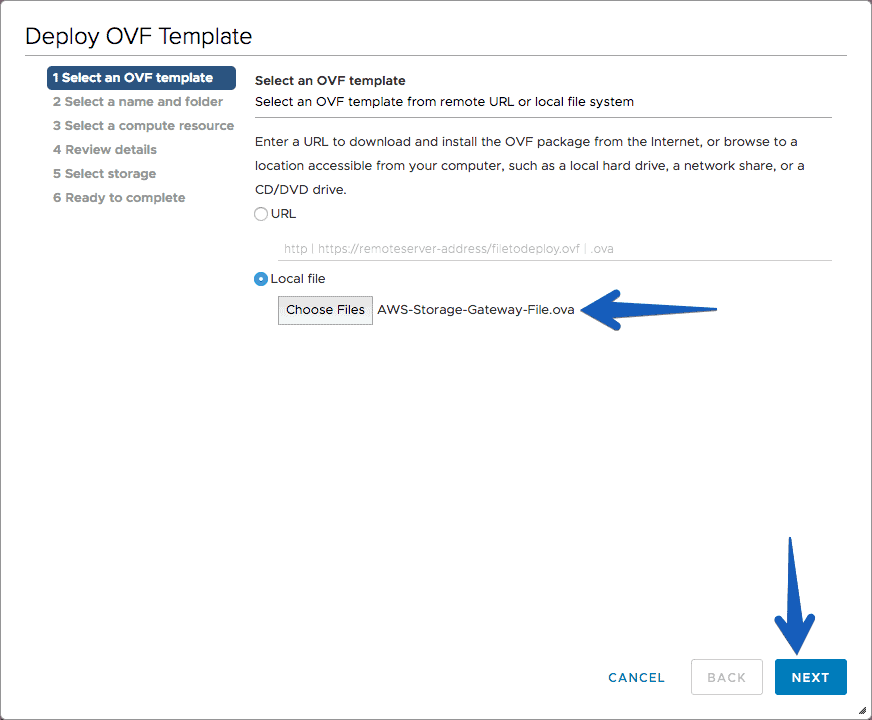
 In our vSphere Client HTML5, or in our vSphere Client Flash, we will right-click on our cluster and select deploy ovf template.
 Select the file you have just downloaded and unzipped and click Next.
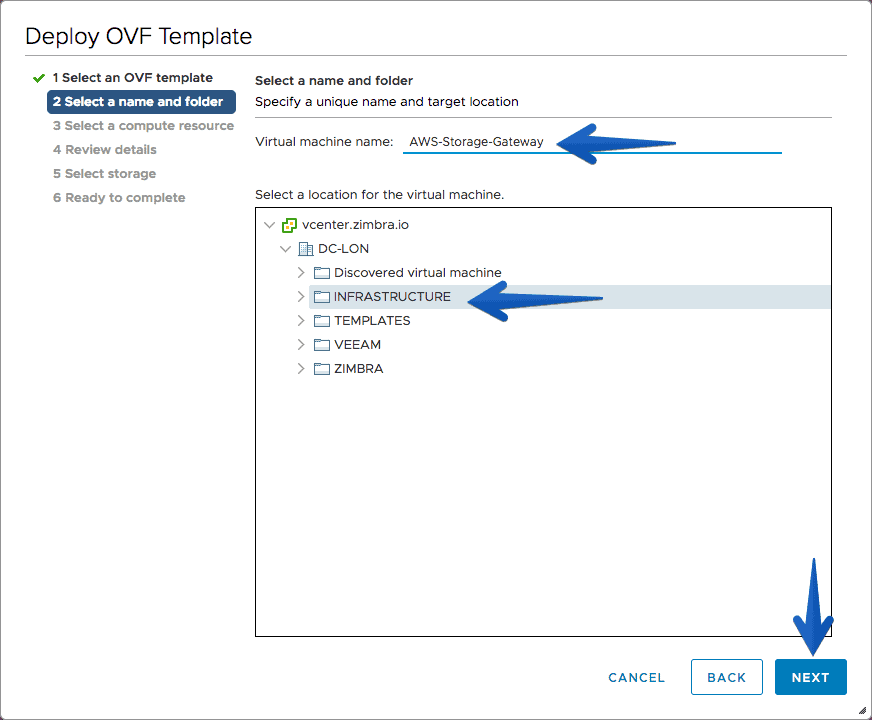
 We will select a name for our VM, and the folder where we want to locate it.
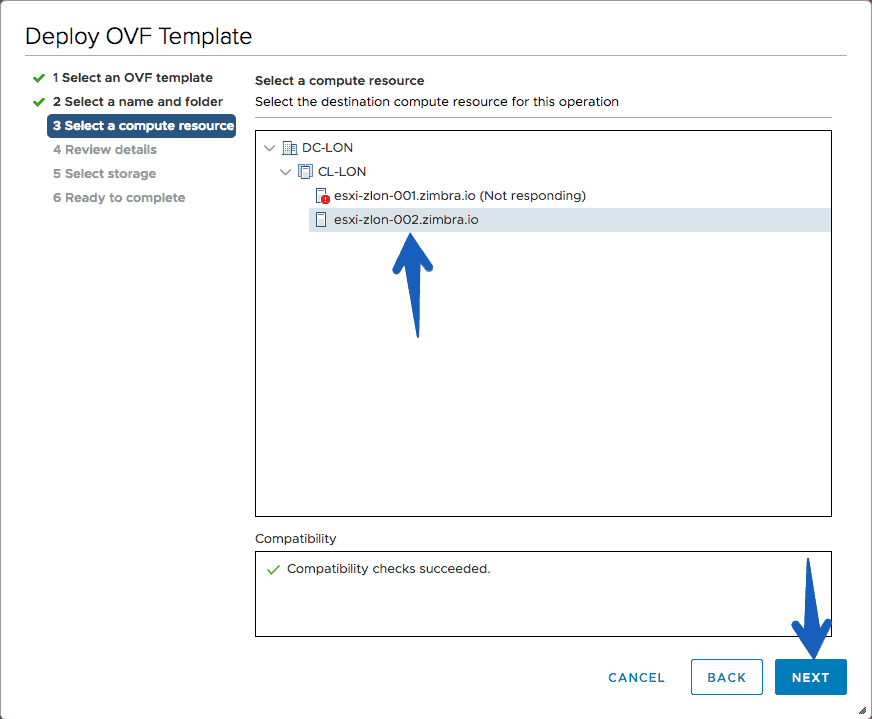
 We will select then the Host and the rest of the usual steps.
 We can see the task progress on the Recen Tasks view
![]() When the deployment ends, we should turn on the VM.
When the deployment ends, we should turn on the VM.
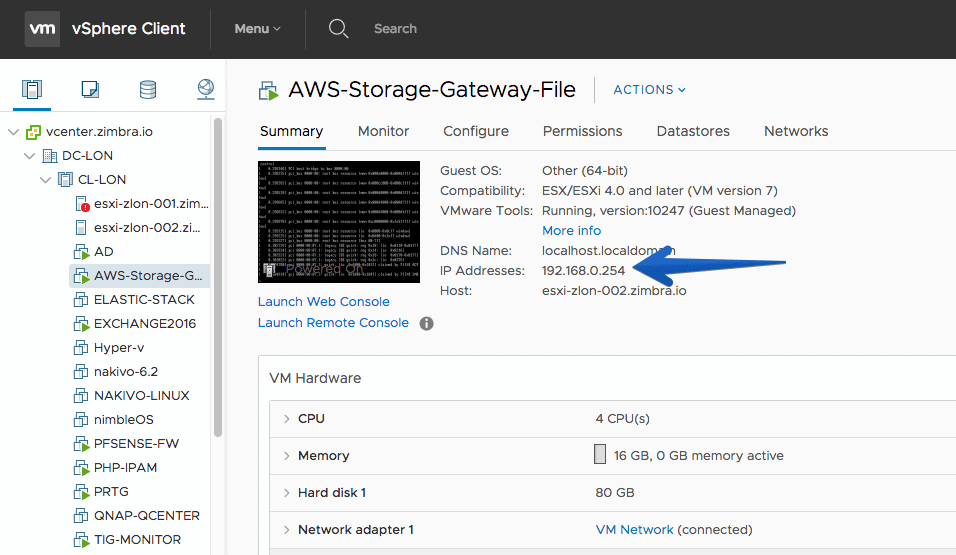
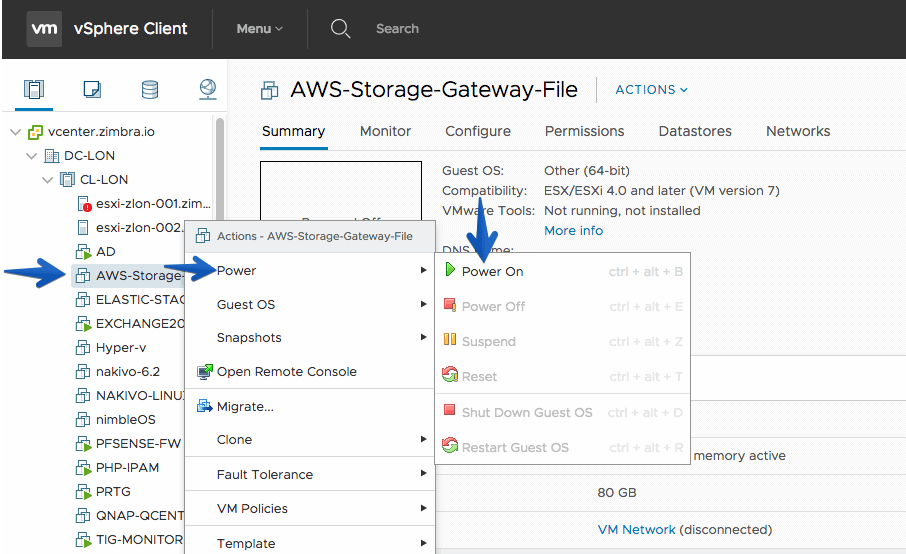 Once we have it turned on, we need to write down the IP as we will use it in the next step of the AWS Storage Gateway configuration.
Configuring AWS Storage Gateway
Back to the configuration, we will now enter the IP of the AWS Storage Gateway VM, and press Connect to gateway.
 We will select the time zone of the appliance, as well as a descriptive name for the gateway.
 Now in our AWS Storage Gateway VM we will create the cache disks, we can create one or several, besides hosting them in the Datastore that we want, if we want better speed locate it in fast disk, if the speed is not a problem, then in SATA.
Keep in mind that the cache disk is used until the information is transferred, so you need to have enough space for our copies of the VMs.
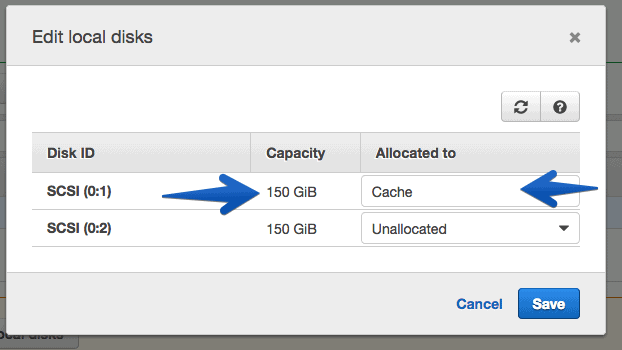
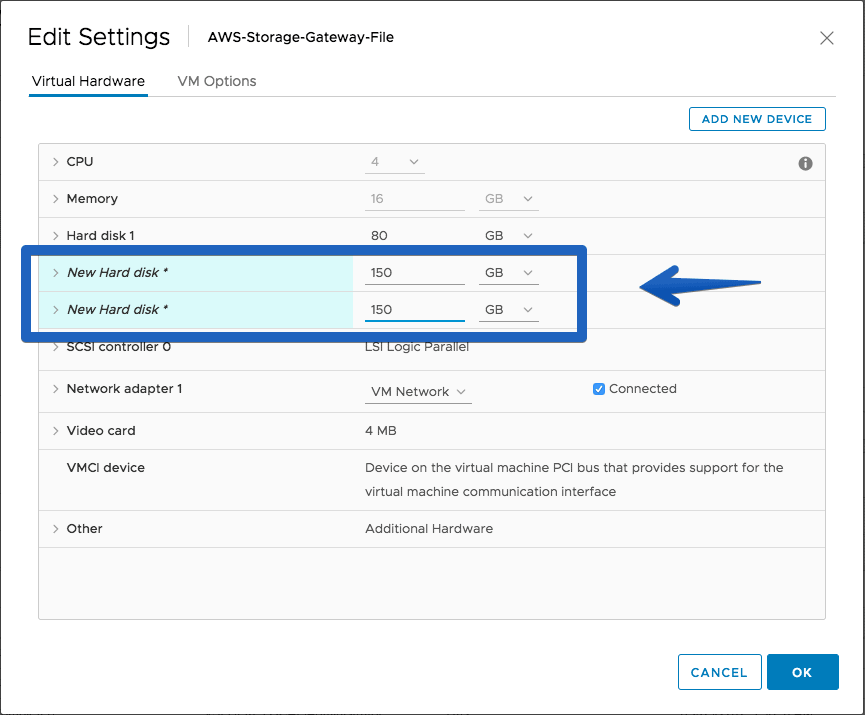 Once we have added the disks to our appliance, we can click on Edit local disks.
 And select the disk you want and mark it as a cache.
 Little trick: Login on the appliance
If we want to configure the static IP within the AWS Storage Gateway or perform other operations, we will enter the VM console:
 And we will introduce the user name and password by default (we can change the pass from the AWS actions menu). User: sguser, and default password: sgpassword
How to create a File Share on Amazon S3
Once we have the cache disk or disks ready, the next step is to create File Share, we can do it by pressing the button you see in the image:
 On another browser tab, we’ll create a new S3 Bucket:
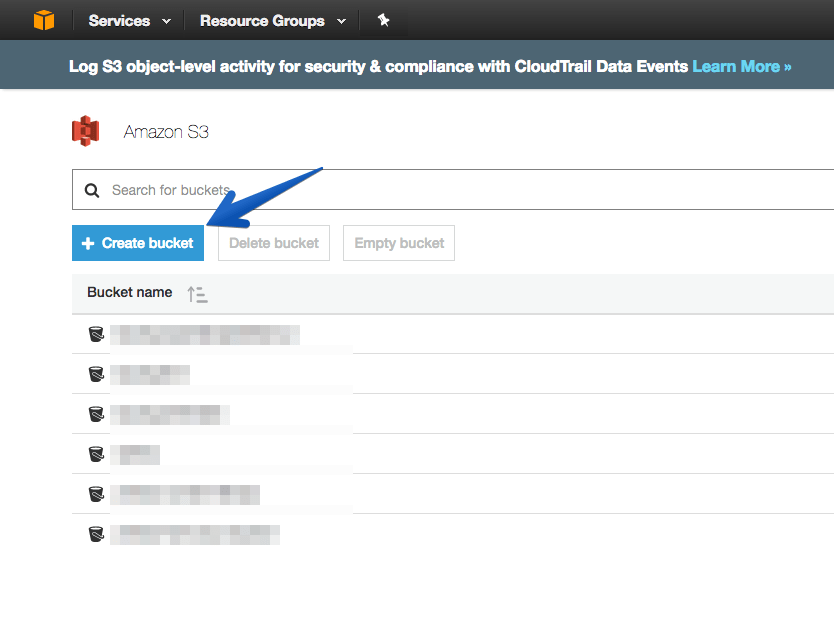 We will call it in a descriptive way, and if we want to edit the access, etc. In my case, I pressed create without any additional settings.
 Back to the AWS Storage Gateway wizard, we will select the gateway we have and manually enter the name of the S3 bucket we just created. We can select at this time if we want it to be S3 Glacier or S3 normal. I selected normal.
 The next step will allow us to further configure and filter the appearance of the NFS server that will be configured in the AWS Storage Gateway we have locally. (It can be edited later, so don’t worry)
 If we click on File Share, we have the command to conveniently connect this new NFS in our local environment.
How to create a Repository on Veeam Backup and Replication
By offering only one NFS drive, we will use a Linux repository to access this NFS, in our Veeam we will go to the wizard to create a new repository:
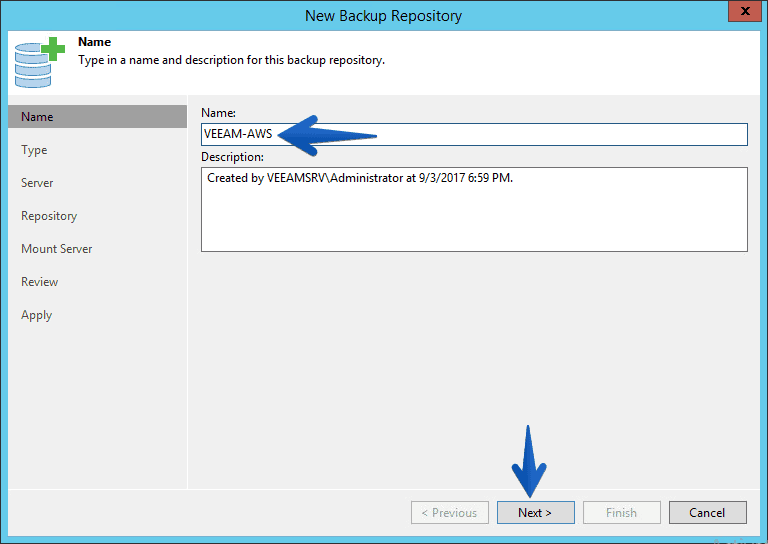 Select the Linux server option
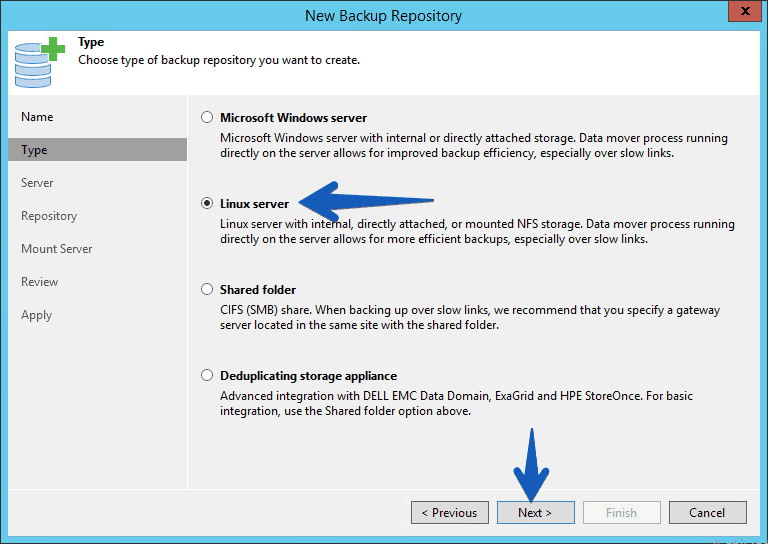 We will select the server, which had already created previously, and we will give you populate, we will see the mount point of I have with the NFS, we will select it and click on Next.
 In the path to folder we can edit if we want where the copies will be saved, but by default I have left backups in the folder. In addition we can always play a little bit with the advanced settings, simultaneous tasks, etc.En el path to folder podemos editar si queremos donde se guardaran las copias, pero por defecto he dejado en la carpeta backups. Además siempre podemos jugar un poco con las configuraciones avanzadas, tareas simultáneas, etc.
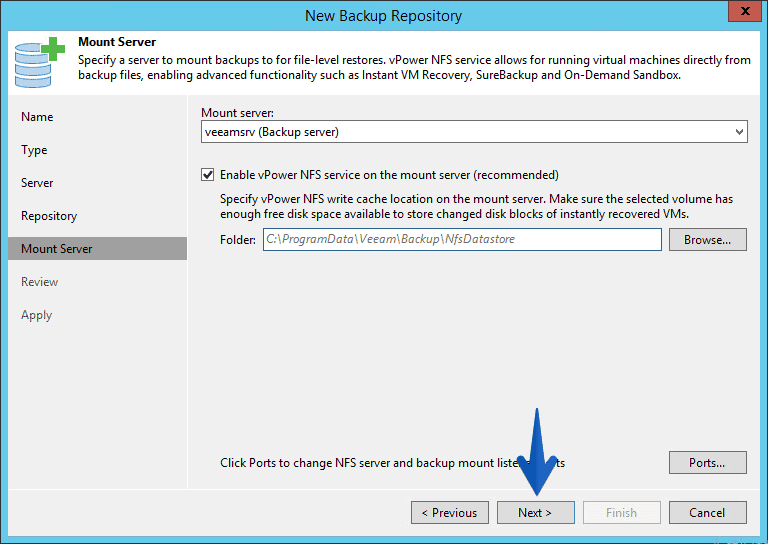
 As mount server we will leave this own Veeam server and click on Next.
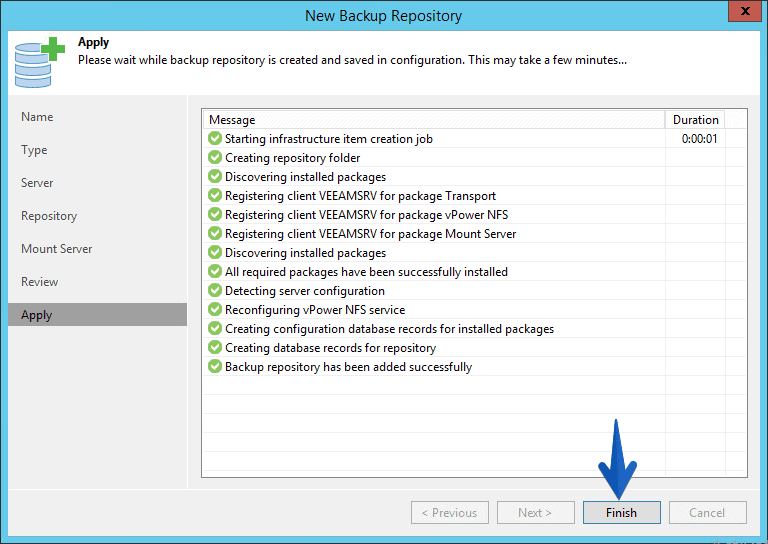
 If the configuration summary is correct, we can press Apply.
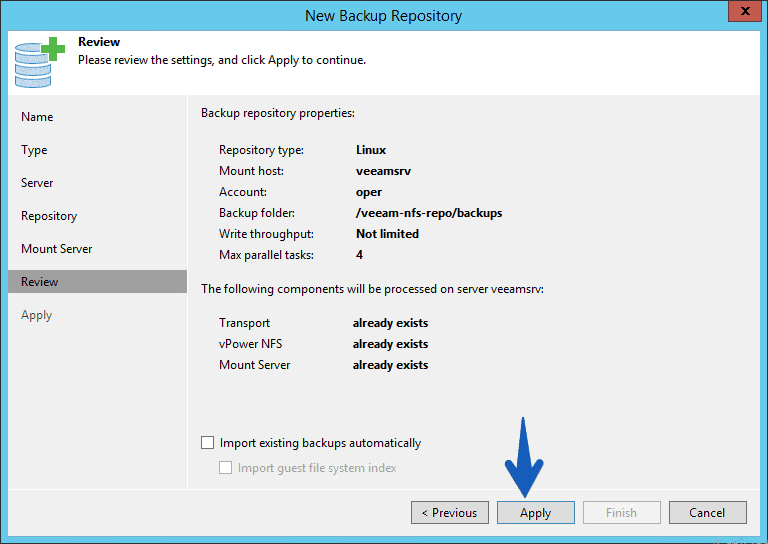 And we’ll see how to start the Linux Repository configuration process.
Backup Copy job – quick overview
Let’s run a test with a Backup Copy job, let’s go to the wizard and select VMware:
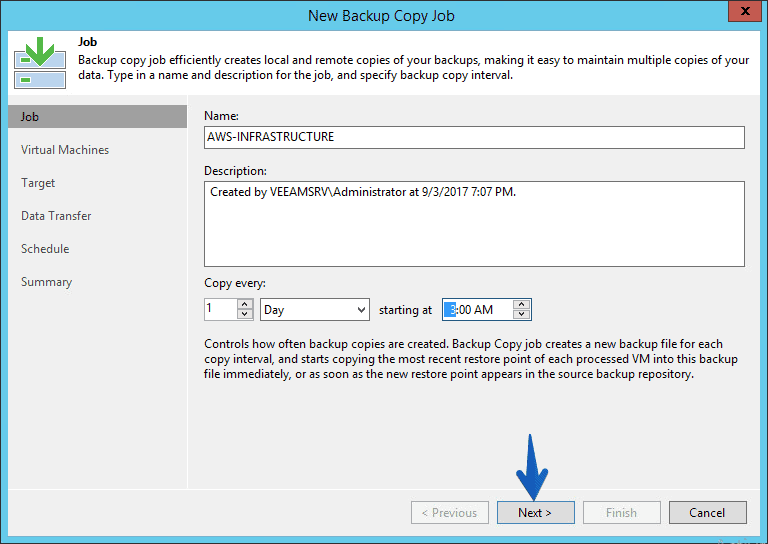
 We can select a name, and the schedule to create a backup copy:
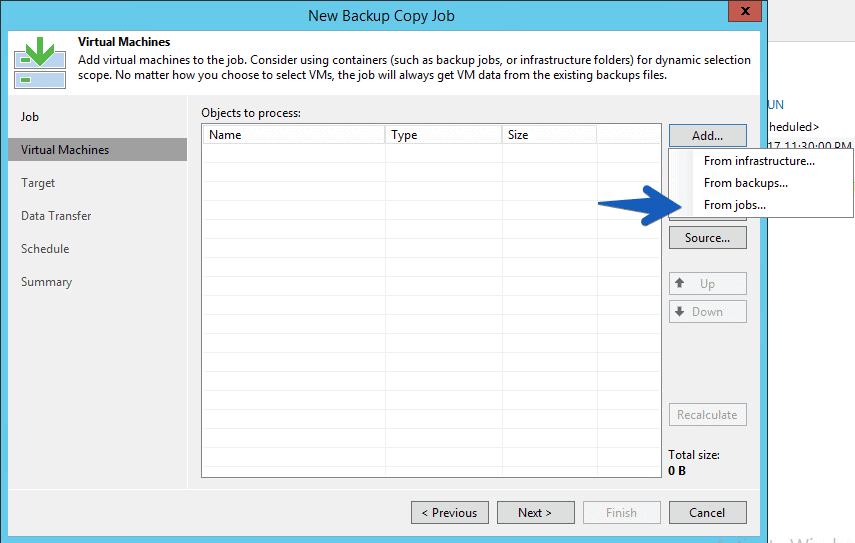
 We can select the VMs from different sources, on this case I’ve selected from jobs
 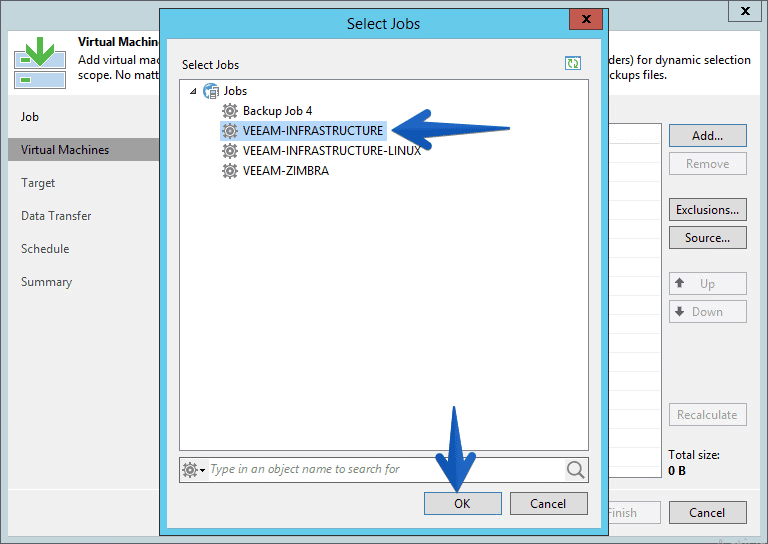 As an example, I’ve selected the VEEAM-INFRASTRUCTURE job I have:
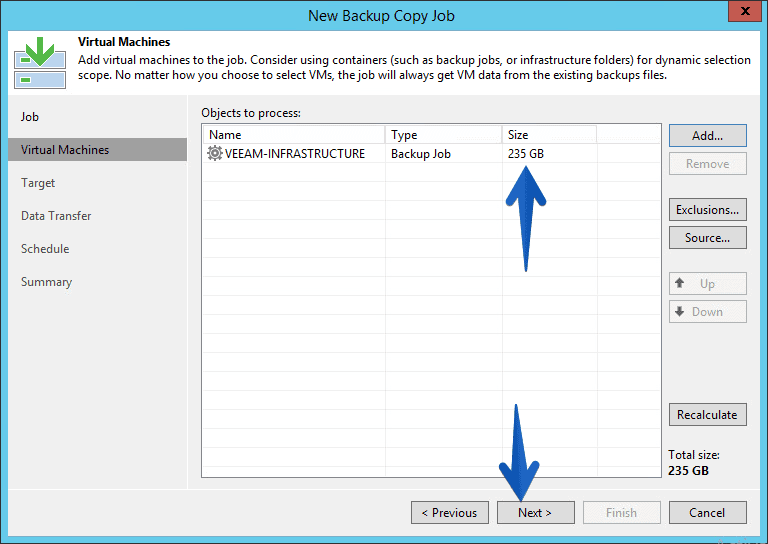
 The job has a total size of 235GB, but as the VM are not full on their disks, the final copy will be less.
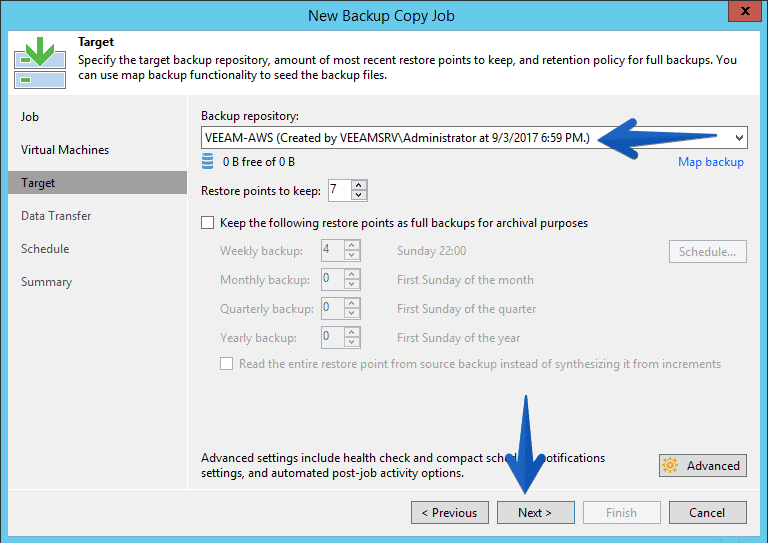
 We will need to select the Backup Repository we’ve created before:
 For the Data Transfer step we will keep it on Direct, as the repository is on the same LAN.
 And we could also control when the job can send information and when not, since backup copy jobs transmit information continuously.
 If everything is alright, we can click on Finish.
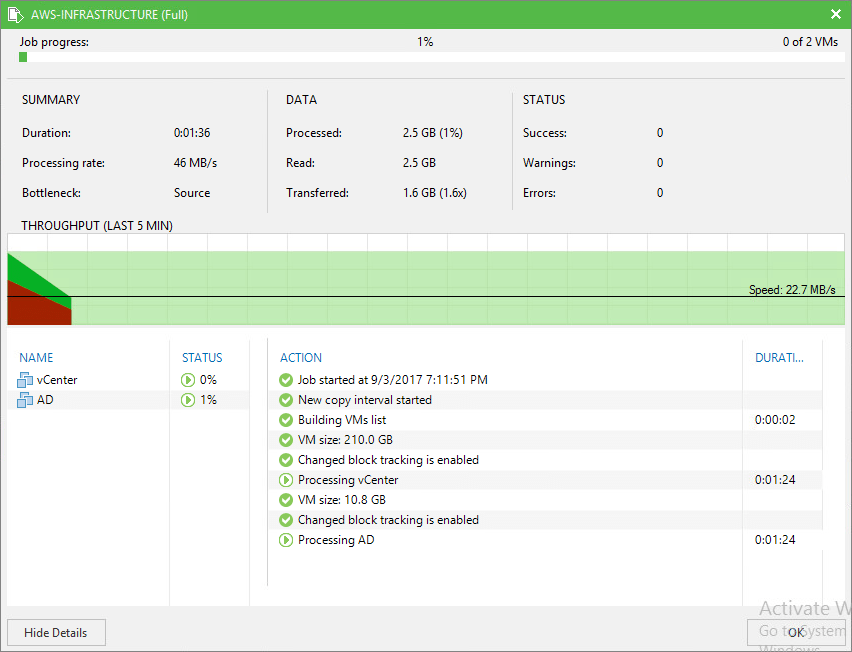
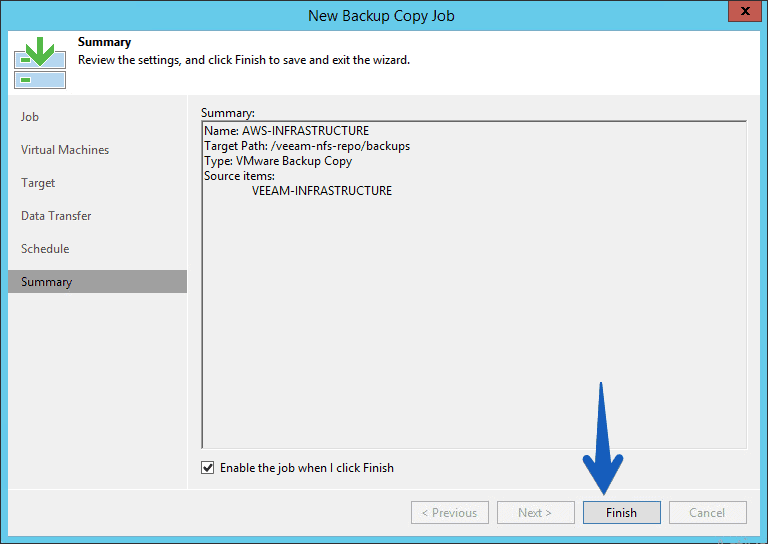 The work will begin to run, and again, it will be copied to the Linux-based repository which in turn has the AWS Storage Gateway with the cache mounted on NFS, so the copy is inside our Data Center.
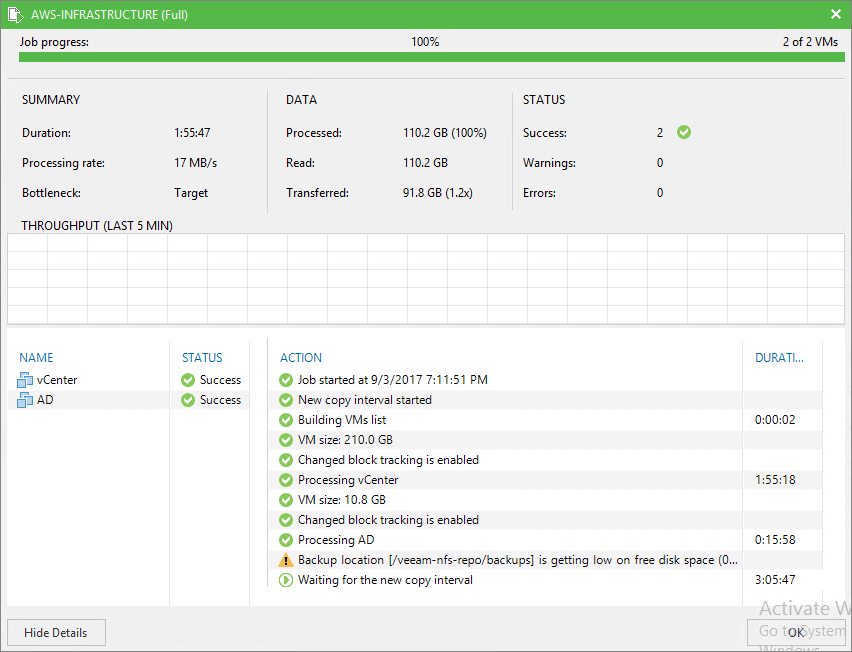
 After two hours, the work is finished correctly and we have the two VMs copied to our new Repository, it has taken up to 91.8GB at the end.
 The good thing we have using AWS Storage Gateway, is that we can perform all the operations of restoring as if we had the disks in a local way, we can restore the VM, only one disk, some files, etc.
Backup job – quick overview
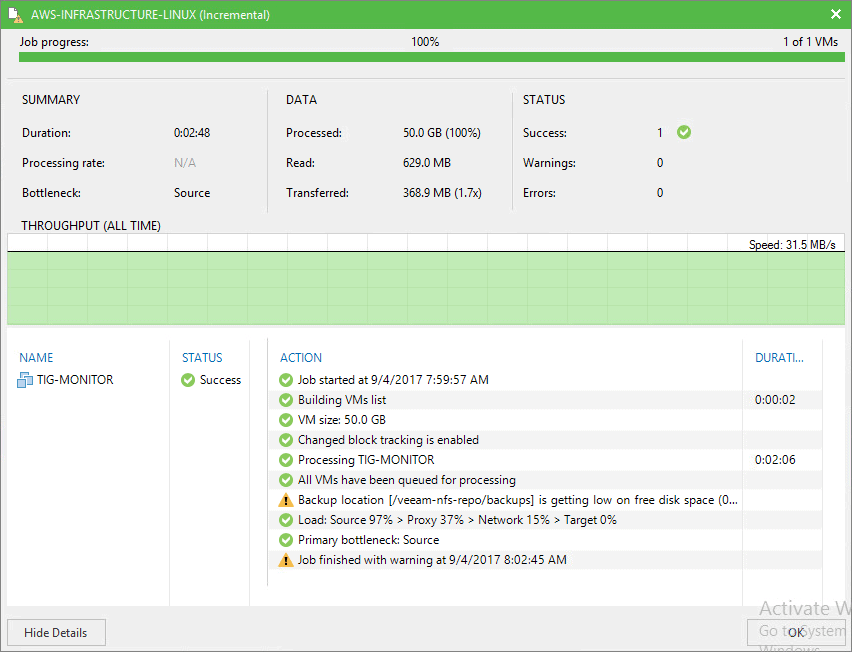
I do not extend myself in the configuration of a Veeam copy job, as it is the usual, here the result of a full copy of a VM to this new repository, it took only 23 minutes and 16GB have been transferred.
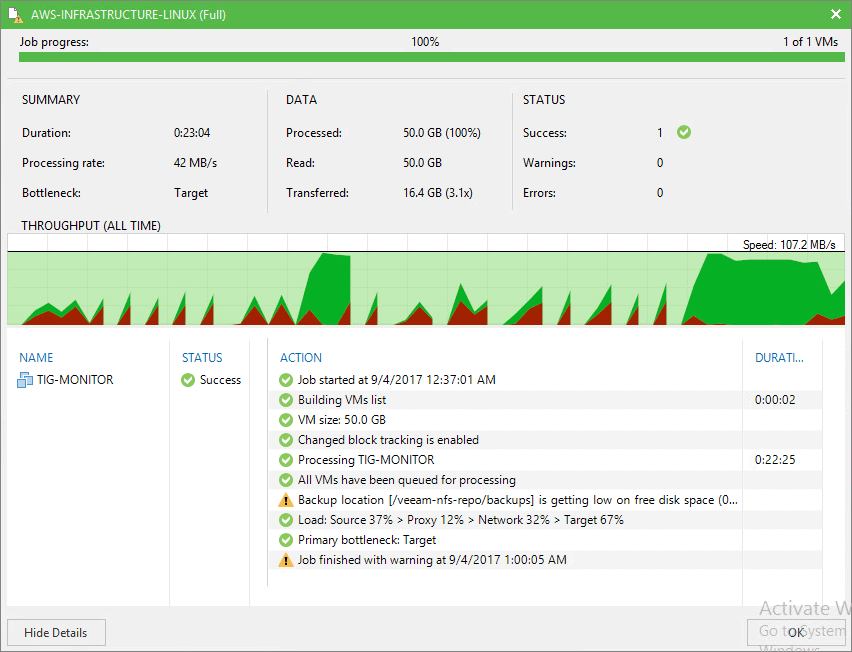 If I launch the job again, to get the incremental, it took only two minutes, some 368MB were copied and it went much faster.
 If we connect the AWS Storage Gateway NFS to a Windows machine, we can see all files as if they were on a network drive, when they are actually stored in Amazon S3.
How to monitoring with Cloud Watch
It is very interesting to see with Cloud Watch the consumption of bandwidth, or disk writing, etc. For example, these are the statistics of File Share, we can see how many bytes we write when we make the backup copy job, how much with the backup job full and how much with the backup job in incremental. In addition, the thin purple line is the constant synchronization between the cache and Amazon S3, consuming about 1Mbps continuously.
 These are the statistics from the AWS Storage Gateway, where it shows us the status of the cache.
 This is all friends, in future posts we will see an AWS Storage Gateway tutorial with Volume by iSCSI and Virtual Tape Drive as well.
If you have any questions with Amazon AWS Storage Gateway scaling and Veeam I recommend you write to my friend James






In the section “How to create a Repository on Veeam Backup and Replication”
you’ve completely skipped over how to authenticate to the server. I put my credentials in correctly and I get an error saying “No suitable authentication method…(publickey)” , I’m not even sure port 22 (ssh) is available on my VM.
The credential settings are absolutely necessary to complete this setup.
Help!!!! Thanks
Hi Brett, I’ll add the steps later on. Best regards
Hello,
The Document is Good but i got stuck at this point “How to create a Repository on Veeam Backup and Replication” .
1) My question is that we need to use a Linux system and add the Storage Gateway fileshare to it ?
2) This is where i guess a bit confusing on the document after creating a Fileshare on AWS and mapping it as a repository in Veeam .
Thanks,
Hi sudheer,
Yes to add it as a repository in Veeam, you need the intermediate Linux filesystem and connect using NFS the AWS Fileshare, I will improve it this week.
Thanks!
Hi Sudheer, did you get the authentication working? Like the others, I can’t get Veeam to authenticate to the AWS Gateway Server.
I’ve installed an intermediate linux (Debian). Finally got it connected. Now how do I formulate the /etc/fstab entry to make the mount persistent on reboot?
What I have so far is below but’s not working
//192.168.0.2:/myBucketName /dev/shm nfs iocharset=utf8,sec=ntlm 0 0
Is there any way to get veeam to split the backup files for when the backups are bigger than the cache so we can do a quick restore without having to download a huge file first when it’s bigger than cache. Then on a restore it could just get the part of the file that it needs?
Hello, do not think so, to be honest the best way to send data to AWS right now with Veeam will be using Cloud Tier/Capacity Tier, much more efficient in both, backups and restores.
Please check
https://helpcenter.veeam.com/docs/backup/vsphere/capacity_tier_cal.html?ver=95u4