
 Greetings friends, I already told you in the previous post about how to deploy a backup system using SLA policies, and in that first post, the first steps were mentioned, especially creating the SLA architecture and policies in VMware as vSphere Tags.
In this second entry, we’re going to see how to create the Veeam architecture we mentioned in the first post, something similar to the following: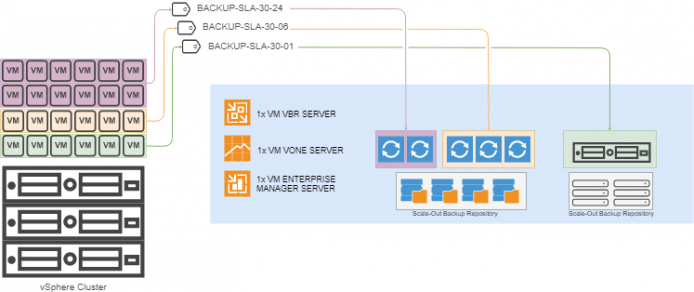
How to create our SLA policies in Veeam Backup & Replication
Let’s take a look at the step-by-step process of creating the proxies, and the backup repositories, as well as how to add each resource to the different SLA policies.
Creating all the Backup Repositories in Veeam Backup & Replication
Before creating any Backup Proxy, let’s start with the disk space, although it’s true that I haven’t touched the aspect of how much space we will need in the first post, I leave you with some forecasts here:
- BACKUP-SLA-30-24 – 100VMs – http://rps.dewin.me/?m=1&s=30720&r=30&c=50&d=10&i=D&dgr=10&dgy=1&dg=0&re=1&sy=0,0,0,0,0,1,0&e
The rps tool does not consider the scenarios we want to protect every 6 hours or every hour to calculate disk, but you can get an idea by looking at the 24 hour SLA.
Our scenario would look something like the following with the relevant Backup Repositories: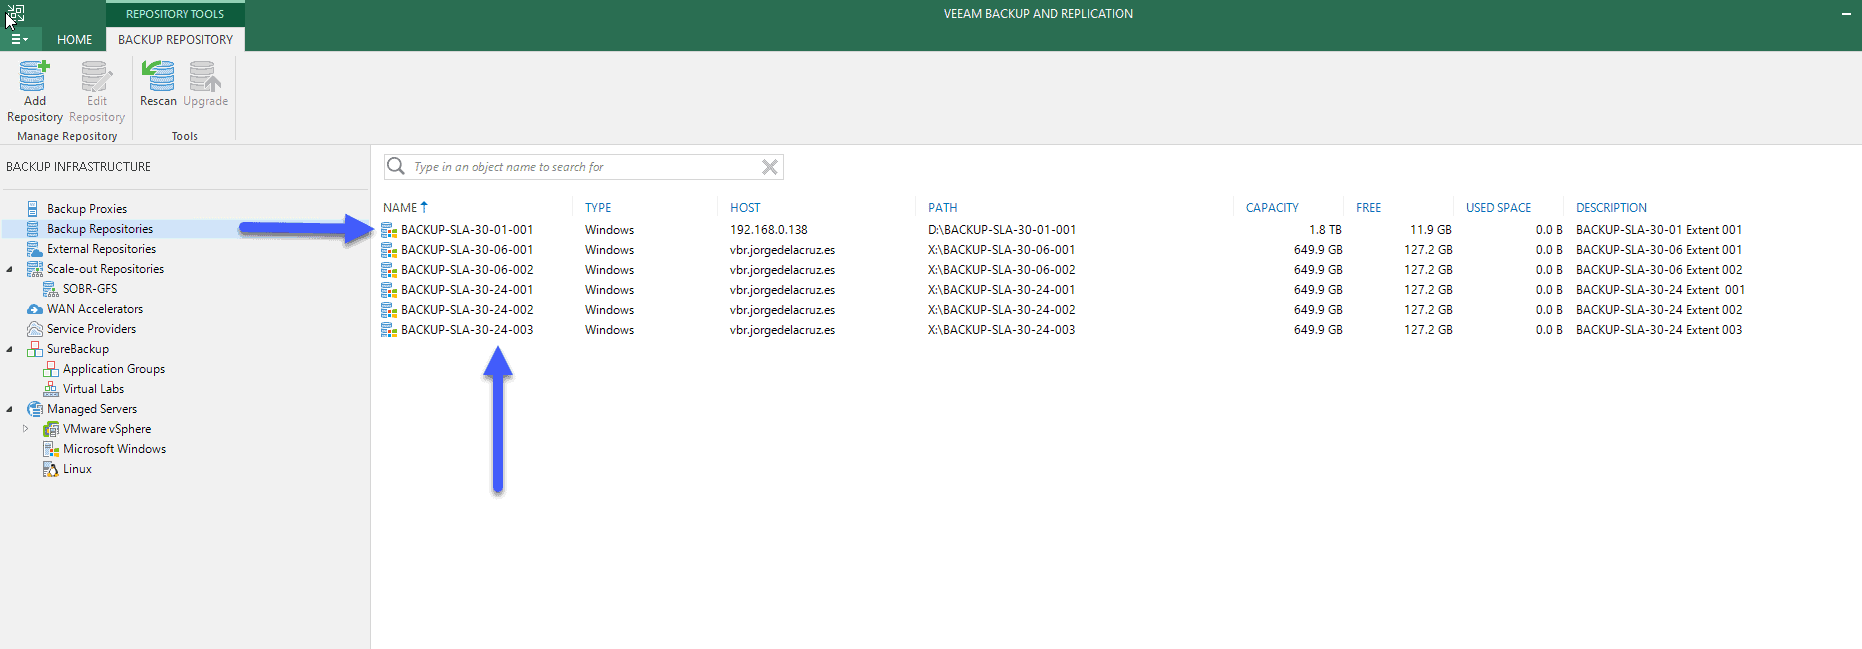
Creating the different Scale-Out Backup Repositories
Once we have the Backup Repositories, we will make use of the Veeam Scale-Out Backup Repository which will give us flexibility when it comes to growing in space, or when it comes to carrying out maintenance operations in the different Backup Repositories, this is indispensable. After creating your SOBR, you would have something similar to the following: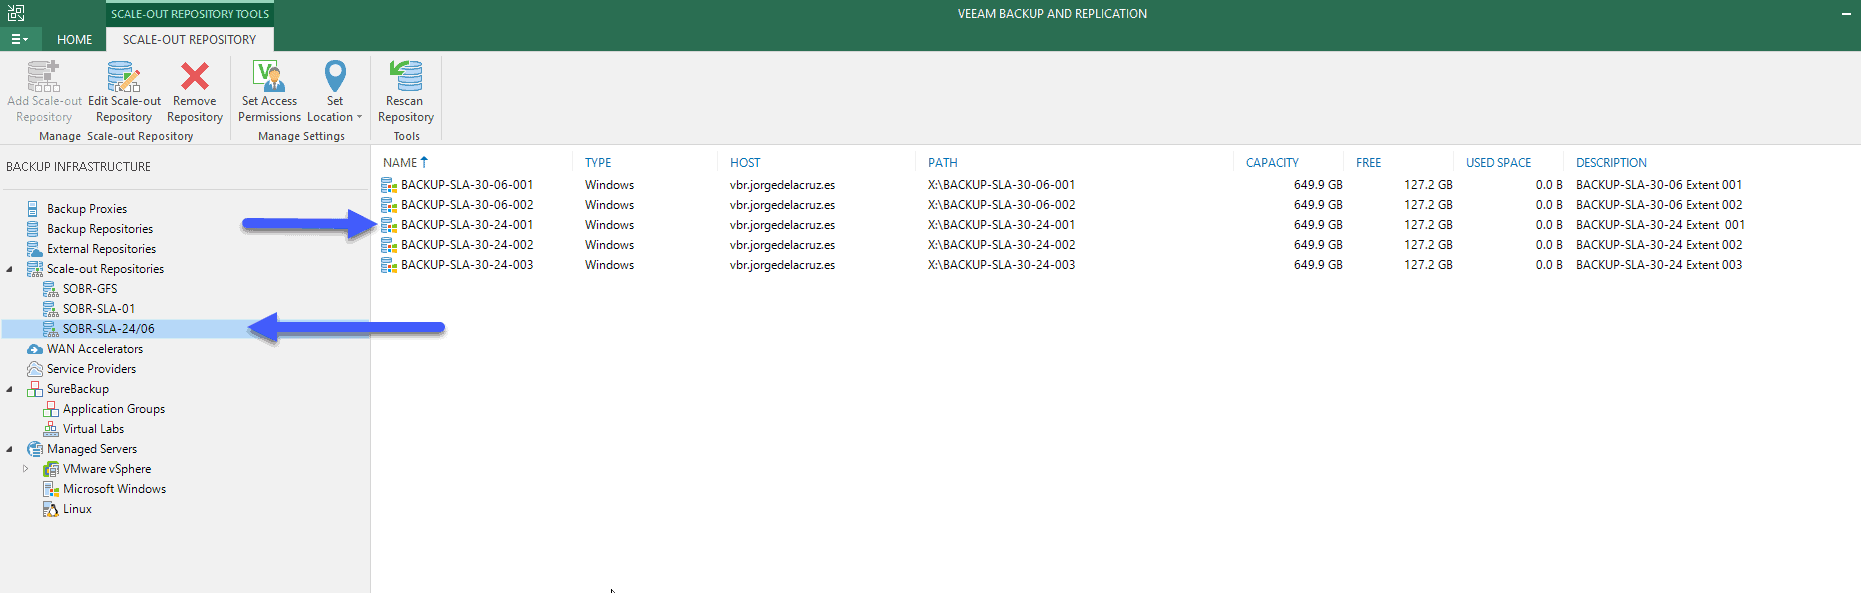 Where we can see that in the different SOBR, we have the extent we need and want to cover our backup service.
Creating all the Proxies in Veeam Backup & Replication
One of the new features that Veeam Backup & Replication brings is Linux Proxies, which will help us deploy this much faster. But for this case, we are going to use Windows Server 2016 for all of them.
Once the virtual proxies are deployed with the resources we saw in the first post, and having the physical server ready for the most aggressive policy, we will add them all from the next view of Veeam Backup & Replication, it should look something like this: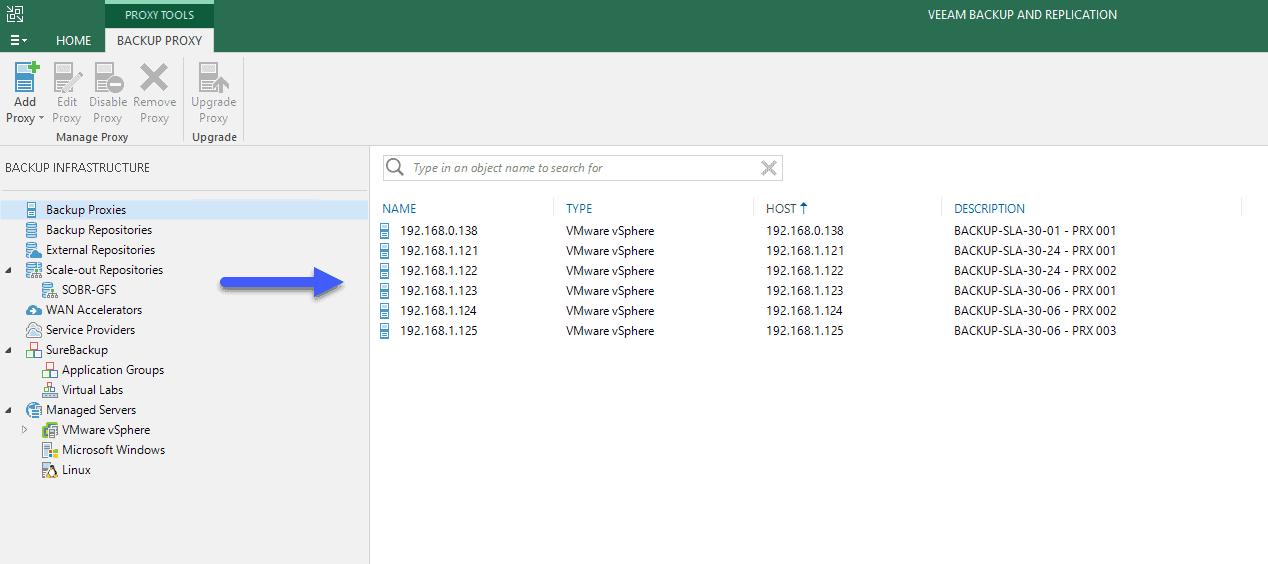 If we use PowerShell, we can see the complete list with the following command:
Get-VBRViProxy

Name                      Type         Host            IsDisabled      Description
----                      ----         ----            ----------      -----------
192.168.1.123             Vi           192.168.1.123   False           BACKUP-SLA-30-06 - PRX 001
192.168.0.138             Vi           192.168.0.138   False           BACKUP-SLA-30-01 - PRX 001
192.168.1.124             Vi           192.168.1.124   False           BACKUP-SLA-30-06 - PRX 002
192.168.1.122             Vi           192.168.1.122   False           BACKUP-SLA-30-24 - PRX 002
192.168.1.121             Vi           192.168.1.121   False           BACKUP-SLA-30-24 - PRX 001
192.168.1.125             Vi           192.168.1.125   False           BACKUP-SLA-30-06 - PRX 003
Now that we have all our Proxies ready and also our Repositories, we could use the Affinity Proxy option that helps Veeam use resources more efficiently: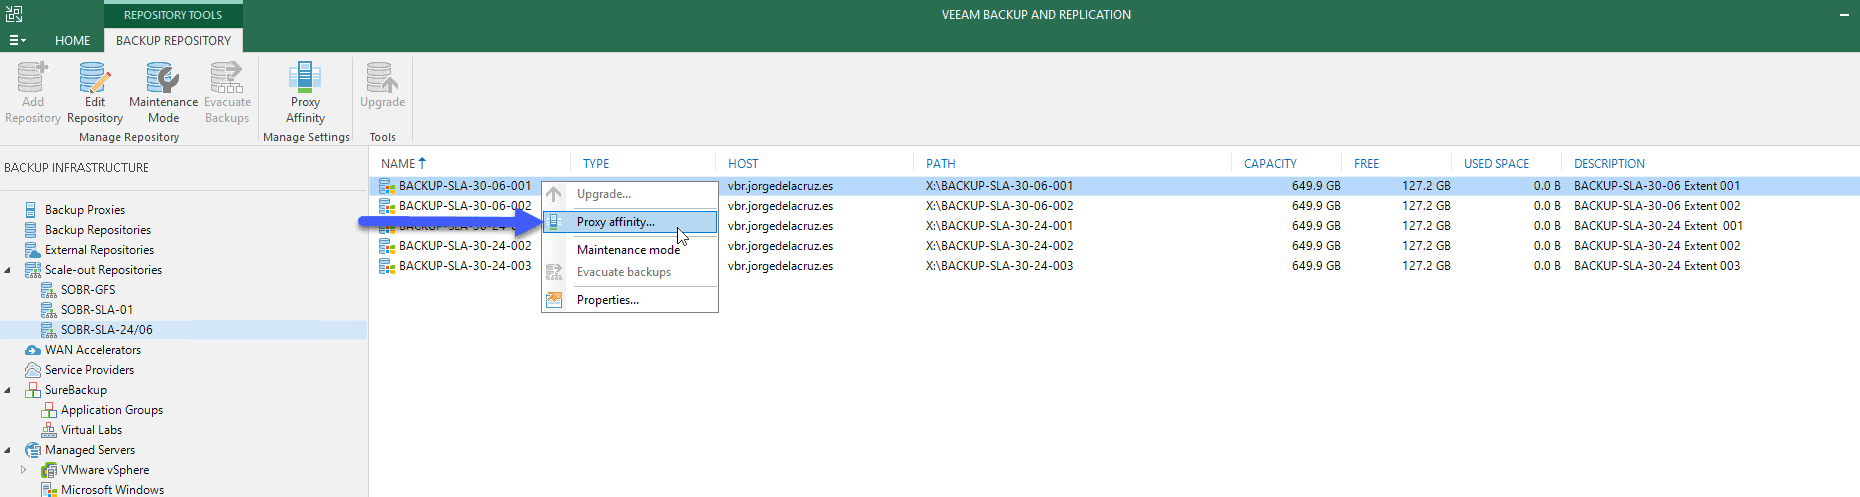 This is optional as we’ll force the jobs to use one or another proxy anyway.
Also, as I mentioned, it would be advisable to force the physical proxy so that the traffic is from the SAN directly:
Creating the Backup jobs using an SLA policy
Now that we have created everything, let’s take a look at the step-by-step process of creating Backup Jobs for each SLA policy.
BACKUP-SLA-30-24
We will create a new VM backup job, with the descriptive name we want, in my case the same as the SLA policy: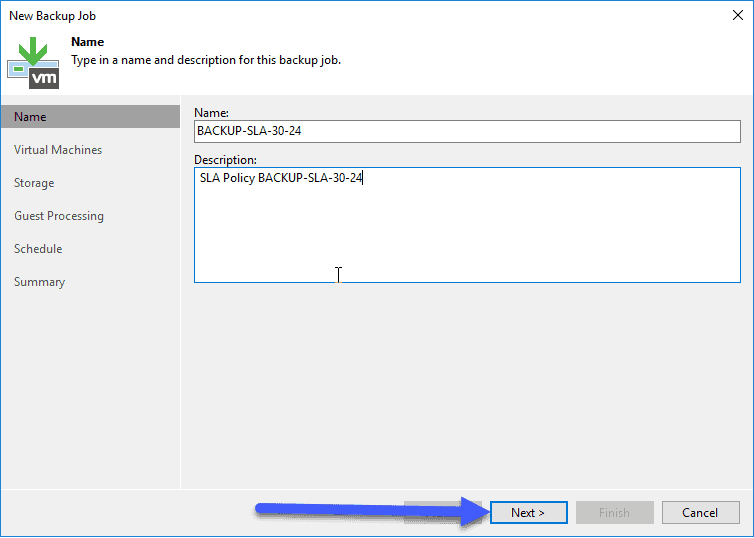 When selecting the elements that we want to protect, we will say that it is a vSphere Tag, that corresponds with the SLA policy that we want to protect:
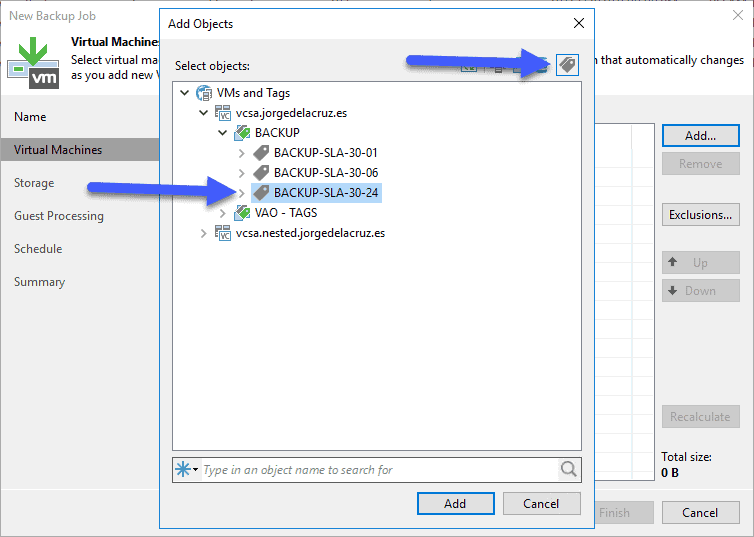 Nothing special in Storage, the only thing to take into account is to manually select the Proxies and the Repository, besides the points to maintain:
 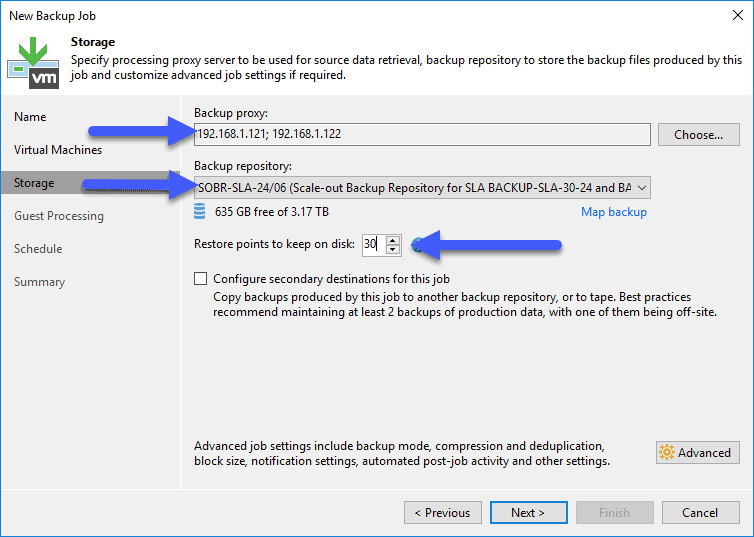 Finally, the frequency with which we want to protect this SLA policy:
  Everything would be ready, when VMs are added to the corresponding vSphere Tag, they will already start protecting the VMs.
BACKUP-SLA-30-06
We will create a new VM backup job, with the descriptive name we want, in my case the same as the SLA policy: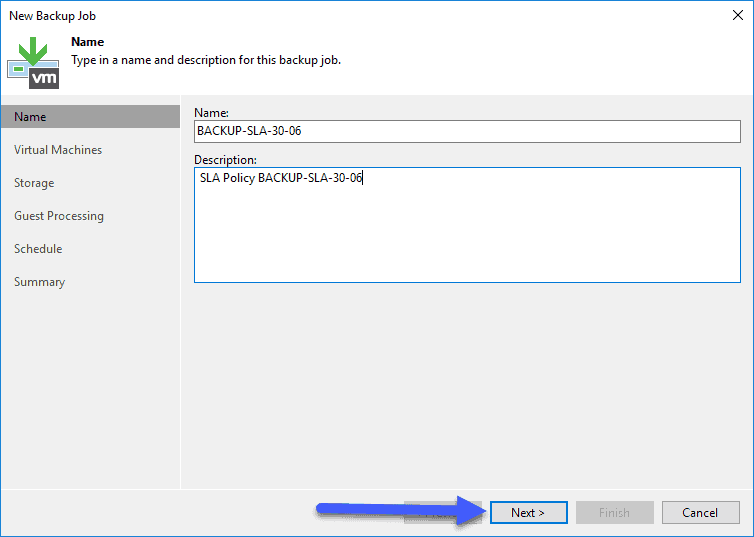 When selecting the elements that we want to protect, we will say that it is a vSphere Tag, that corresponds with the SLA policy that we want to protect:
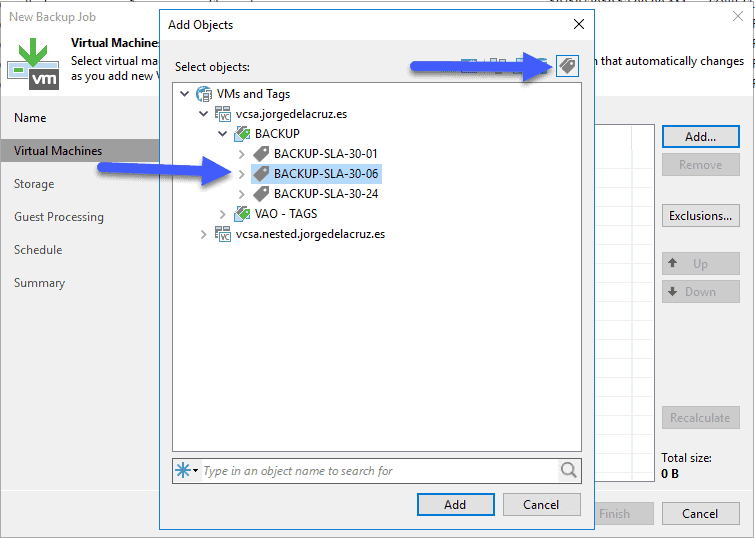 Nothing special in Storage, the only thing to consider is to select manually the Proxies and the Repository, besides the points to maintain, since they are four points a day (every 6 hours) for the 30 days that we want, this makes 120 points to maintain (or select just 30 days if you have v10):
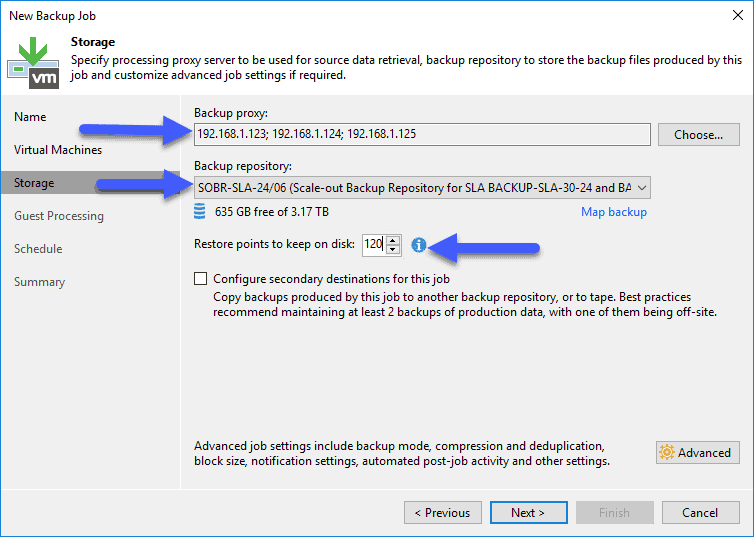 Additionally, I like to consolidate so many copies once a day:
 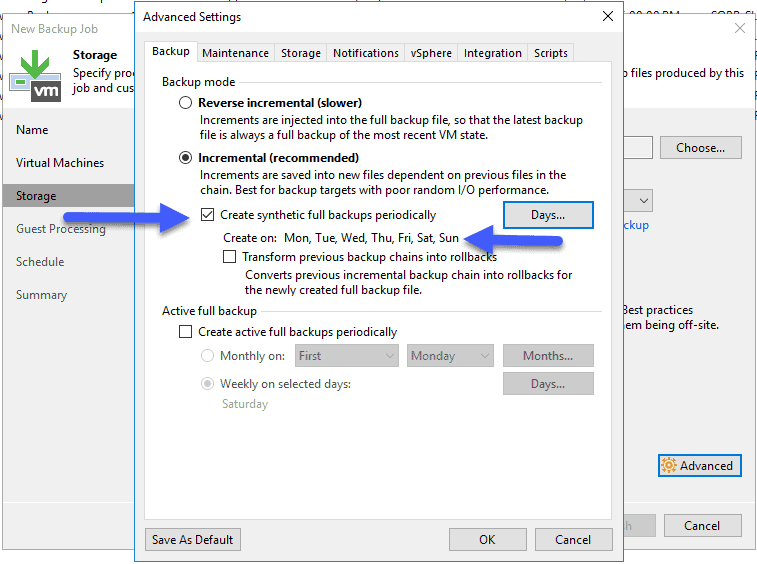 Finally the frequency with which we want to protect this SLA policy:
 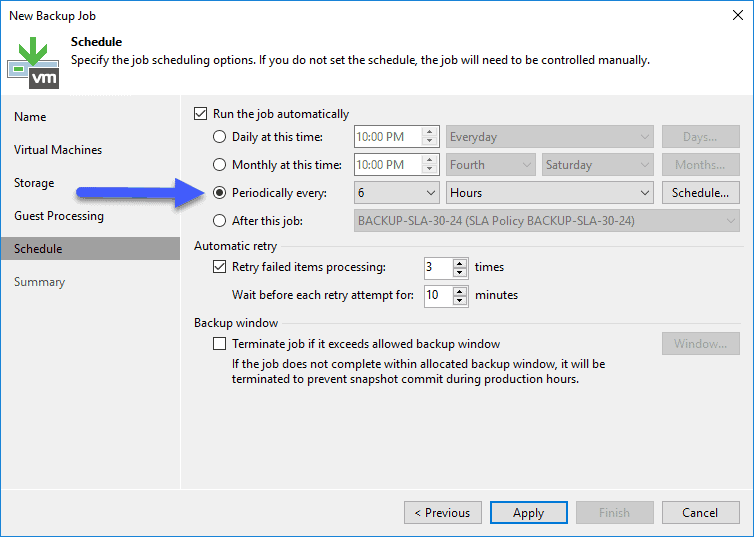 Everything would be ready when VMs were added to the corresponding vSphere Tag, they would already start protecting the VMs.
BACKUP-SLA-30-01
We will create a new VM backup job, with the descriptive name we want, in my case the same as the SLA policy: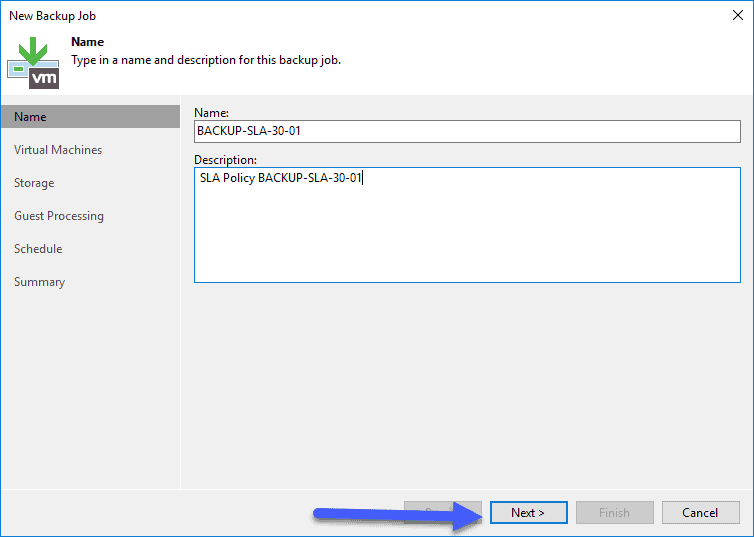 When selecting the elements that we want to protect, we will say that it is a vSphere Tag, that corresponds with the SLA policy that we want to protect:
 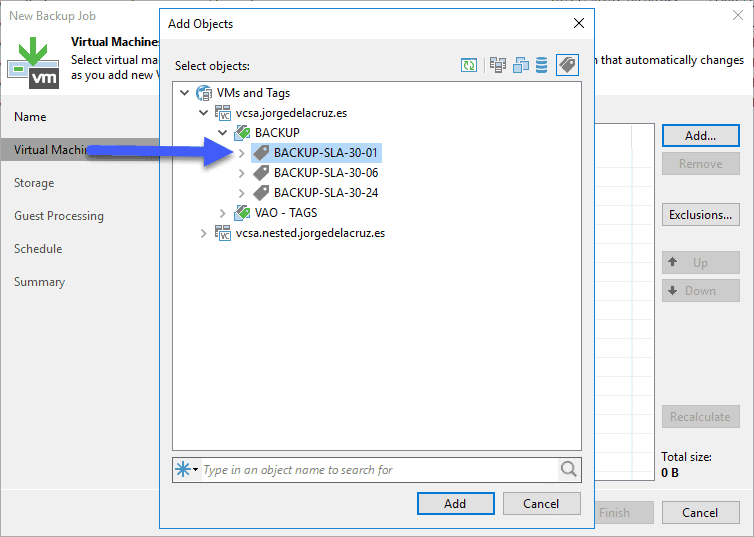 Nothing special in Storage, the only thing to take into account is to manually select the Proxies and the Repository, besides the points to maintain, since they are twenty-four points a day (every 1 hour) for the 30 days that we want, this makes 720 points to maintain (or select just 30 days if you have v10):
 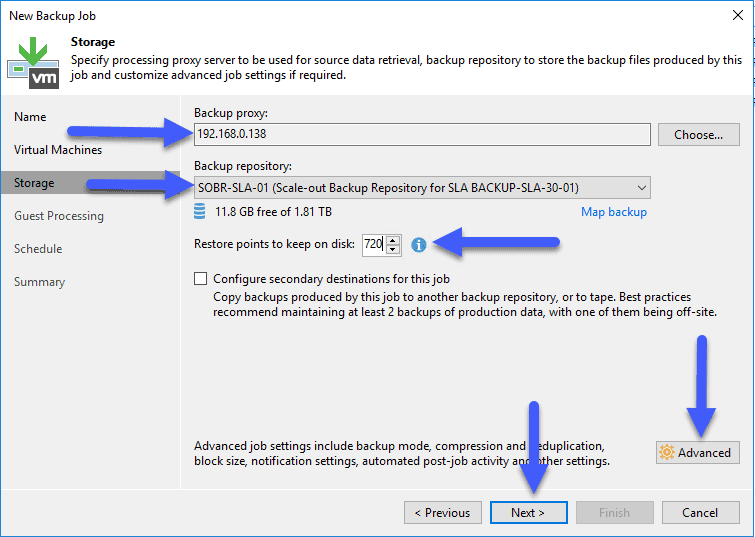 Additionally, I like to consolidate so many copies once a day: In the Integration part, we will select the Backup from Storage Snapshots option whenever possible:
 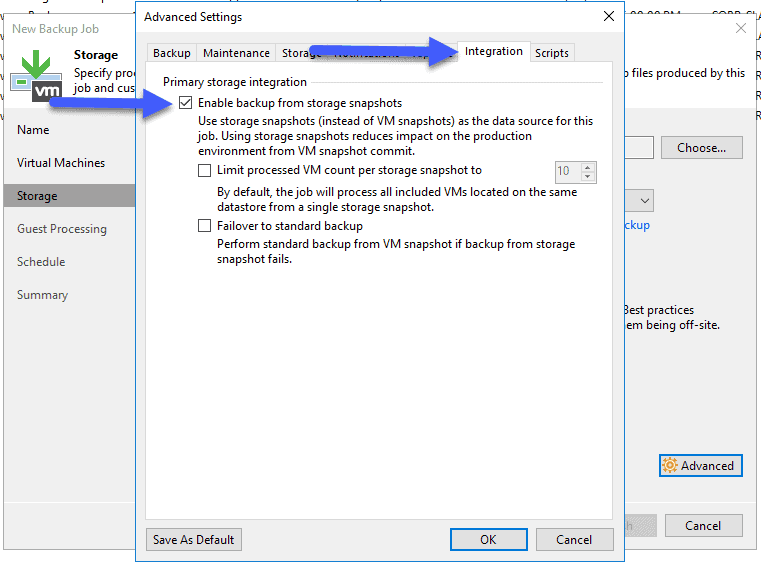 And finally, the frequency, in the case of the SLA policy, every hour:
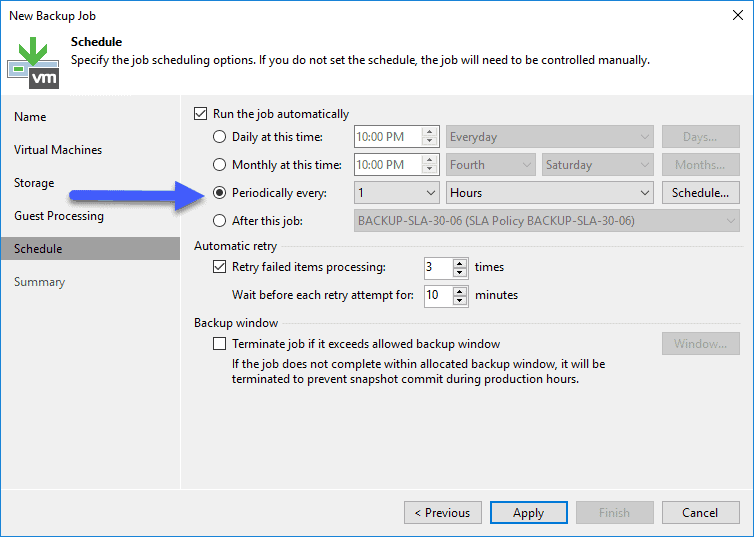 Everything would be ready, when VMs are added to the corresponding vSphere Tag, they will start protecting the VMs.
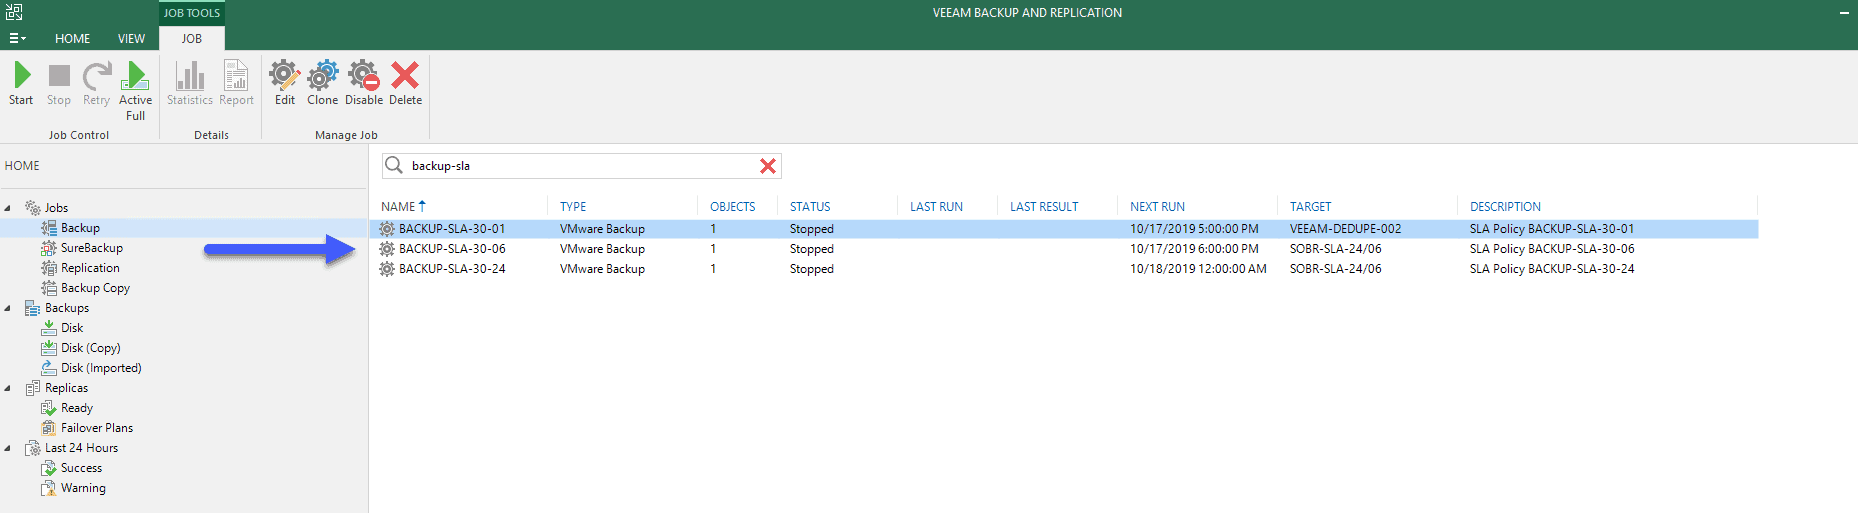
This would leave our Veeam Backup & Replication with the three SLA policies. In each iteration, the number of VMs will be refreshed according to the VMs that have been included or excluded:
 That’s all for now in this first part of this blog series about SLA policies to create backups, I leave you with the complete series:
- Veeam: How to Design and Implement a Backup System Based on SLA Policies – Part I – Design, Architecture, and Tagging in vSphere
- Veeam: How to Design and Implement a Policy-Based Backup System – Part II – Creating the Policies in Veeam Backup & Replication
- Veeam: How to Design and Deploy a Backup System Based on SLA Policies – Part III – Assigning vSphere Tags to Application Groups
- Veeam: How to Design and Implement a Backup System Based on SLA Policies – Part IV – Quick Overview and Reporting of Backup Policies
- Veeam: How to design and implement a policy-based SLA backup system – Part V – Monitoring the Veeam Backup & Replication environment with Veeam ONE
Leave a Reply