 Greetings friends, some time ago I showed you all the news of Veeam Availability Suite v9.5 U4, and among them, I have told you in several articles all the power of Veeam Capacity/Cloud Tier, which allows us to take advantage of Object Storage providers to store large numbers of backups that normally require a long retention, months, semesters or years.
Many of you, and in the Community, have wondered if you can use storage that we have in our Datacenters that offer Object Storage services, and the answer is YES, of course, as long as the product publishes the S3 service following modern standards should work. Veeam has an unofficial list of products and solutions that you can deploy in your Datacenter.
And it’s from this list that I’ve got one of the products that most caught my attention, because of the company behind it, Dell EMC, and because they have a Community Edition, I’m talking about Dell EMC ECS.
As this blog entry is quite long, I leave you the menu here to jump wherever you want:
- Dell EMC ECS at a Glance
- Dell EMC ECS CE at a Glance
- Dell EMC ECS CE System Requirements
- Dell EMC ECS CE OVA Deployment on VMware vSphere 6.7 U2
- Configuring Dell EMC ECS CE OVA
- Object Storage Repository and Capacity Tier Configuration in Veeam Backup & Replication v9.5 U4
Dell EMC ECS at a Glance
Dell EMC ECS is an industry-leading object storage platform designed to support traditional and next-generation workloads. Available in multiple consumer models: it is defined software and can be purchased as a turnkey device or as a service operated by Dell EMC-ECS. It enables organizations of all sizes to economically store and manage unstructured data at any scale and for any length of time.
EMC ECS is an object storage system that makes use of persistent storage containers for cloud storage protocols. ECS supports AWS S3 and OpenStack Swift. In file-enabled buckets, ECS can provide NFS exports for access to file-level objects.
We find two main models, in the smallest we can start with a not inconsiderable 60TB and in the largest we can find configurations of up to 8.6PB per rack.
As we can imagine what Dell EMC ECS provides us with is object-based storage, scalable and at a reduced price, if we think of an architecture in which a user writes a block using an S3 connector, it would be like this: 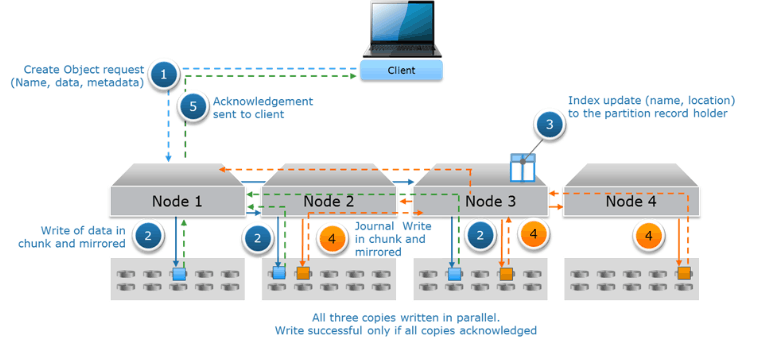 We see how all nodes are replicated between them, and that only if the block has been stored in all nodes is considered valid.
If we thought of a similar operation, but this time reading an S3 block, it would be like this:
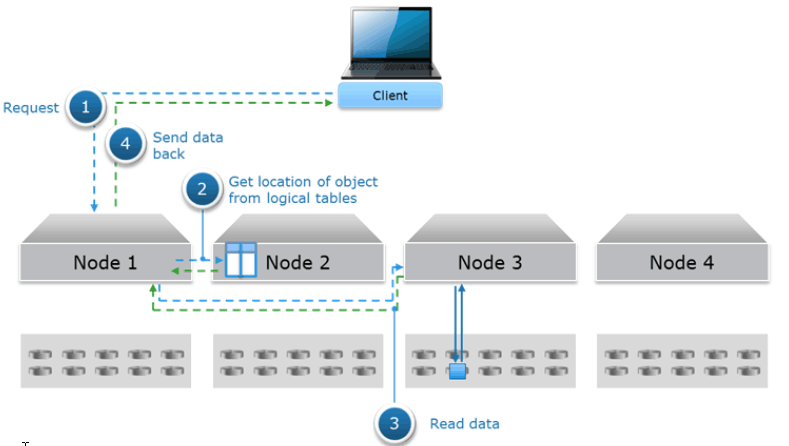 We see how the request enters through Node 1, which gathers the information of all nodes and at the end it is sent from node 3 to node 1 and from there it is presented to the client.
Dell EMC ECS EX300
Starting at 60TB, the EX300 model can grow to 1536TB (1.5 PB) per rack, and will enable easier adoption due to its simplicity, size and price.
- Hyper-converged Nodes
- Front accessible and hot-plug discs
- Identical performance characteristics with each node
Dell EMC ECS EX3000
With a total capacity of up to 8.6 PB per rack, the EX3000 is perfect for storing high data density, at a very low price, which also this object storage serves for multiple purposes.
- Single-node or dual-node configurations
- The front is accessible and also the disks are hot-plug.
- Includes standard 12TB disks per node
 These would be the models that we would really have to acquire if we want to have an enterprise, supported, and scalable storage object. It is probable that in some of your cases, you are already using them or you have them in your Datacenter.
Dell EMC ECS CE at a Glance
Dell EMC has made the gesture of releasing all their Dell EMC ECS work into GitHub, which you can find here. And it has not only released the source code that displays on the Hardward shown above, offering a commercial and enterprise version. They also maintain an Open Source version ready for us to deploy on any hardware, whether on-prem, cloud, baremetal or virtualized, or containers. Best of all, they have an OVA version, ready to download.
Of course, please keep in mind that this version of Dell EMC ECS CE, Community Edition, is that, an unsupported edition, perfect for small tests and environments, but we should refrain from using it in production by actually storing TB or PB data.
ECS Community Edition is a small, free version of Dell EMC ECS software. Of course, this means that there are some limitations on the use of the software, so the question arises: How is the ECS Community Edition different from the production version?
Basically, Dell EMC ECS cannot be used in production environments, it can only be used in labs, etc. Additionally, at the functionality level:
- ECS Community Edition does NOT support encryption
- ECS Community Edition DOES NOT include the ECS’ system management layer, or “fabric”.
In this image we can see a little more about the components of Dell EMC ECS, we see that Dell EMC ECS Ce does not include the Fabric layer: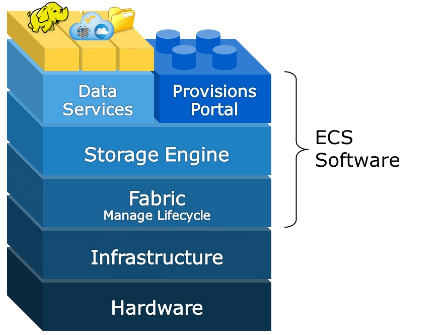
System Requirements for Dell EMC ECS CE
Dell EMC ECS CE can grow as much as we want, has no limit, no space, no nodes. However, we will have to clone the nodes using the first image we display, the download requirements are as follows:
- 8 vCPU
- 64GB RAM
- 16GB for operating system
- 1TB additional for storage
- CentOS Minimal installation using the latest Release of CentOS (not necessary if using OVA)
You can start with about 16GB of RAM if you want, but I recommend giving more RAM if you want to use this appliance for months, or years.
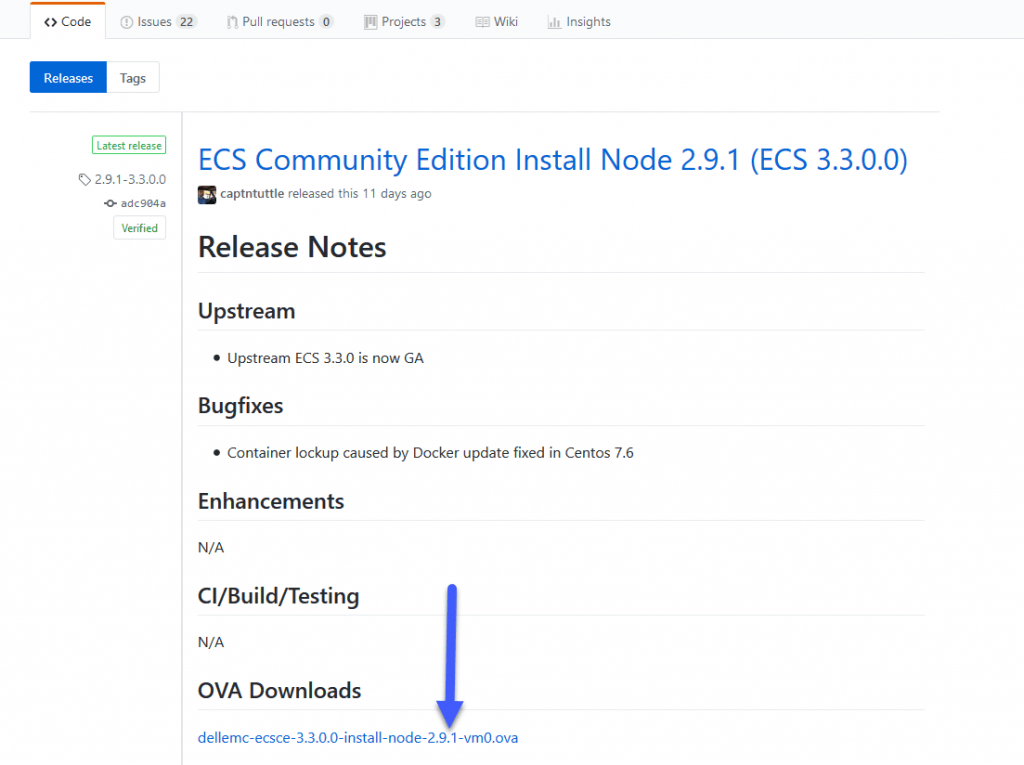
We can download the OVA image from here, without registration or anything:
Dell EMC ECS CE OVA Deployment over VMware vSphere 6.7 U2
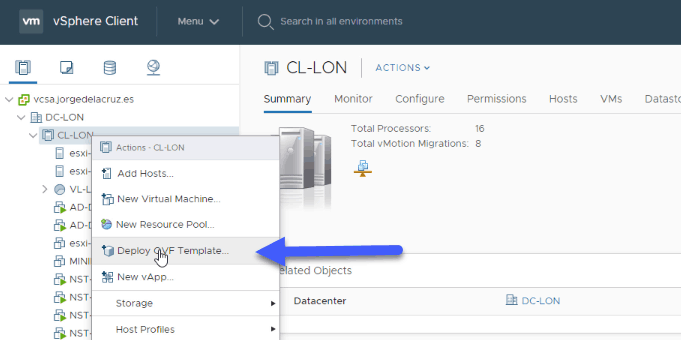
Let’s see the steps we need to follow in VMware to deploy the appliance. We’ll start by going to our Cluster, Right Click and Deploy OVF Template:
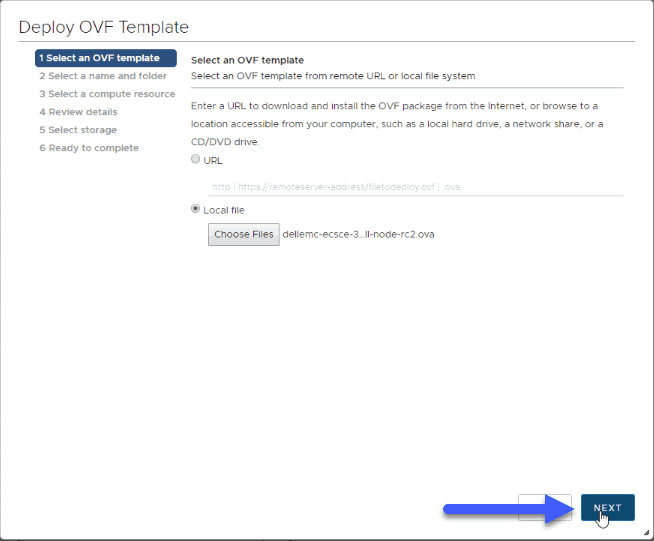
 We will select the OVA file that we have downloaded from GitHub, in my case version 3.3.0, which came out very little:
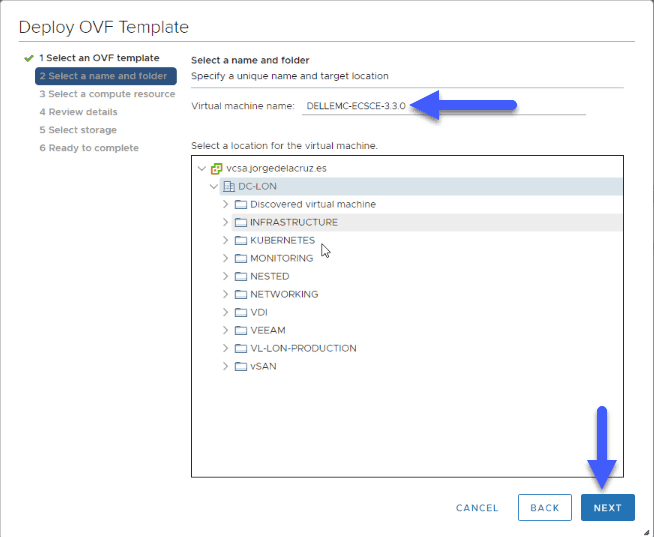
 We will select a name for our VM:
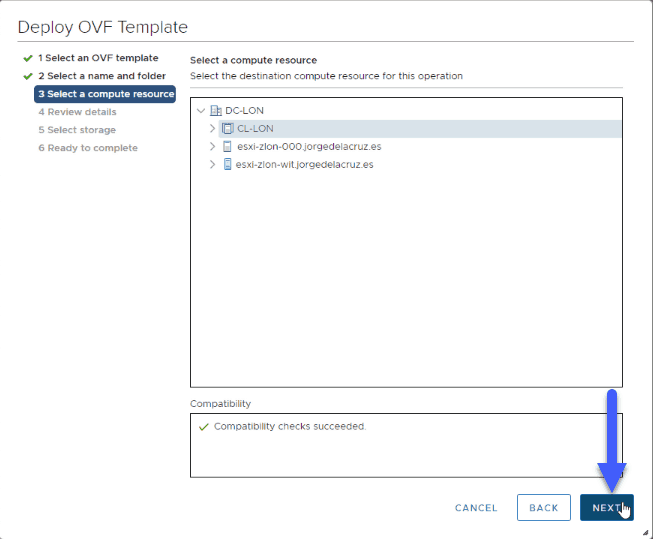
 A compute resource where to run it, in my case my cluster:
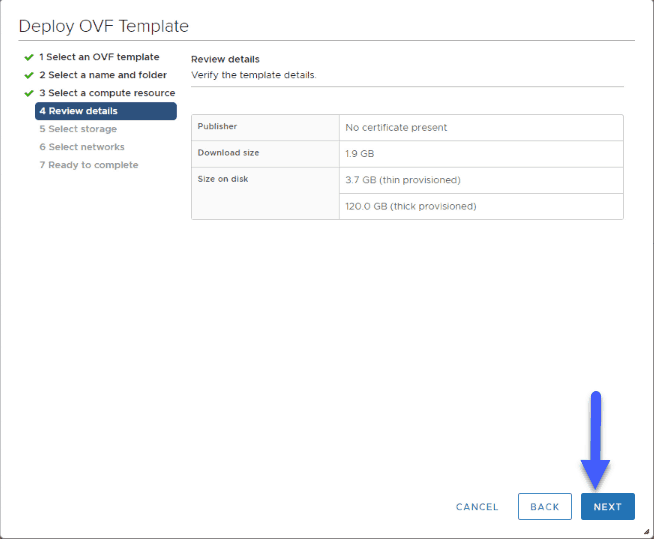
  We can see that will deploy a disk of 3.7GB for the operating system, and 120GB for data:
 In my case I have released everything to my vSAN, which has a very good performance:
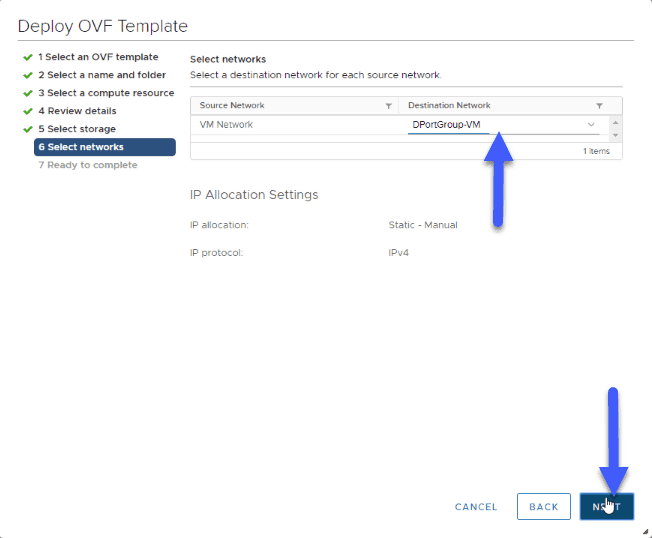
  We will select the network where we want to launch this VM:
 And finally we’ll see the summary and click Finish:
  The process of deploying the OVA will take more or less depending on our disks and network latency from our PC to the VMware Cluster:
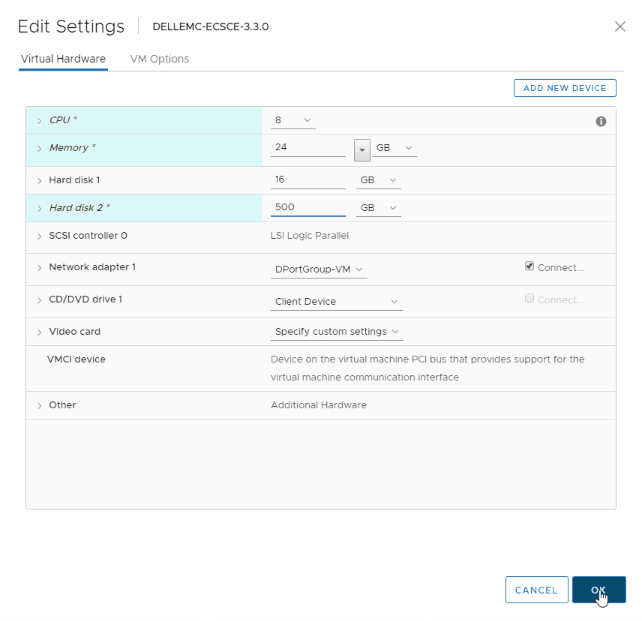
 Finally, and before turning on the VM, I’m going to edit the resources so that they resemble the recommended requirements I’ve left you above:
Everything would be ready, we can do a snapshot right now in case we need to go back.
Configuring Dell EMC ECS CE OVA
Although it is true that the configuration is not complicated, it requires that the steps be executed in order and with control, let’s get to it.
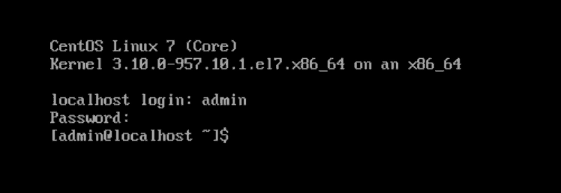
First, we will connect through the VMware console and access with the admin user and ChangeMe password:
 Once inside, the first thing is to configure the network card, for it we will launch the following command:
sudo nmtui
And we’ll take care of giving an IP, configuring the DNS and the gateway: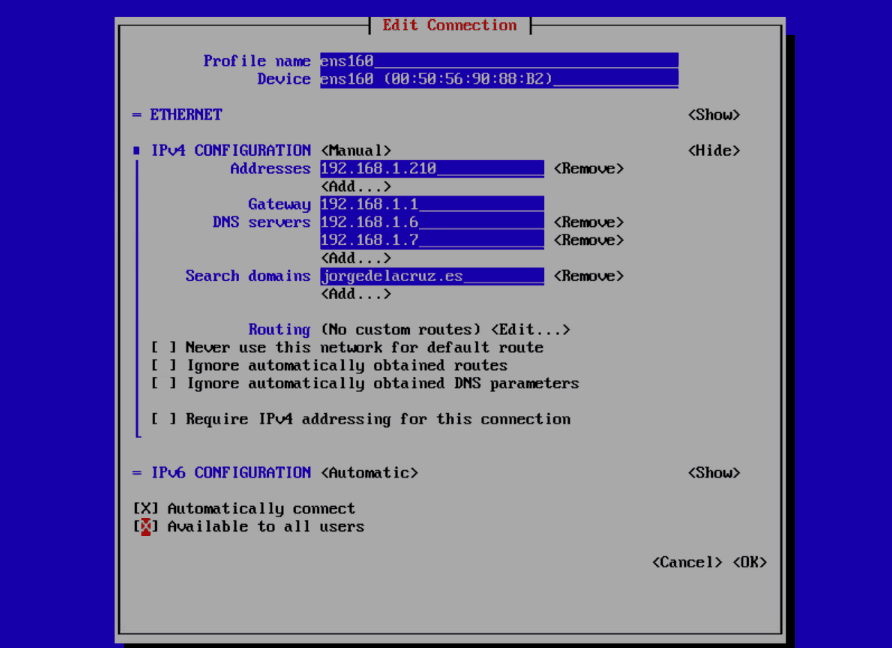 Also, I recommend you to configure the hostname, if possible not to use neither – nor _, better all together:
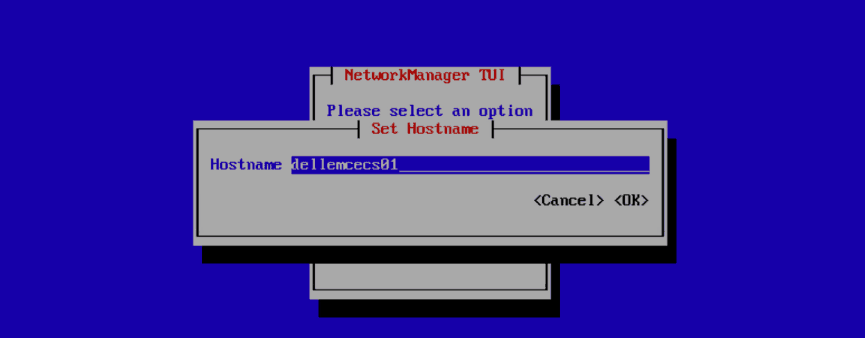
Now that we have network configuration, and before restarting, we will have to do a yum update:
yum update
Once we accept and finish installing all the updates, there are enough, we can do a reboot:
reboot
We are now ready to start with the fat configuration, again, and this time for SSH if you want, as admin/ChangeMe we will go to the ECS folder that we have in our home:
cd ECS-CommunityEdition/
There we will edit our deploy.yml file with your favorite editor, in my case I saw, the important thing is to configure our IP, accept the EULA, etc, I leave you a summary of what I have touched:
install_node: 192.168.1.210
#####
  node_defaults:
    dns_domain: jorgedelacruz.es
    dns_servers:
      - 192.168.1.6
    ntp_servers:
      - 0.uk.pool.ntp.org
#####
  storage_pool_defaults:
    is_cold_storage_enabled: false
    is_protected: false
    description: Default storage pool description
    ecs_block_devices:
      - /dev/sdb
#####
    - name: sp1
      members:
        - 192.168.1.210
      options:
        is_protected: false
        is_cold_storage_enabled: false
        description: My First SP
        ecs_block_devices:
          - /dev/sdb
#####
Basically I’ve changed the default IP to mine, I’ve put my DNS, an NTP server, as well as using /dev/sdb which is my secondary disk to be used for the storage pool.
Once you are sure that you have everything changed, we will execute the following command:
update_deploy /home/admin/ECS-CommunityEdition/deploy.yml
Now that we have updated the path of the file we want to use to deploy our Dell EMC ECS, we will execute the following command:
videploy
The whole environment will start to deploy, and we’ll see something similar to this, if we don’t have any errors, everything will have gone well:
TASK [installer_generate_ssh_keys : Installer | Generate RSA Keypair] ********************************************************************************************************************************************
TASK [installer_generate_ssh_keys : Installer | Check ed25519 Keypair] *******************************************************************************************************************************************
TASK [installer_generate_ssh_keys : Installer | Generate ed25519 Keypair] ****************************************************************************************************************************************
TASK [installer_generate_ssh_keys : Installer | Fail when no crypto selected] ************************************************************************************************************************************
TASK [installer_generate_ssh_keys : Installer | Ensure directory permissions on ssh keystore] ********************************************************************************************************************
[1;34mok: [localhost] => (item=/opt/ssh/id_rsa)[0m
[1;34mok: [localhost] => (item=/opt/ssh/id_rsa)[0m
PLAY [CentOS 7 | Setup SSH on install node] **********************************************************************************************************************************************************************
Once the deploy is finished, we are ready to launch the command ova-step1, as follows:
ova-step1
This step will launch the whole environment, the last steps I have seen are the following:
TASK [common_purge_cleanup : Common | Purge node caches] *********************************************************************************************************************************************************
TASK [common_purge_cleanup : Common | Create ecs-install host directory on nodes] ********************************************************************************************************************************
TASK [common_purge_cleanup : Common | Create ecs-install cache directory on nodes] *******************************************************************************************************************************
PLAY RECAP *******************************************************************************************************************************************************************************************************
[1;36m192.168.1.210[0m              : [1;34mok=14  [0m [1;36mchanged=11  [0m unreachable=0    failed=0

Playbook run took 0 days, 0 hours, 0 minutes, 28 seconds
The same as before, if we have not seen any error that has caused it to hang, or stop dry, we are ready for step 2, as simple as an ova-step2:
ova-step2
This step takes time, enough, I leave you the output of my step so that you can see if you get stuck in any of them:
> Pinging Management API Endpoint until ready
> Pinging endpoint 192.168.1.210... (CTRL-C to break)
> WAIT: API service is not alive. This is likely temporary.
> WAIT: API service is not alive. This is likely temporary.
> WAIT: API service is not alive. This is likely temporary.
> WAIT: API service is not alive. This is likely temporary.
> WAIT: API service is not alive. This is likely temporary.
> WAIT: API service is not alive. This is likely temporary.
> WAIT: API service is not alive. This is likely temporary.
> WAIT: API service is not alive. This is likely temporary.
> WAIT: API service is not alive. This is likely temporary.
> WAIT: API service is not alive. This is likely temporary.
> WAIT: API service is not alive. This is likely temporary.
> WAIT: API service is not alive. This is likely temporary.
> WAIT: API service is not alive. This is likely temporary.
> WAIT: API service is not alive. This is likely temporary.
> WAIT: API service is not alive. This is likely temporary.
> WAIT: ECS API internal error. If ECS services are still bootstrapping, this is likely temporary.
> WAIT: ECS API internal error. If ECS services are still bootstrapping, this is likely temporary.
> WAIT: api_endpoint=192.168.1.210 username=root dt_query fail: 'total_dt_num'
> PONG: api_endpoint=192.168.1.210 username=root diag_endpoint=192.168.1.210 dt_total=0 dt_unready=0 dt_unknown=0

> Installing licensing in ECS VDC(s)
> Using default license
> Adding licensing to VDC: vdc1
>   OK
> Added default license to ECS

> Pinging Management API Endpoint until ready
> Pinging endpoint 192.168.1.210... (CTRL-C to break)
> PONG: api_endpoint=192.168.1.210 username=root diag_endpoint=192.168.1.210 dt_total=0 dt_unready=0 dt_unknown=0

> Creating Storage Pool: vdc1/sp1
>   OK
> Adding Data Stores to Storage Pool:
>   vdc1/sp1/192.168.1.210

> Pinging Management API Endpoint until ready
> Pinging endpoint 192.168.1.210... (CTRL-C to break)
> PONG: api_endpoint=192.168.1.210 username=root diag_endpoint=192.168.1.210 dt_total=384 dt_unready=0 dt_unknown=0

> Creating all VDCs...
>   vdc1
> Created all VDCs

> Waiting for all VDCs to online and become active...
> Checking vdc1:
>   WAIT: VDC still onlining...
> Retrying...
> Checking vdc1:
>   OK: VDC online

> Pinging Management API Endpoint until ready
> Pinging endpoint 192.168.1.210... (CTRL-C to break)
> PONG: api_endpoint=192.168.1.210 username=root diag_endpoint=192.168.1.210 dt_total=416 dt_unready=0 dt_unknown=-1

> Creating replication group rg1
>   Generating zone mappings for rg1/vdc1
>   sp1
>   Applying mappings
>   OK
> Created all Replication Groups

> Pinging Management API Endpoint until ready
> Pinging endpoint 192.168.1.210... (CTRL-C to break)
> PONG: api_endpoint=192.168.1.210 username=root diag_endpoint=192.168.1.210 dt_total=416 dt_unready=0 dt_unknown=-1

> Creating all configured management users:
>   admin1
>   monitor1
> Created all configured management users

> Pinging Management API Endpoint until ready
> Pinging endpoint 192.168.1.210... (CTRL-C to break)
> PONG: api_endpoint=192.168.1.210 username=root diag_endpoint=192.168.1.210 dt_total=416 dt_unready=0 dt_unknown=0

> Creating all Namespaces
> Adding namespace ns1
>   OK
> Created all configured namespaces

> Pinging Management API Endpoint until ready
> Pinging endpoint 192.168.1.210... (CTRL-C to break)
> PONG: api_endpoint=192.168.1.210 username=root diag_endpoint=192.168.1.210 dt_total=416 dt_unready=0 dt_unknown=0

> Creating all configured object users:
> Creating all object users
> Creating 'object_admin1' in namespace 'ns1'
>   Waiting for 'object_admin1' to become editable
>   OK
>   Adding object_admin1's S3 credentials
>   Adding object_admin1's Swift credentials
> Creating 'object_user1' in namespace 'ns1'
>   Waiting for 'object_user1' to become editable
>   OK
>   Adding object_user1's S3 credentials
>   Adding object_user1's Swift credentials
> Created all configured object users

> Pinging Management API Endpoint until ready
> Pinging endpoint 192.168.1.210... (CTRL-C to break)
> PONG: api_endpoint=192.168.1.210 username=root diag_endpoint=192.168.1.210 dt_total=416 dt_unready=0 dt_unknown=0

> Creating all buckets
> Creating bucket: bucket1
>   OK
> Created all configured buckets
When we see that everything has been created satisfactorily, we can go to our https://DELLEMCECSCEIP with user root/ChangeMe to access: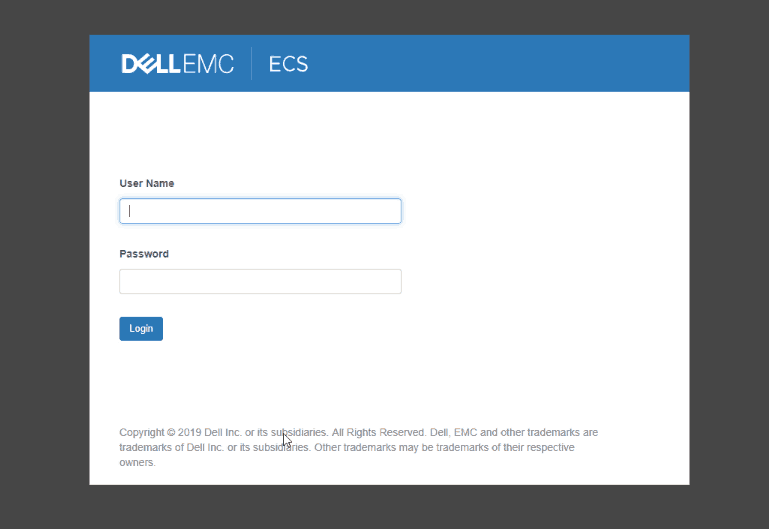 Of course the first step will be to change the root pass:
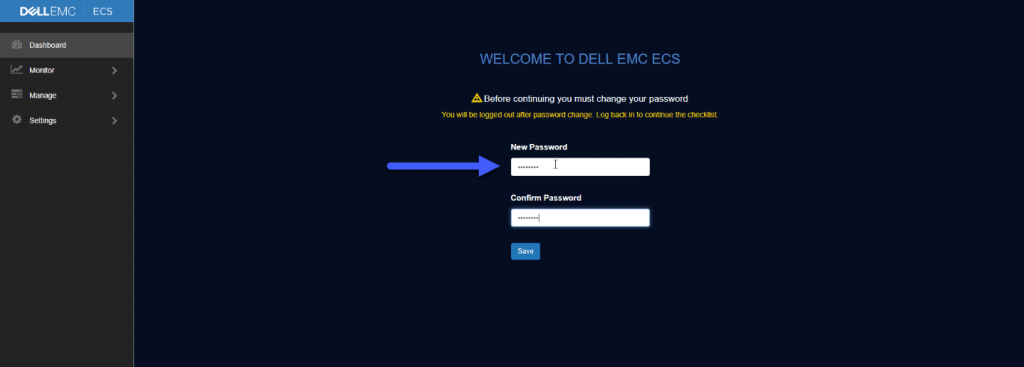 Once we have changed it, and do relogin, we can see the powerful Dashboard:
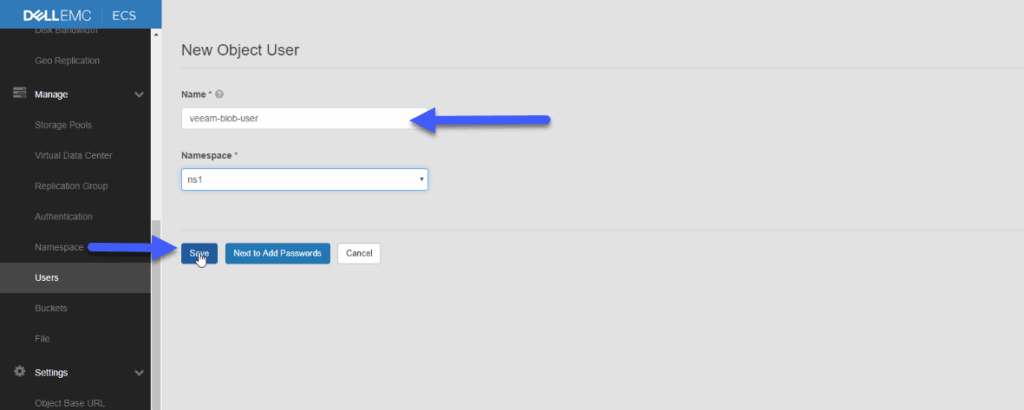
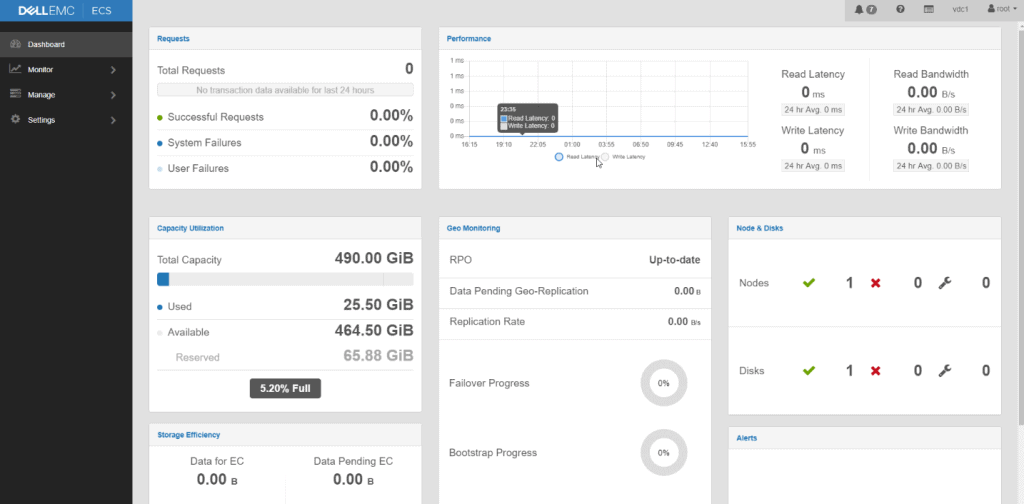 As well as for example to create a new user to be used later with Veeam:
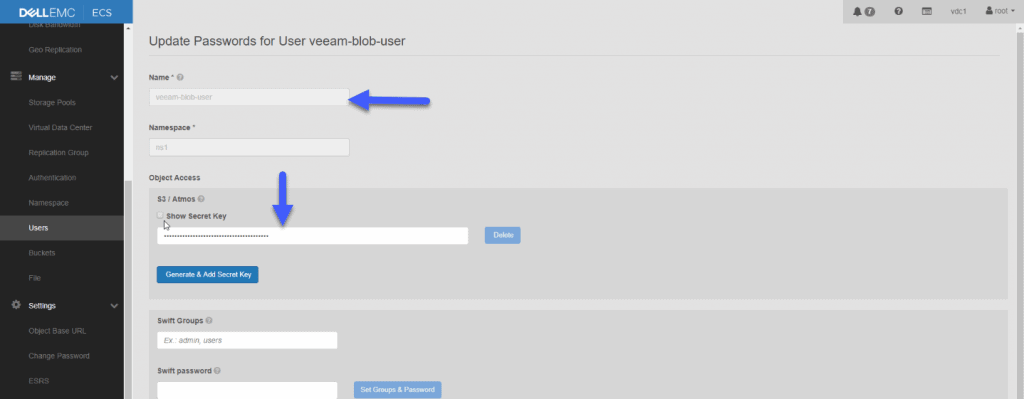
 Remember that we can create as many namespaces as we want, these would be the resources for each tenant, also as many users as we want within namespace. We should write down the password also to be able to connect later with that user:
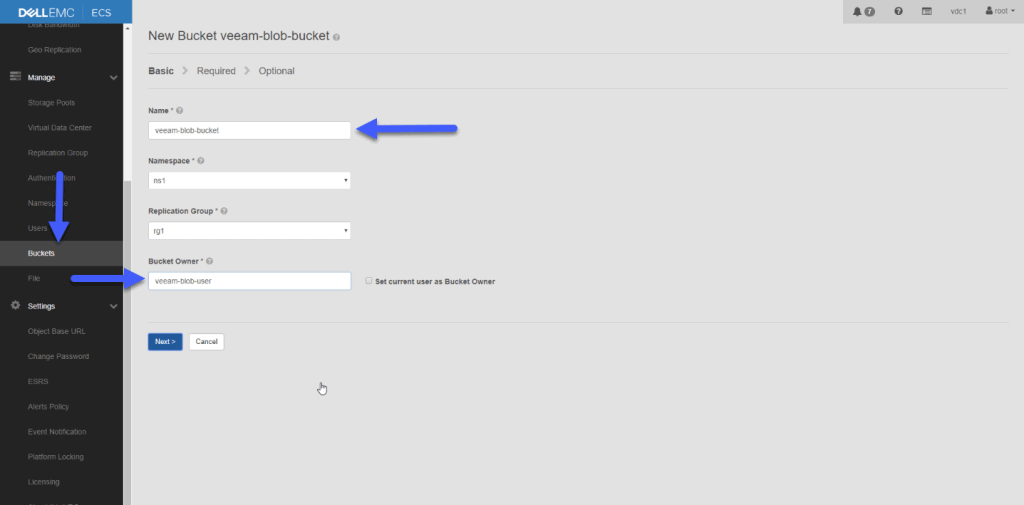
 Once we have the user, we are going to create a bucket that we will associate to this new user:
 We would have everything ready and configured to start sending backups to this Object Storage.
Object Storage Repository and Cloud/Capacity Tier configuration in Veeam Backup & Replication v9.5 U4
Finally we would only have the Veeam configuration, remember that we can only send files that are complete, that their string is not open, for example from a Backup Copy Jobs string, those that are closed are the GFS that are created with the retention we select, in my case 4 Weekly, 12 Monthly and 1 Yearly, so that the files that comply with GFS and have been created, being full, are perfect to send.
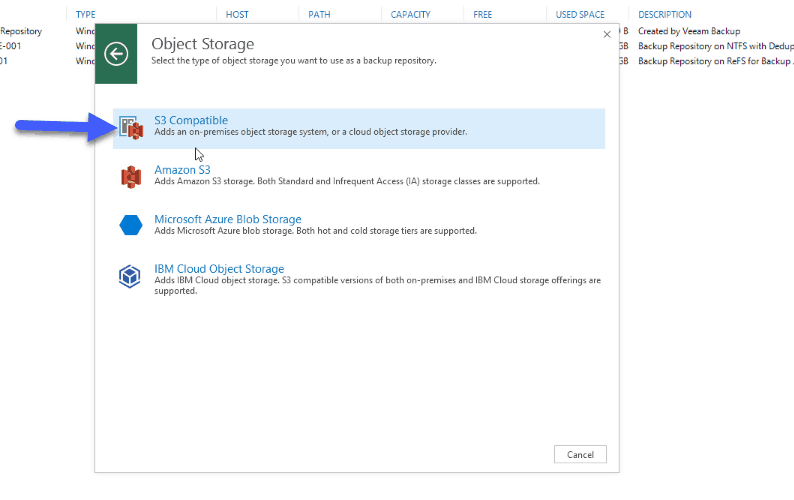
We will start by creating an Object Storage Backup Repository, pointing to this Dell EMC ECS CE: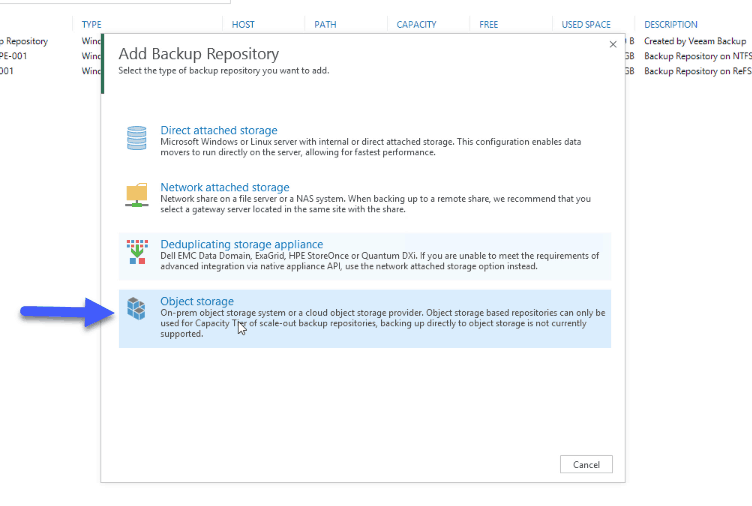 Select S3 Compatible:
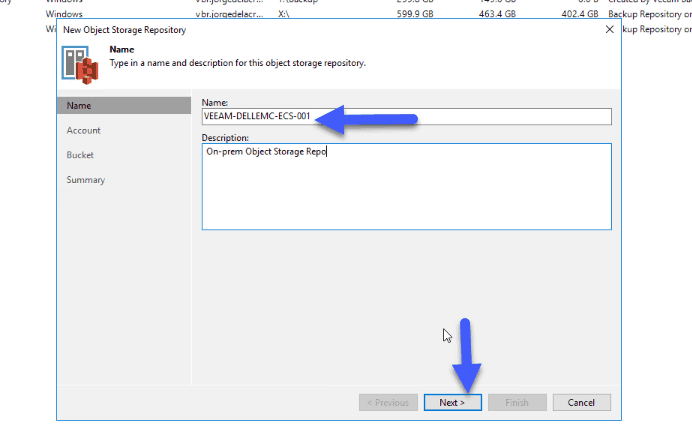
  Introduce a name for our repository:
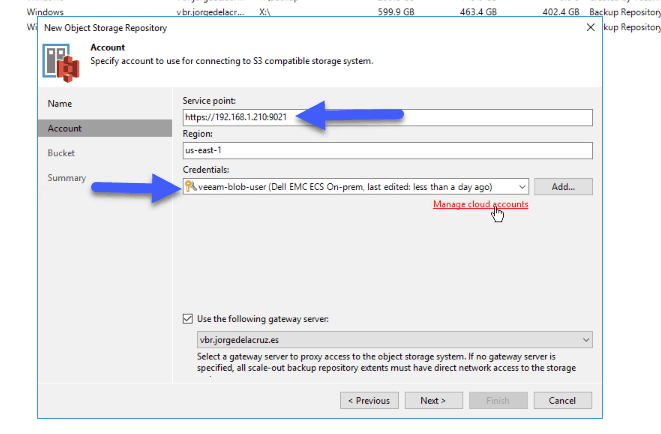
  Introduce now the Service point, for Dell EMC ECS is https://YOURIP:9021, the region is left as it is, and make sure we have the credentials we have created previously:
  We will see the Object Storage bucket, we will have to create a folder:
 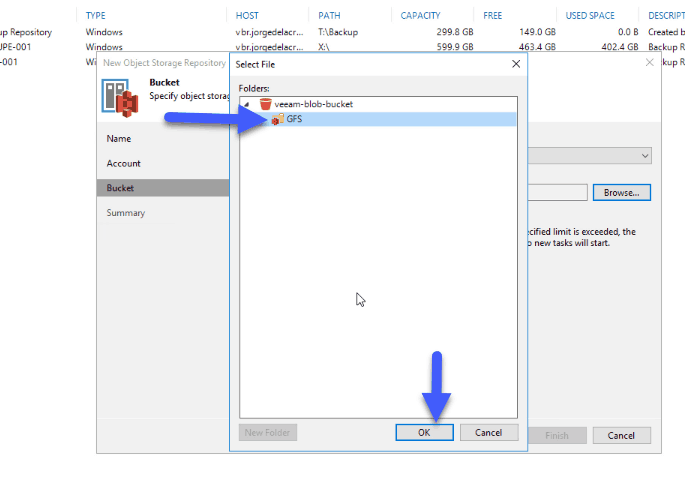 Once we have everything ready, we will click Finish:
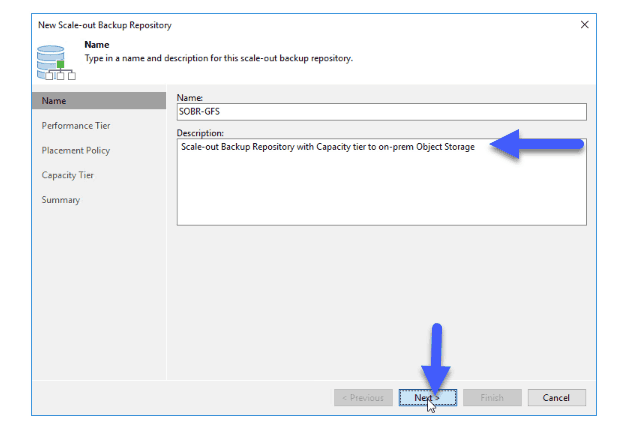
  The next and last step is to create a Scale-out Backup Repository, where we will combine local repositories, with Object Storage repositories, which is where we will make the Capacity Tier, we will make next:
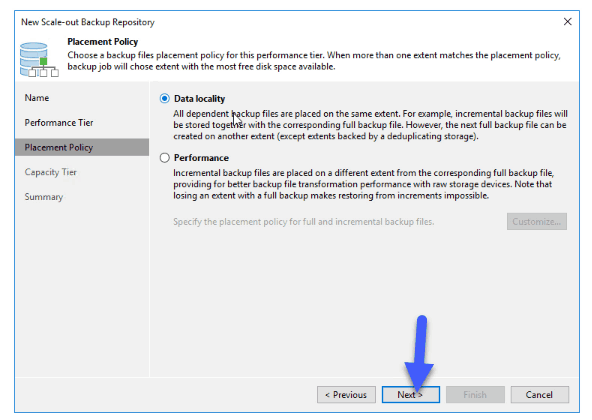
  We will select from Performance Tier a repository where we will have GFS copies, and we will leave the policy in Data Locality:
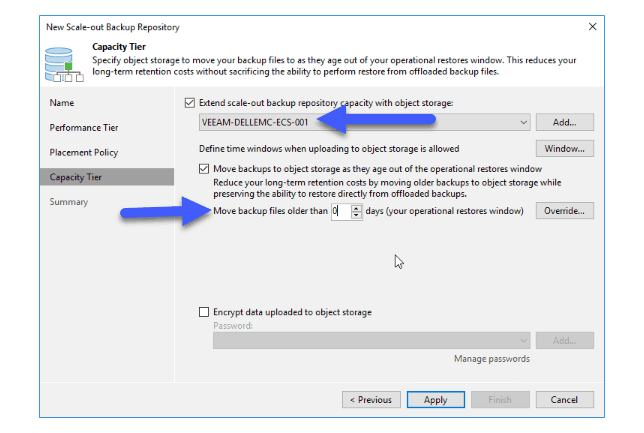
  We will select in Capacity Tier the Object Storage Repository, and in my case I want to send everything that is already sealed and that is older than 0 days, this means that if it is Saturday and the weekly is created by policy, in a range of about four hours maximum this copy will be sent to this object storage:
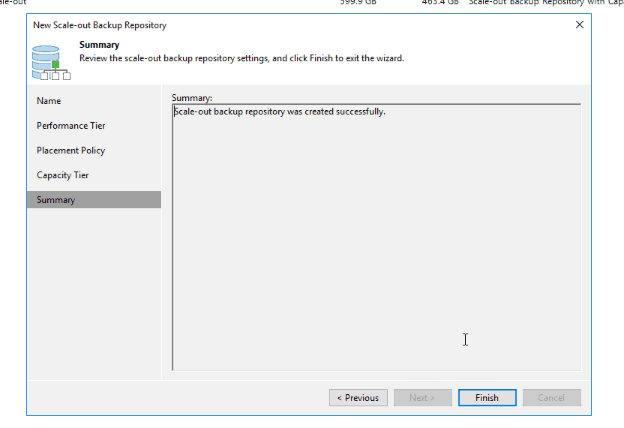
 If everything is OK we will click on Finish:
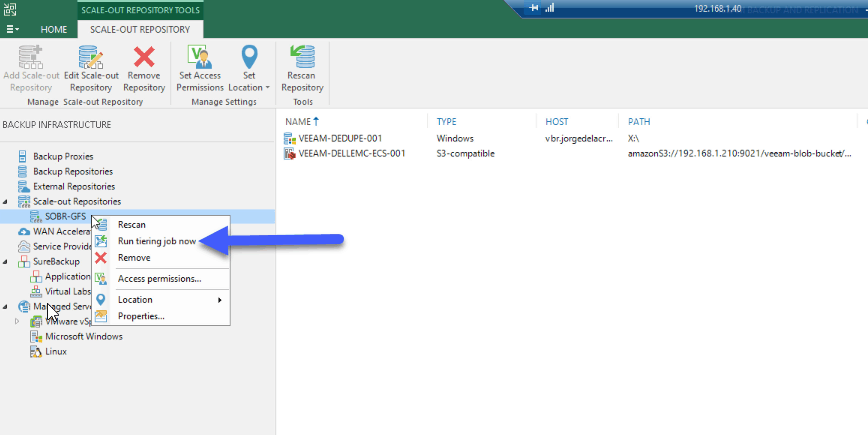
  Finally, we will do CTRL + Right button and I will execute the work manually, because I want to send everything to my object storage:
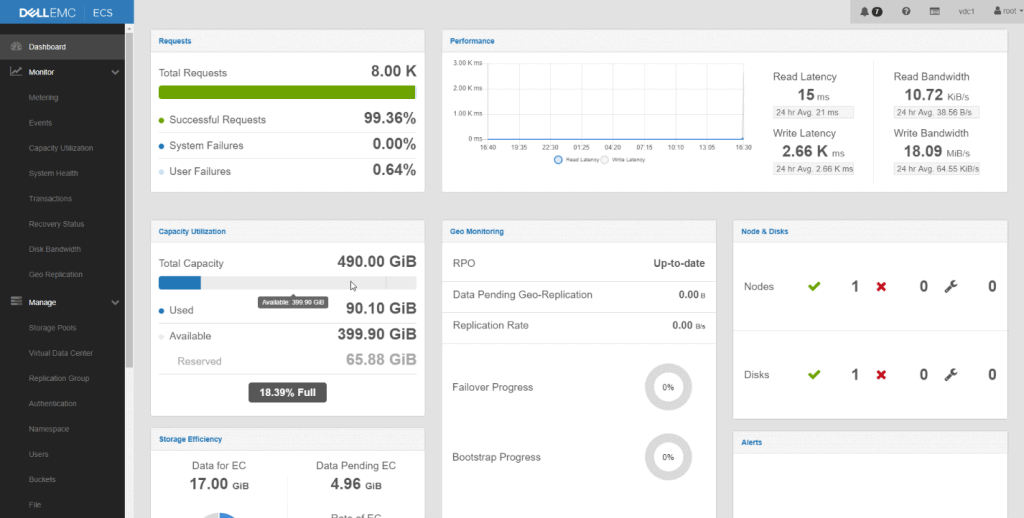
  The work will begin, and since we have the Object Storage in our network, the performance is really powerful, is another of the advantages, apart from security, data protection, and so on. If we go back to our Dell EMC ECS CE Dashboard we will be able to see the space consumption and the performance graph we will also be able to see how it moves.
  That’s all friends, I hope you like it, that you think about creating your own Object Storage in your labs for free and very powerful with Dell EMC ECS CE and that I left comments on the article.


Can this tiering to AWS S3? or Glacier
Hello,
Veeam can for sure, so instead of tier to this on-prem Dell EMC ECS, you can tier directly to AWS S3, or AWS SE-IA, not Glacier for now, no.
Cheers
Hello Jorgeuk,
Thanks for this awesome post. I have a single node OVA installation of ECS-CE, can I add another data node to it to expand storage.
Hello Mo,
My understanding is that yes, you can add more and extend it, but will need to take a look.
Thanks for your quick reply,
I found that we can not add more nodes to an ECS-CE regarding lack of Fabric layer.
https://github.com/EMCECS/ECS-CommunityEdition/issues/471
https://github.com/EMCECS/ECS-CommunityEdition/issues/408
https://github.com/EMCECS/ECS-CommunityEdition/issues/286
In ova_step1 stuck on set the clock process. If i terminate the process by Ctrl+C
then ova_step1 is successful but ova_step2 fails. I already wait for 4h but still stuck on set the clock process
Hello Mahade, that is very strange. Have you opened a community thread on the Dell Forums mate?
Let me know