
 Greetings friends, the other day I showed you how to deploy FreeNAS 11.x on a vSphere environment, which can be perfectly reproduced in Hyper-V, or in any other Hypervisor or physical, or in Cloud.
One of the most important things in this type of cases, is to have security when we activate space sharing services, whether FTP, Object Storage, etc.. That’s why today, we’re going to see how to deploy a Let’s Encrypt SSL Certificate over FreeNAS 11.x.
SSH connection to our FreeNAS 11.x
The first step will be to be able to access our FreeNAS via SSH, for this we will go to the services part, and in SSH, we will click on Actions to edit the options: Several options here, the most important in my case is to allow root login, since I have no more users:
 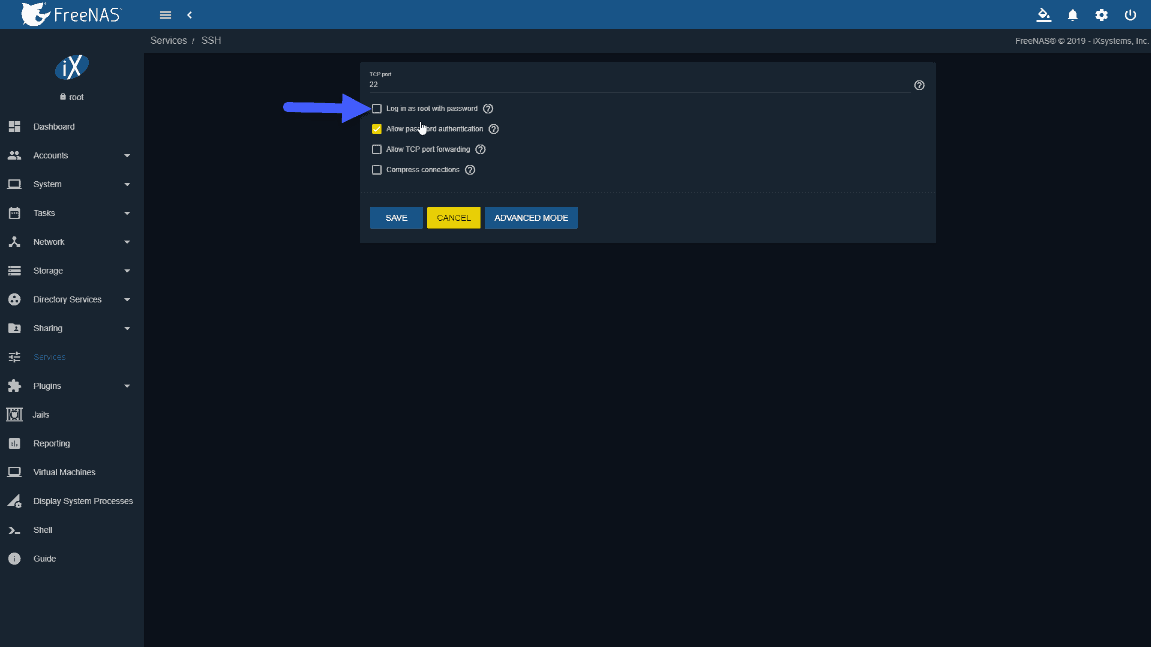 Once we have the configuration as we want, we will enable the service and also tell it to start automatically, if we want to access often by SSH, not really recommended:
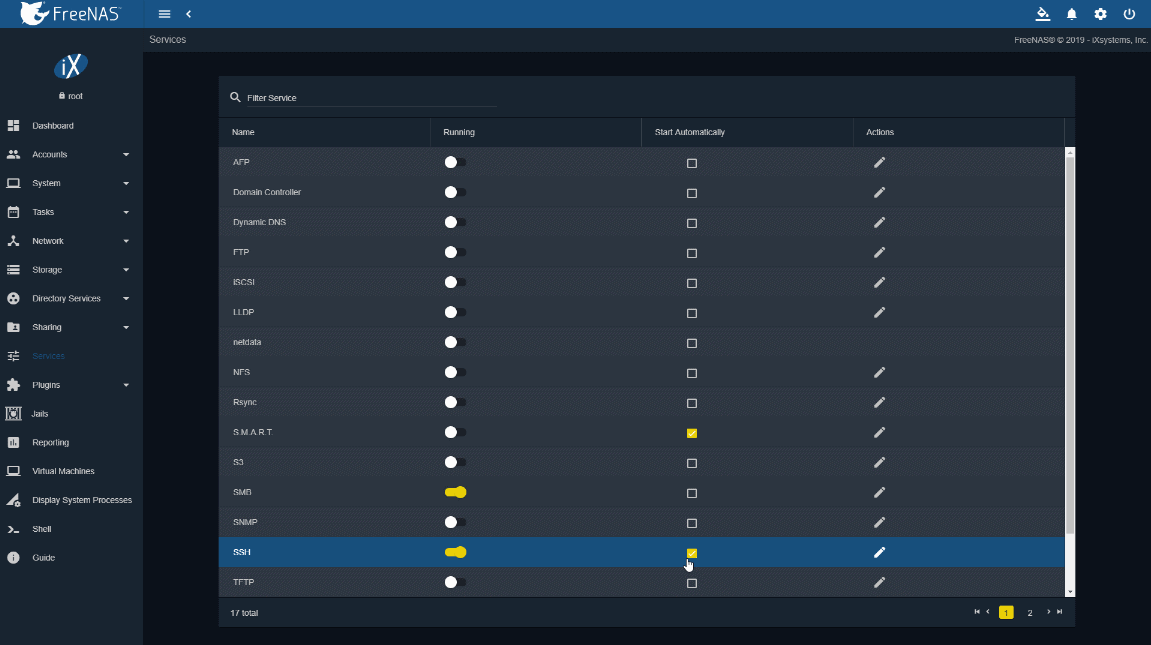
Installing Let’s Encrypt packages and requesting our SSL certificate
Once we are connected by SSH, we will download the acme package, which allows us to automate calls to Let’s Encrypt:
curl https://get.acme.sh | sh
In addition, we will download the following GitHub repository that contains the script that allows us to do this automatically, thanks to Danb35:
git clone https://github.com/danb35/deploy-freenas
Once downloaded everything, we will have to edit the file called deploy_config.example and rename it to deploy_config, to the document we will have to add our password, and that will be the only change we will make.
cp /root/deploy-freenas/deploy_config.example /root/deploy-freenas/deploy_config
nano /root/deploy-freenas/deploy_config
Now that we have almost everything ready, we will return to the main root folder and launch the following commands, in my case I am using CloudFlare for my domain, so we can obtain an SSL certificate very easily using DNS authentication, which this script does automatically, we must know our FQDN for our FreeNAS, in my case freenas.jorgedelacruz.es:
cd /root
bash
export CF_Key="NUESTRAKEYDECLOUDFLARE"
export CF_Email="[email protected]" # The email address we use in CloudFlare
.acme.sh/acme.sh --issue -d ELFQDNDETUFREENAS --dns dns_cf --reloadcmd "/root/deploy-freenas/deploy_freenas.py"
To know your Cloudflare Key, here where you can find it:
Once we launch this command well, we can see a result similar to this one:
[Sat Aug  3 09:44:15 PDT 2019] Create account key ok.
[Sat Aug  3 09:44:15 PDT 2019] Registering account
[Sat Aug  3 09:44:16 PDT 2019] Registered
[Sat Aug  3 09:44:17 PDT 2019] ACCOUNT_THUMBPRINT='uYM'
[Sat Aug  3 09:44:17 PDT 2019] Creating domain key
[Sat Aug  3 09:44:17 PDT 2019] The domain key is here: /root/.acme.sh/freenas.jorgedelacruz.es/freenas.jorgedelacruz.es.key
[Sat Aug  3 09:44:17 PDT 2019] Single domain='freenas.jorgedelacruz.es'
[Sat Aug  3 09:44:17 PDT 2019] Getting domain auth token for each domain
[Sat Aug  3 09:44:17 PDT 2019] Getting webroot for domain='freenas.jorgedelacruz.es'
[Sat Aug  3 09:44:18 PDT 2019] Adding txt value: gr-ctRr for domain:  _acme-challenge.freenas.jorgedelacruz.es
[Sat Aug  3 09:44:19 PDT 2019] Adding record
[Sat Aug  3 09:44:20 PDT 2019] Added, OK
[Sat Aug  3 09:44:20 PDT 2019] The txt record is added: Success.
[Sat Aug  3 09:44:20 PDT 2019] Let's check each dns records now. Sleep 20 seconds first.

[1;31;32m0[0m
[Sat Aug  3 09:44:42 PDT 2019] Checking freenas.jorgedelacruz.es for _acme-challenge.freenas.jorgedelacruz.es
[Sat Aug  3 09:44:42 PDT 2019] Domain freenas.jorgedelacruz.es '_acme-challenge.freenas.jorgedelacruz.es' success.
[Sat Aug  3 09:44:42 PDT 2019] All success, let's return
[Sat Aug  3 09:44:42 PDT 2019] Verifying: freenas.jorgedelacruz.es
[Sat Aug  3 09:44:45 PDT 2019] [1;31;32mSuccess[0m
[Sat Aug  3 09:44:45 PDT 2019] Removing DNS records.
[Sat Aug  3 09:44:45 PDT 2019] Removing txt: gr-ctRr for domain: _acme-challenge.freenas.jorgedelacruz.es
[Sat Aug  3 09:44:46 PDT 2019] Removed: Success
[Sat Aug  3 09:44:46 PDT 2019] Verify finished, start to sign.
[Sat Aug  3 09:44:46 PDT 2019] Lets finalize the order, Le_OrderFinalize: https://acme-v02.api.letsencrypt.org/acme/finalize/6270/8308
[Sat Aug  3 09:44:48 PDT 2019] Download cert, Le_LinkCert: https://acme-v02.api.letsencrypt.org/acme/cert/0311
[Sat Aug  3 09:44:49 PDT 2019] [1;31;32mCert success.[0m
-----BEGIN CERTIFICATE-----
MIIFaDCCBFCgAwIBAgISAxHnDytpXEcvMstuUfbEFWbEMA0GCSqGSIb3DQEBCwUA
ME...
qzyM8YsqdEMSRMkUsPc1WH9gGzyWb1y8L8hzPajy9KZtKe9GwyFWtvpWwUo=
-----END CERTIFICATE-----
[Sat Aug  3 09:44:49 PDT 2019] Your cert is in /root/.acme.sh/freenas.jorgedelacruz.es/freenas.jorgedelacruz.es.cer
[Sat Aug  3 09:44:49 PDT 2019] Your cert key is in /root/.acme.sh/freenas.jorgedelacruz.es/freenas.jorgedelacruz.es.key
[Sat Aug  3 09:44:49 PDT 2019] The intermediate CA cert is in  /root/.acme.sh/freenas.jorgedelacruz.es/ca.cer
[Sat Aug  3 09:44:49 PDT 2019] And the full chain certs is there: /root/.acme.sh/freenas.jorgedelacruz.es/fullchain.cer
[Sat Aug  3 09:44:49 PDT 2019] Run reload cmd: /root/deploy-freenas/deploy_freenas.py
Certificate import successful
Certificate list successful
Setting active certificate successful
[Sat Aug  3 09:44:51 PDT 2019]
[1;31;32m Reload success
We see how the script has taken care of everything, from creating the DNS entry, to making the request to Let’s Encrypt, downloading the SSL, and including it in the paths for FreeNAS to see.
Change the interface of FreeNAS 11.x to be accessible only from HTTPS
We will go through HTTP and FQDN or IP to our FreeNAS, up to System – General, and change the interface to HTTPS and select Let’s Encrypt SSL Certificate: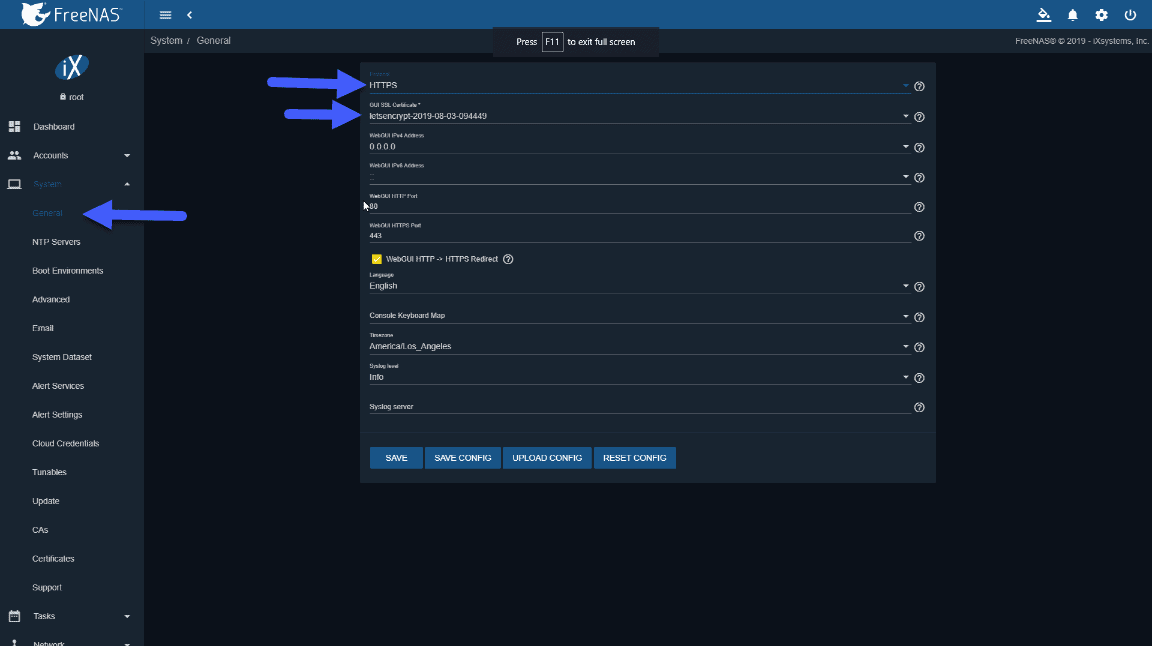 Once we have saved the changes, access by HTTPS://TUNOMBREDEFREENAS.TUDOMINIO.COM and we can see the long-awaited green padlock, if we explore we can see that is a valid SSL certificate:
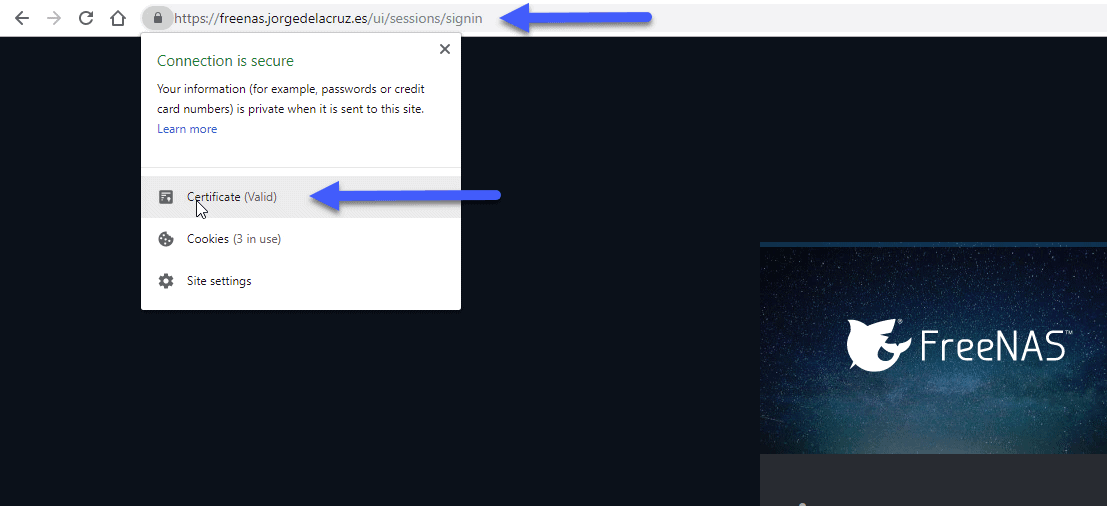 If we want to see the details, here we can see the FQDN that I use with my valid SSL.
 Congratulations! We have everything ready and securely to start offering NAS services securely, I hope you like the article.
I leave you the whole menu with the entries on FreeNAS:
- FreeNAS: Initial installation and configuration of FreeNAS 11.x as VM within vSphere
- FreeNAS: Enable and configure Object Storage in FreeNAS 11.x compatible with S3 APIs – Based on MinIO
- FreeNAS: How to Deploy a Let’s Encrypt SSL Certificate in FreeNAS 11.x and HTTPS Configuration
- FreeNAS: Configure Veeam Backup Repository Object Storage connected to FreeNAS (MinIO) and launch Capacity Tier
i have ran the script but it keeps saying :
FileNotFoundError: [Errno 2] No such file or directory: ‘/root/.acme.sh/freenas.local/freenas.local.key’
[Thu Dec 5 12:23:01 PST 2019] Reload error for :
Please help
p.s. i am a freenas and shell rookie
Worked like a charm. Thanks.
I have installed several jails in FreeNAS 11.3.
How can I connect to them via https?
Thank you
Well done.
This is working with gcloud
You just have to add a zone https://cloud.google.com/dns/zones
Then # /root/.acme.sh/acme.sh –issue –dns dns_gcloud -d albandrieu.com -d ‘*.albandrieu.com’ –reloadcmd “/root/deploy-freenas/deploy_freenas.py”
Awesome, really great to know, cheers!
I am a complete novice and new to FreeNAS. I use easyDNS. I believe that I have followed everything correctly, but I am not able to view or import the certificate within FreeNAS GUI. This appears to be as far as I can get….
[Fri May 22 14:20:35 PDT 2020] Your cert is in /root/.acme.sh/123.com/123.com.cer
[Fri May 22 14:20:35 PDT 2020] Your cert key is in /root/.acme.sh/123.com/123.com.key
[Fri May 22 14:20:35 PDT 2020] The intermediate CA cert is in /root/.acme.sh/123.com/ca.cer
[Fri May 22 14:20:35 PDT 2020] And the full chain certs is there: /root/.acme.sh/123.com/fullchain.cer
[Fri May 22 14:20:35 PDT 2020] Run reload cmd: /root/deploy_freenas.py
/root/.acme.sh/acme.sh: line 5291: /root/deploy_freenas.py: No such file or directory
Do you know what I may have done wrong?
Hello Ryan,
Once you ran the script, it should autoadded it to the GUI, you can anyways double check your SSL certificate on the GUI under Administration, can see you it there?
It is not there in certificates. Only freenas_default exists.
Did the acme.sh finished properly? Paste the output please, you can omit your domain, etc.
Hello Jorge,
Firstly thank you for your amazing guide it has helped me set this up and has worked great for ages.
I am seeing an error when reloading the SSL certificate.
The certificate renews and when I re run the command it shows that it does not need to renew for another 2 months (as expected)
The SSL certificate is in the file when going in via SSH but it does not get added to the UI and it does not get used by the Web portal.
I have the full log here – https://docs.google.com/document/d/1CD-ezDhVwQlN2jT6kh_–2zACaQ75UspdCfFW7s1vLg/edit?usp=sharing
I suspect this may be to do with either running the v1.0 api or the use of FreeNAS 12 beta.
any guidance would be greatly appreciated, Hostnames blanked out for MY-FreeNAS.Hostname and MY-FreeNAS2.Hostname
Thank you in advance
Zak
Hello Jorge,
I tried your tutorial with TrueNAS CORE 12 and it seems to run.
But after the Certificate is imported, I get the following:
Error importing certificate!
401: Unauthorized
[Sat Oct 3 17:57:09 CEST 2020] Reload error for :
Do you have any Idea what could have gone wrong?
Thank you in advance 🙂
Hello,
No idea, it should work out of the box, you following all steps?
Hello, thanks for your tutorial.
Same for us here, Error importing certificate!
401: Unauthorized Reload error for :
I have investigate about, thinking the problem was related to IPv6 precedence vs IPv4 in the certification generation
I had the 401 error too, I edited the python script and added the API key explicitly and it worked.
Thanks for your post. I followed your instruction. Everything was ok. I have generated 4 certificates but the script end with error:
.acme.sh/acme.sh: line 5874: /root/deploy-freenas/deploy_freenas.py: Permission denied
[Tue Dec 20 18:27:37 CET 2022] Reload error for :
I can do a nano on the script , but I have no permission as root.
Thanks
That is strange; maybe there is a more up-to-date version of the steps. I will need to reverify.
O meu também da o mesmo erro dos amigos acima