 Greetings friends, today I bring you a very interesting post, it’s about everything you need to know about Veeam Availability for Nutanix v2.0, from its deployment to its installation and configuration.
Veeam Availability for Nutanix v2.0 was released just a few days ago, and that’s why we’re going to see the whole process.
It includes video and theory, let’s go! As this post is a bit long, I leave you the menu in HTML as usual:
- Veeam Availability for Nutanix – What is it and why do we need it in Acropolis environments?
- Deployment, installation, and configuration of Veeam Availability for Nutanix in images
- Installing the Veeam Availability for Nutanix v2 plugin in Veeam Backup & Replication
- Adding the Nutanix Cluster to Veeam Backup & Replication
- Creating a backup job in Veeam Availability for Nutanix
- VM recovery using Veeam Availability for Nutanix
- Recovery of VMs, files and more from backups created with Veeam Availability for Nutanix using Veeam Backup & Replication
Veeam Availability for Nutanix – What is it and why do we need it in Acropolis environments?
Many years ago, back in 2015, I told you that Nutanix was launching its own Hypervisor, distancing itself from VMware or Hyper-V and including its own hypervisor to have better control of the hardware that Nutanix provides.
It is true that Nutanix allows replication of VMs between different clusters, and of course, the Acropolis itself and the Nutanix topology offers high availability for all VMs.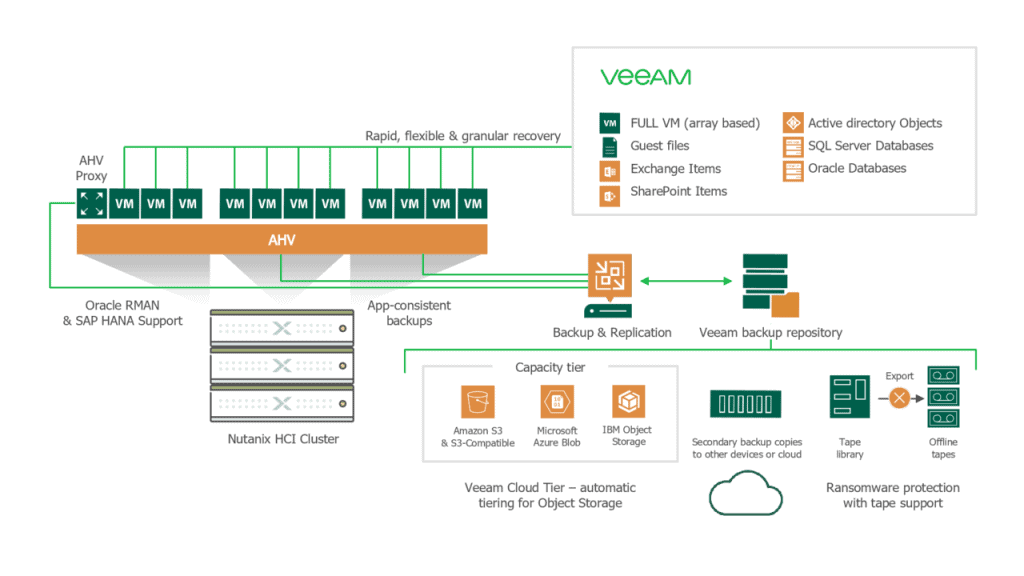 While this is a valid strategy, in different situations what we need to restore is a granular file, or a small element within a SQL Database, or Exchange, and for this Nutanix does not natively include any application.
Veeam Availability for Nutanix v2.0 is an additional component of Veeam Backup & Replication that takes care of backing up and restoring the VMs that reside in the Nutanix AHV clusters.
The main component of Veeam Backup for Nutanix AHV is the Veeam Backup & Replication AHV Backup Proxy which is deployed in a protected AHV cluster. It is a virtual machine that acts as a coordinator between a Nutanix AHV cluster and a backup server to facilitate backup and recovery operations. The AHV Backup Proxy enables the backup, snapshot, and restoration of virtual machines in an AHV cluster.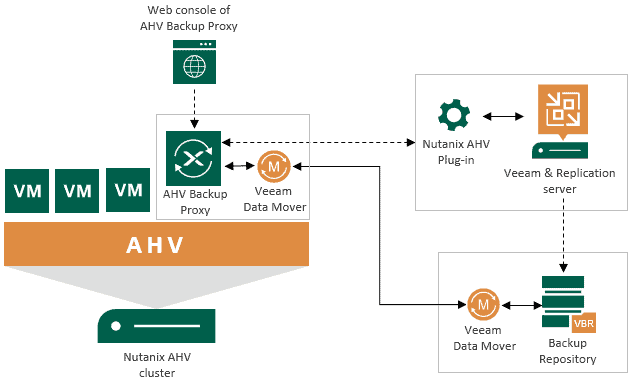 Veeam Availability for Nutanix backs up Nutanix AHV virtual machines and volume groups, the AHV Backup Proxy uses an agentless approach. The solution works at the hypervisor level. It creates image-based backups of the VMs, capturing all VM data at a specific time, including the operating system, system status data, application data, etc. Nutanix AHV virtual machine backups are stored in backup repositories in the native Veeam format.
Deployment, installation, and configuration of Veeam Availability for Nutanix in images
As I know that many of you like the step by step I leave you a few mini categories with the steps to perform in each of them.
Installing the Veeam Availability for Nutanix v2 plugin in Veeam Backup & Replication
With this new version 2.0 of Veeam Availability for Nutanix, we now have the entire proxy deployment centralized within Veeam Backup & Replication, and in a few minutes, we can have everything operational.
The first step will be to download the plugin from the official website of Veeam Availability for Nutanix: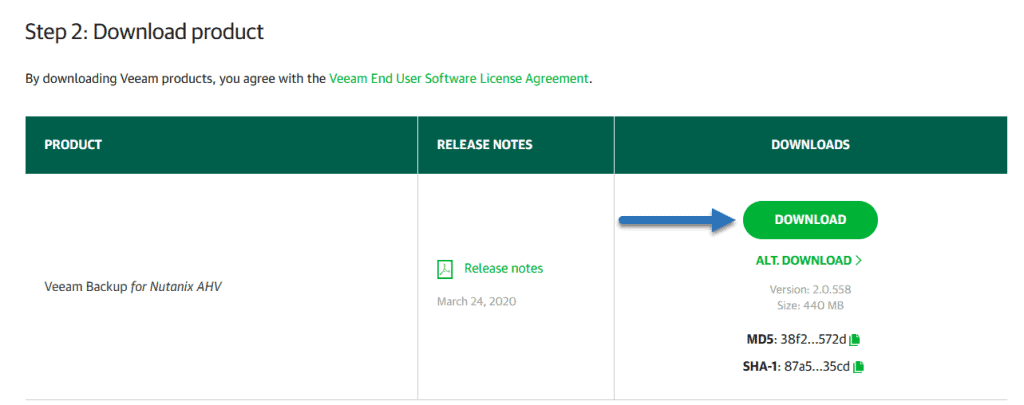 Once we have it downloaded, from the Veeam Backup & Replication Server, we extract it and execute it:
The wizard will open, after accepting and installing .NET Core, it’s a next-next, nothing complicated: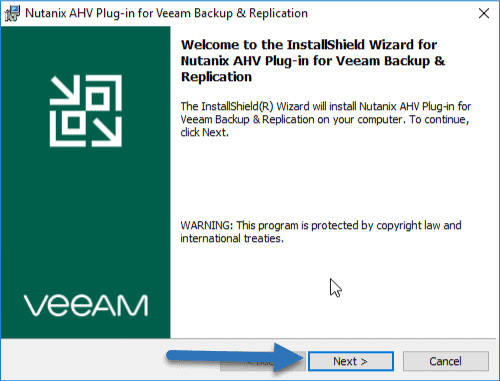
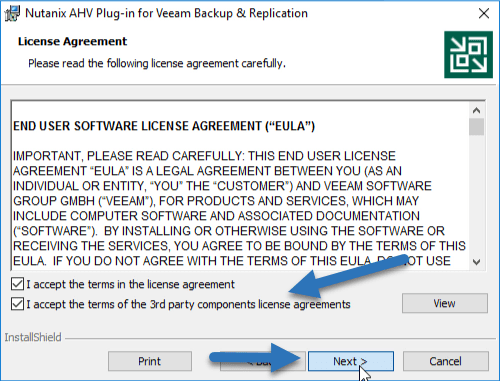
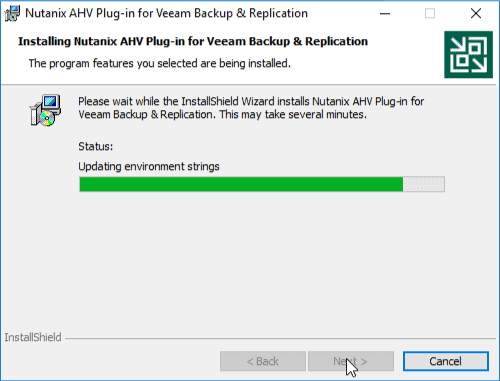

Adding the Nutanix Cluster to Veeam Backup & Replication
Very comfortable and simple steps in this new version of Veeam Availability for Nutanix, from our Veeam Backup & Replication, we will go to Inventory – Add Server, and select Nutanix AHV type: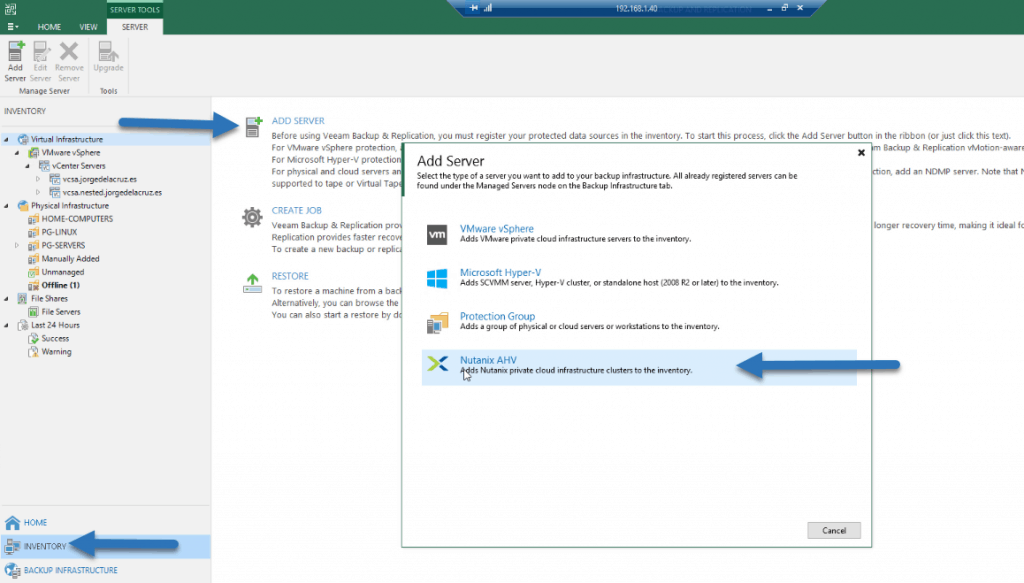 We will introduce the FQDN or IP of our Nutanix Cluster, in my case the IP of my Nutanix CE, that I told you how to deploy it recently:
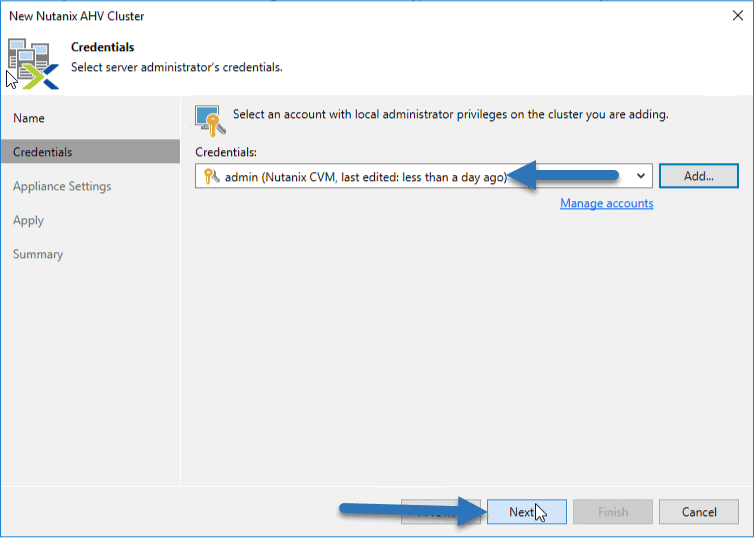
 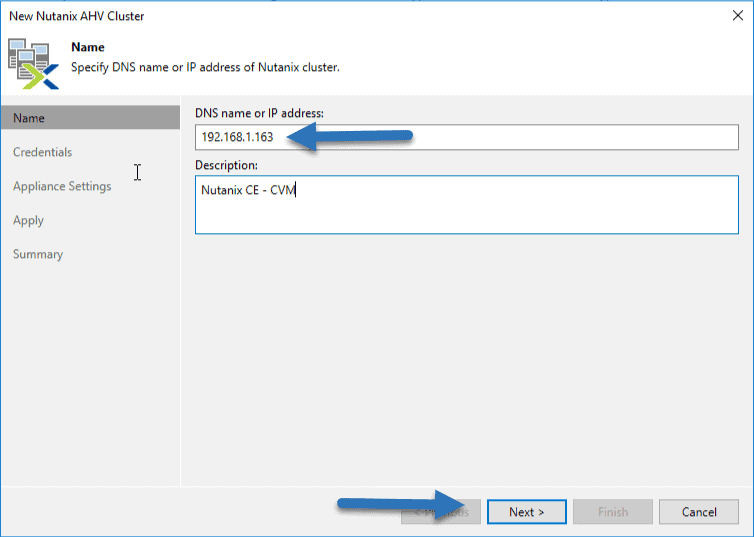 We will introduce the user and the password of the Nutanix cluster:
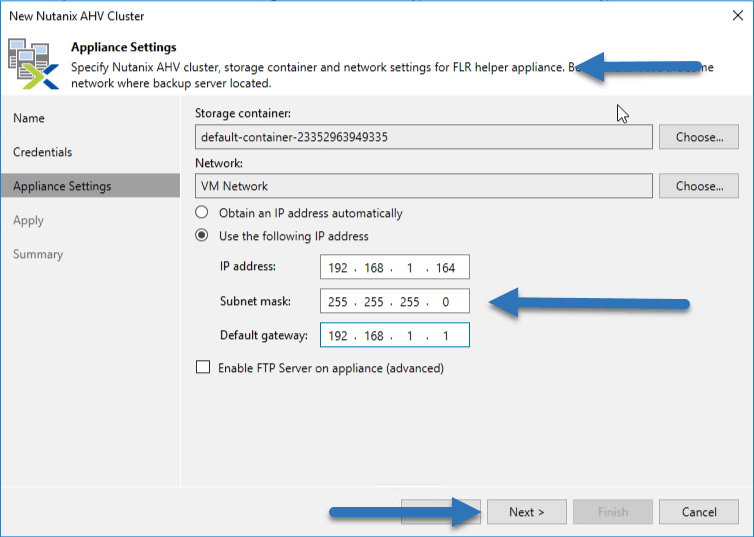
  To restore, it is necessary to use a FLR, to restore files in VMs in Nutanix, we will need this FLR, that we can deploy from here in a very comfortable way:
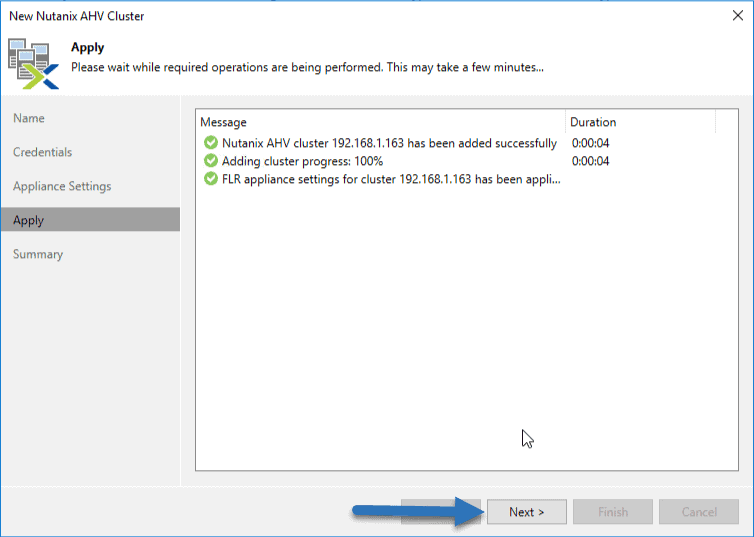
  This takes just a few seconds:
  Now that we have everything deployed, we click on Finish:
  Now it will ask us if we want to deploy the Virtual Proxy inside AHV, we will say yes:
  The assistant, very simple, we will click on deploy new proxy:
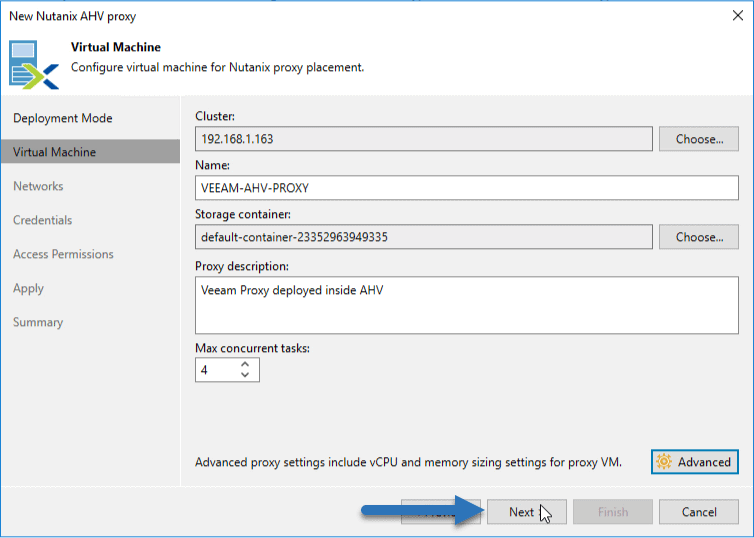
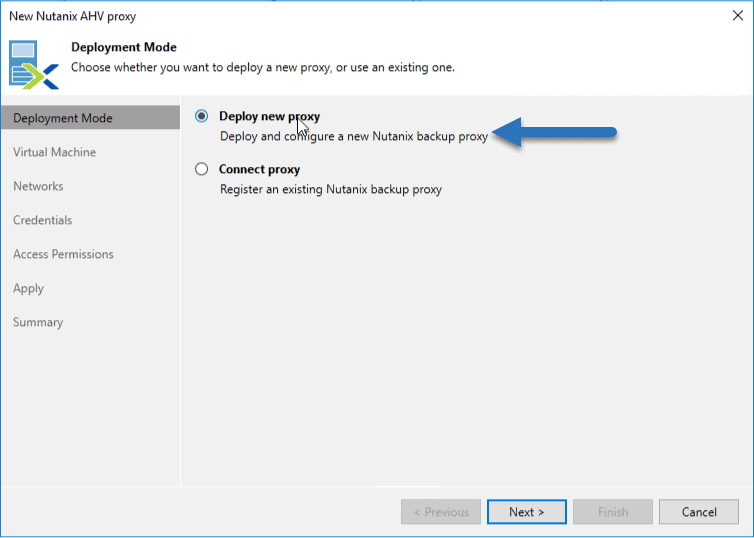 We will select a name, the storage where we want to deploy it, a description and the concurrent tasks, which is better to leave by default:
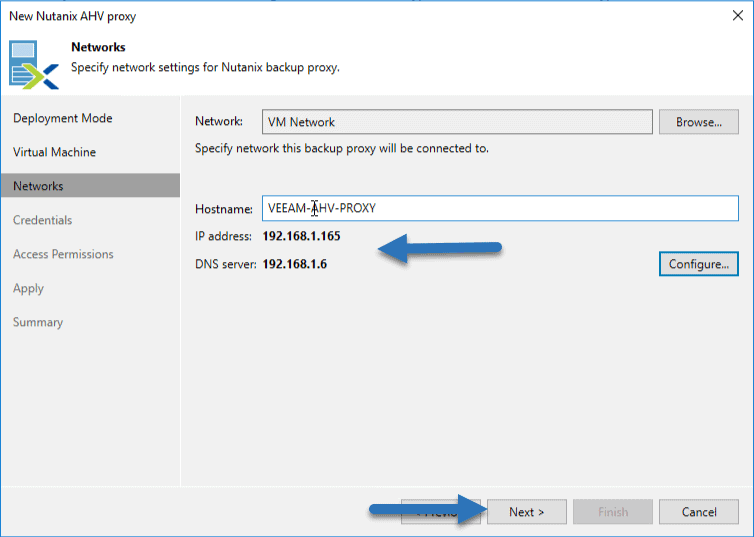
 We will select a static IP, and again it asks us the Hostname for the VM (IMPORTANT, it is better to have already created a DNS record with this hostname and IP)
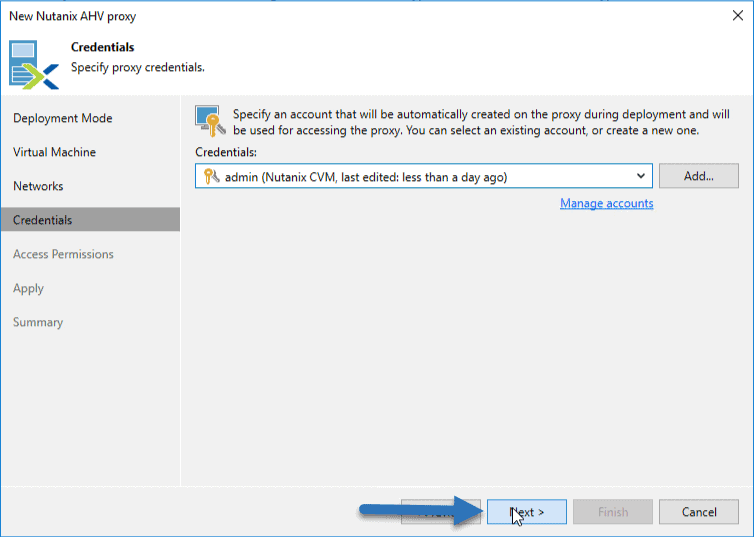
  We will be able to select from here a user and password for this Proxy Appliance:
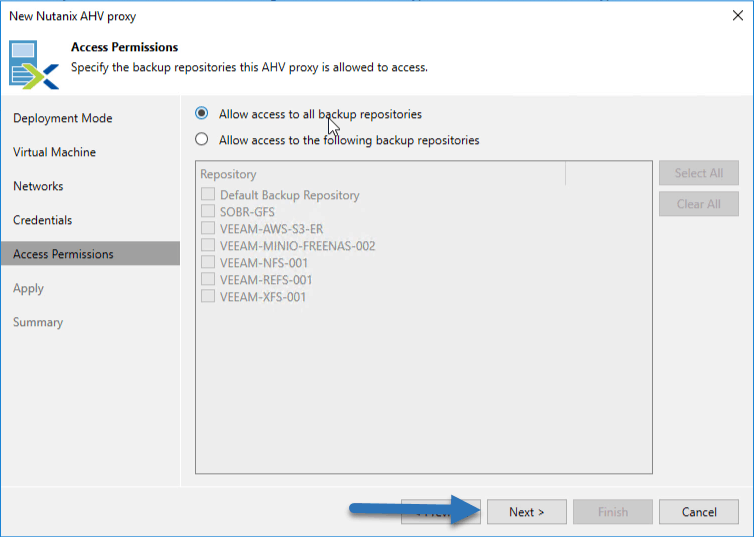
  From here we could give you access to the Repositories that you need, I have given access to all of them:
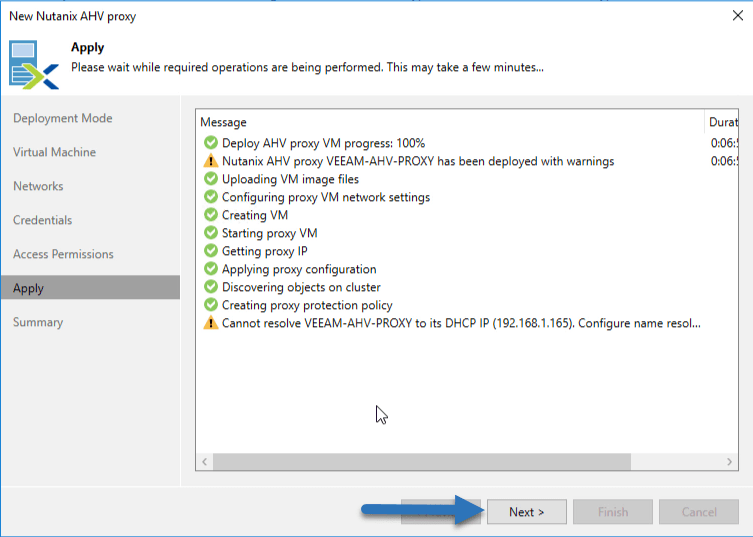
 And after about 7 minutes we will have everything deployed, in my case I have the warning that I did not create the DNS entry, we can, and must, do it now:
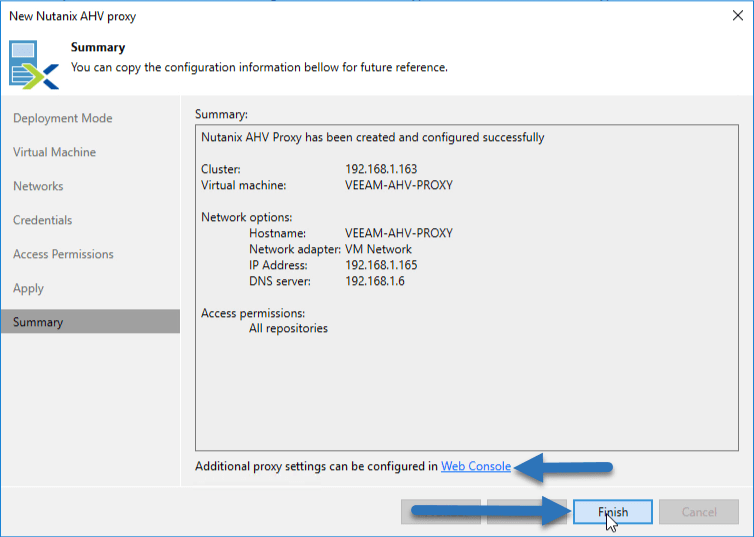
  With all this, we will have everything deployed, from here we can access the URL of the Veeam AHV Proxy Appliance:
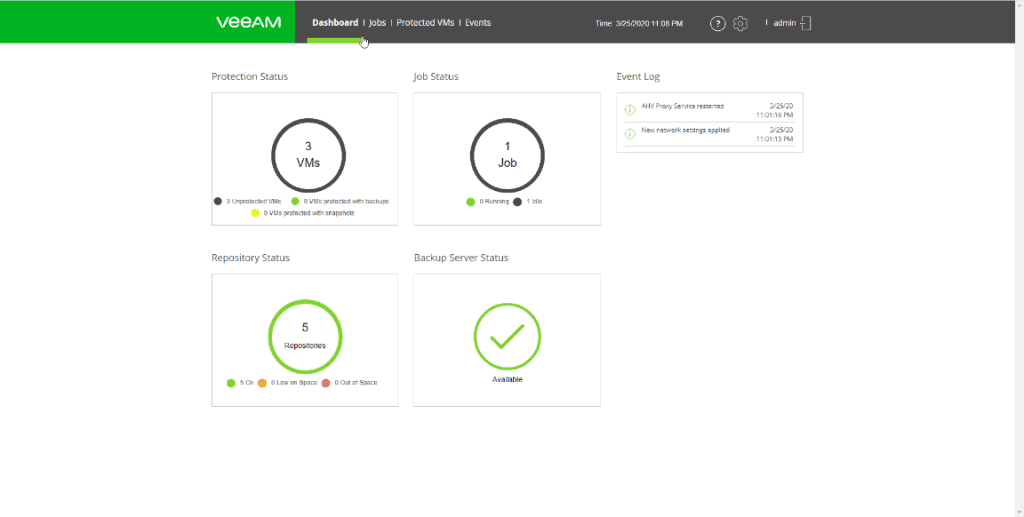
 We will be able to see that we have 3 unprotected VMs, 1 job, 5 repos, etc:
Creating a backup job in Veeam Availability for Nutanix
From the Backup Jobs section, click on Add and enter a name for this job: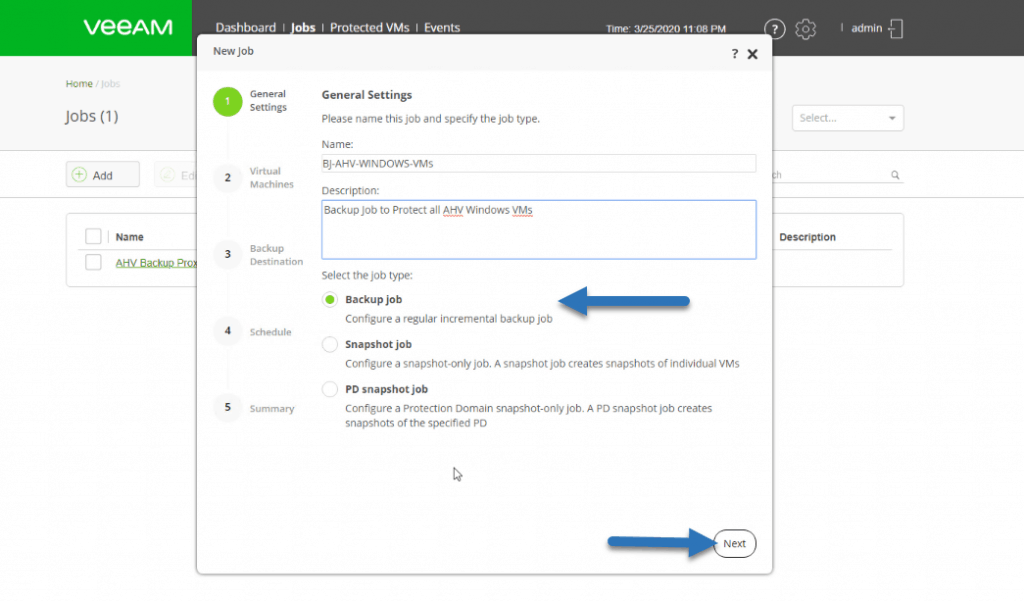 We will now select the VM or VMs that we want to include in the backup job, in my case a Windows Server 2016:
 We will select the repository where we want to save the VMs of this backup job. We could click on Advanced if we want to remove obsolete items after a period of time:
 For the schedule, I leave it to you, plus we can select the restore points we need:
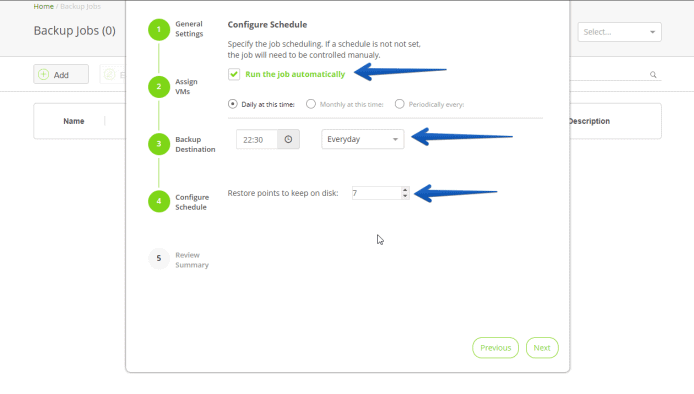 If everything is correct in the summary, we can check if we want to execute the job now and click on Finish:
 The copy process will start and take more or less time to finish depending on how many VMs and the type of Backup Repository:
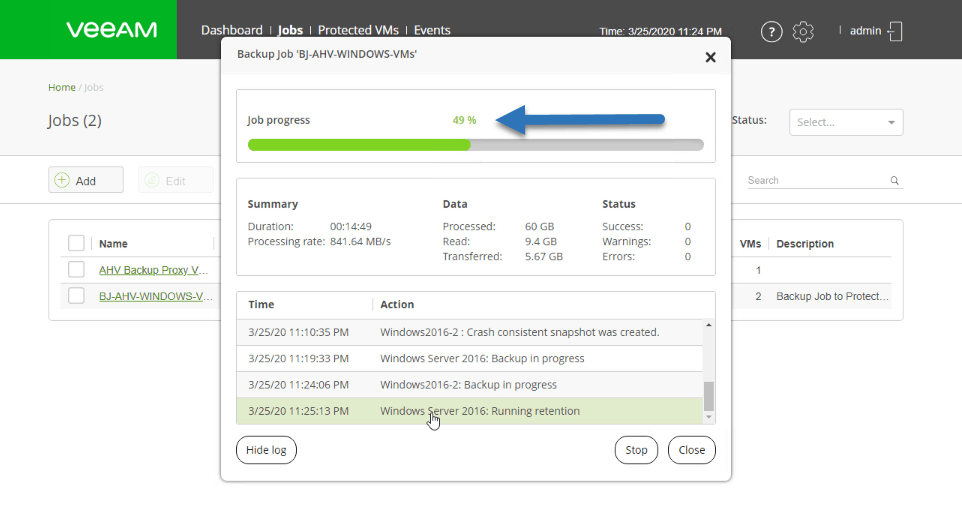
Recovering a VM using Veeam Availability for Nutanix
Now that we have several backups and protected VMs, and this is what our Dashboard shows: We can start making recoveries, we have two options, one of them is to restore the VM inside the Nutanix cluster itself, or restore it to a new location, for that we will keep using this Veeam Availability for Nutanix, we will go to Protected VMs, and we will select the VM we want to restore:
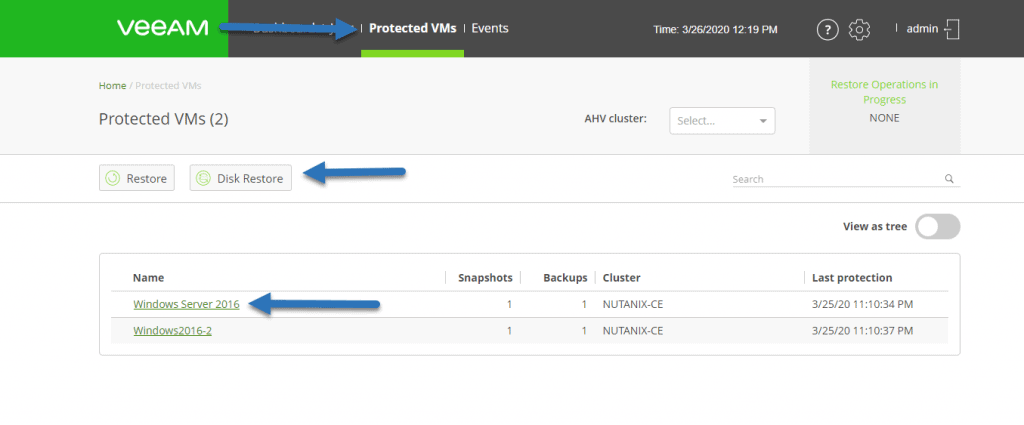 In my case, I’m restoring the VM to another location:
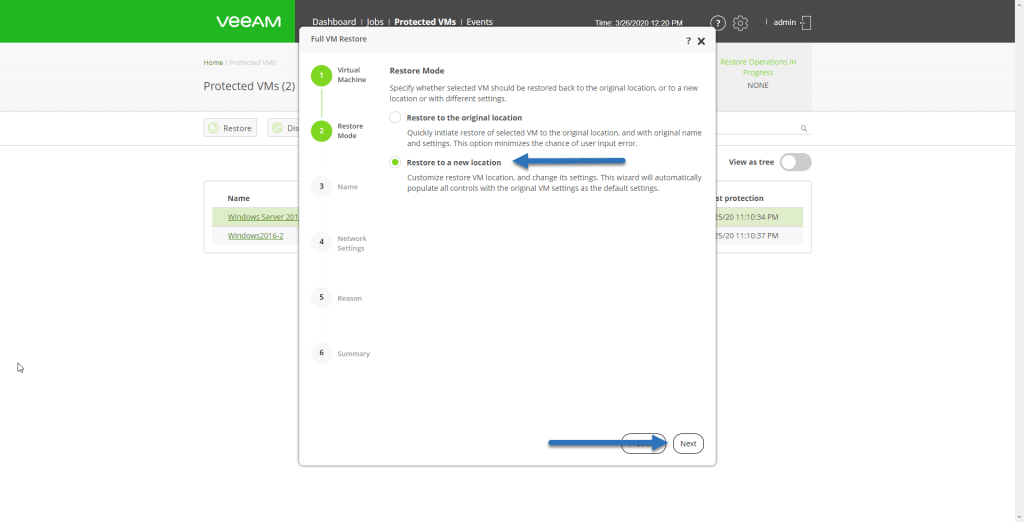 This is an example of how we could restore a VM to the same location or to a new one, inside Nutanix, in a quick and easy way.
Recovery of VMs, files and more from backups created with Veeam Availability for Nutanix using Veeam Backup & Replication
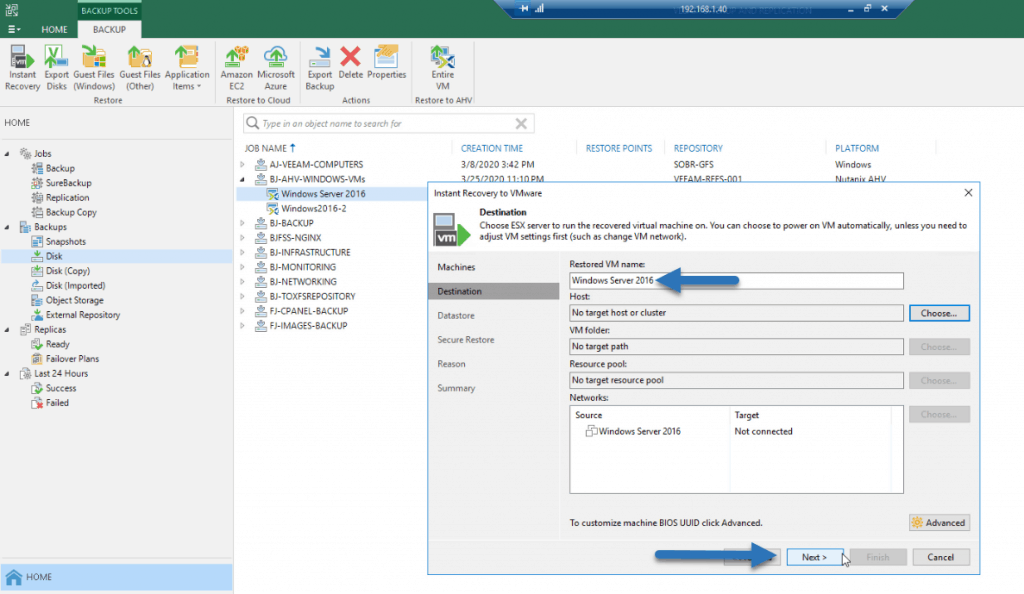
If we want to restore elements from inside the Backup, files or SQL elements, etc, we will use our Veeam Backup & Replication of all life, we will go to Backup – Disk, we will look for our Nutanix work and with the right button we will have the typical restoration options, in this new version 2.0, we have new and elegant options such as Instant VM Recovery from a Nutanix AHV Backup to VMware vSphere!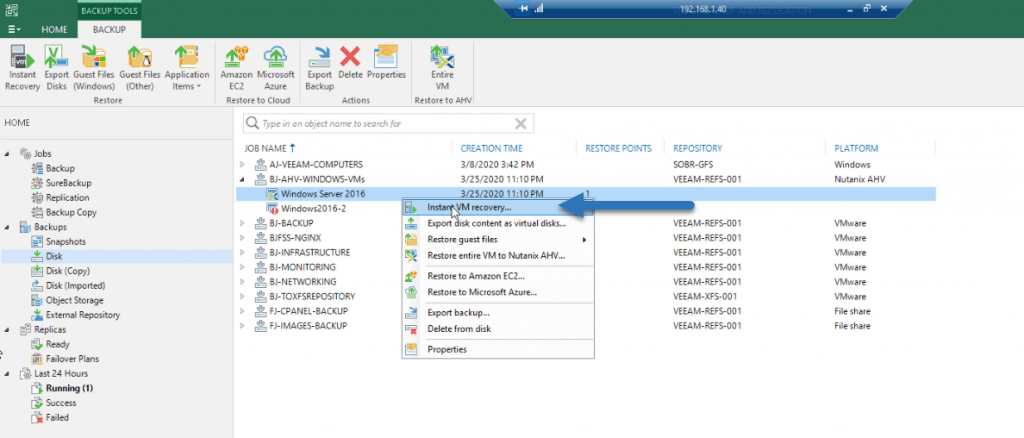 We will select now where we want to restore it, etc:
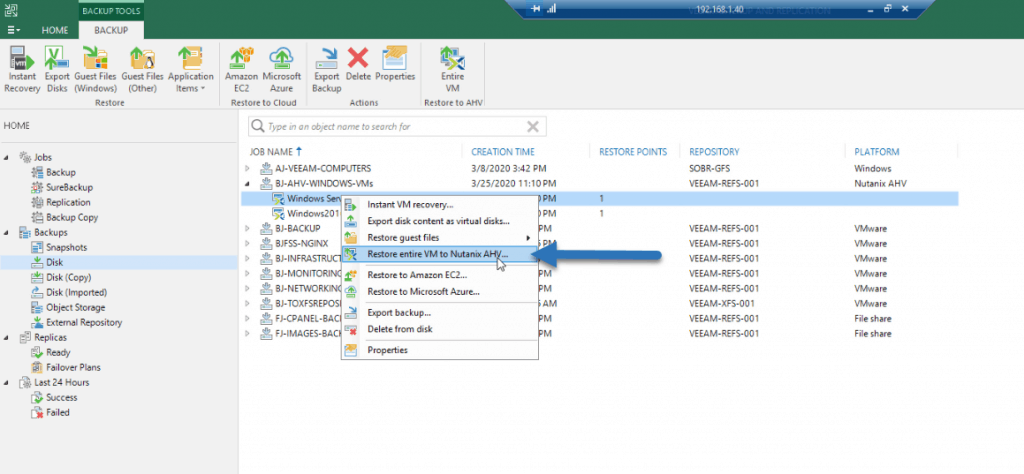
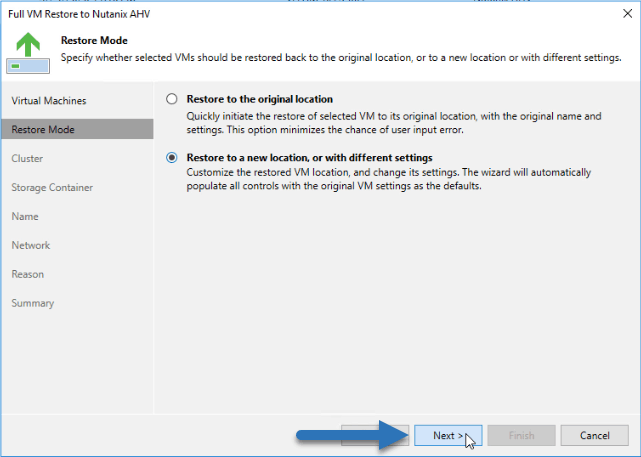
 Also and as new we have the option to restore any VM we have to Nutanix AHV, perfect for VMware or Hyper-V migrations to Nutanix AHV:
  If we select if we want to restore it to the same location a new one, we will be able to click on Next:
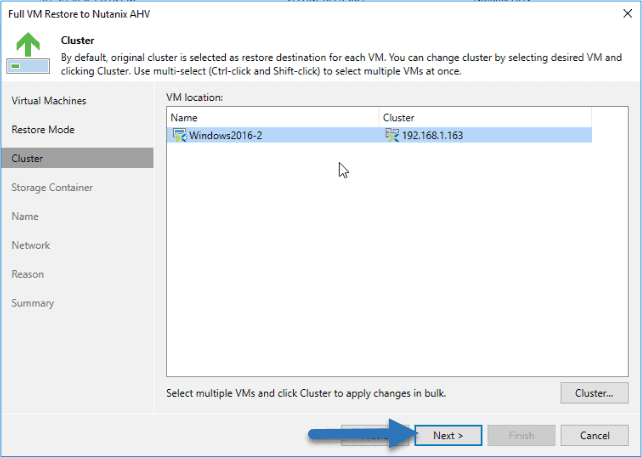
 Introduce the cluster where we want to restore it:
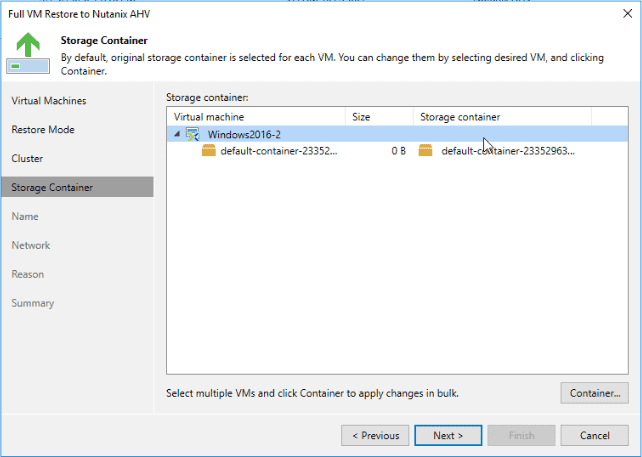
 The storage where we want to restore it:
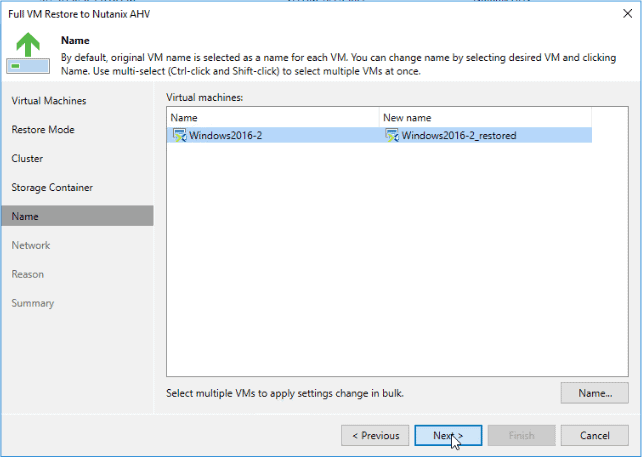
 And finally name, networking, etc:
 That’s all folks, I hope you like it and that it serves you, and if so, leave a comment.

Leave a Reply