
 Greetings friends, just a few days ago Veeam officially announced the support for MinIO Immutability on its HCL. This is wonderful news for us to test this functionality in our labs, or in case we are using Linux storage with MinIO for production.
In this blog entry, we’re going to jump into the pool and see: how to install and configure MinIO with Erasure Coding Enabled, Immutability, Let’s Encrypt, and finally, we’ll see how to configure it in Veeam. As it has gone out of my hands, I leave you with a menu to move faster:
- MinIO System Requirements
- How-to Deploy, and Configure MinIO, including object Immutability, and Let’s Encrypt
- Veeam Backup & Replication Configuration with Immutable Storage
MinIO System Requirements
In this guide, we are not going to try to deploy MinIO in production, as it usually requires about 96GB of RAM, certain cores, etc. In my case I am deploying everything in 4vCPU and 16GB of RAM since I will have only one VBR sending backups, so nothing serious.
One of the most important things to be able to run Immutability in MinIO, and that it is supported by Veeam, is that we need the MinIO RELEASE.2020-07-12T19-14-17Z version or higher, and also we need the MinIO server to be running with Erasure Coding.
What is MinIO Erasure Coding?
MinIO Erasure Coding is a mathematical algorithm to reconstruct lost or corrupted data. MinIO uses Reed-Solomon code to fragment objects into variable data and parity blocks. For example, in a 12-unit configuration, an object can be split into a variable number of data and parity blocks in all units – from six data and six parity blocks to ten data and two parity blocks.
By default, MinIO divides objects into N/2 data and parity units. However, you can use storage classes to use a custom configuration. We recommend the N/2 data and parity blocks, as this ensures the best protection against drive failure.
In the 12-drive example above, with the MinIO server running at the default settings, you can lose any of the six drives and still reliably rebuild data from the remaining drives.
Why use MinIO Erasure Coding?
MinIO Erasure Coding protects data from multiple drive failures, unlike RAID or replication. For example, RAID6 can protect against the failure of two drives, while MinIO Erasure Coding can lose up to half of the drives and still keep the data safe. In addition, MinIO Erasure Coding is at the object level and can recover one object at a time. In the case of RAID, recovery can only be done at the volume level, resulting in high downtime. Since MinIO encodes each object individually, it can cure objects incrementally. Storage servers, once deployed, should not require disk replacement or healing for the life of the server. MinIO’s Erasure Coding backend is designed for operational efficiency and takes full advantage of hardware acceleration whenever available.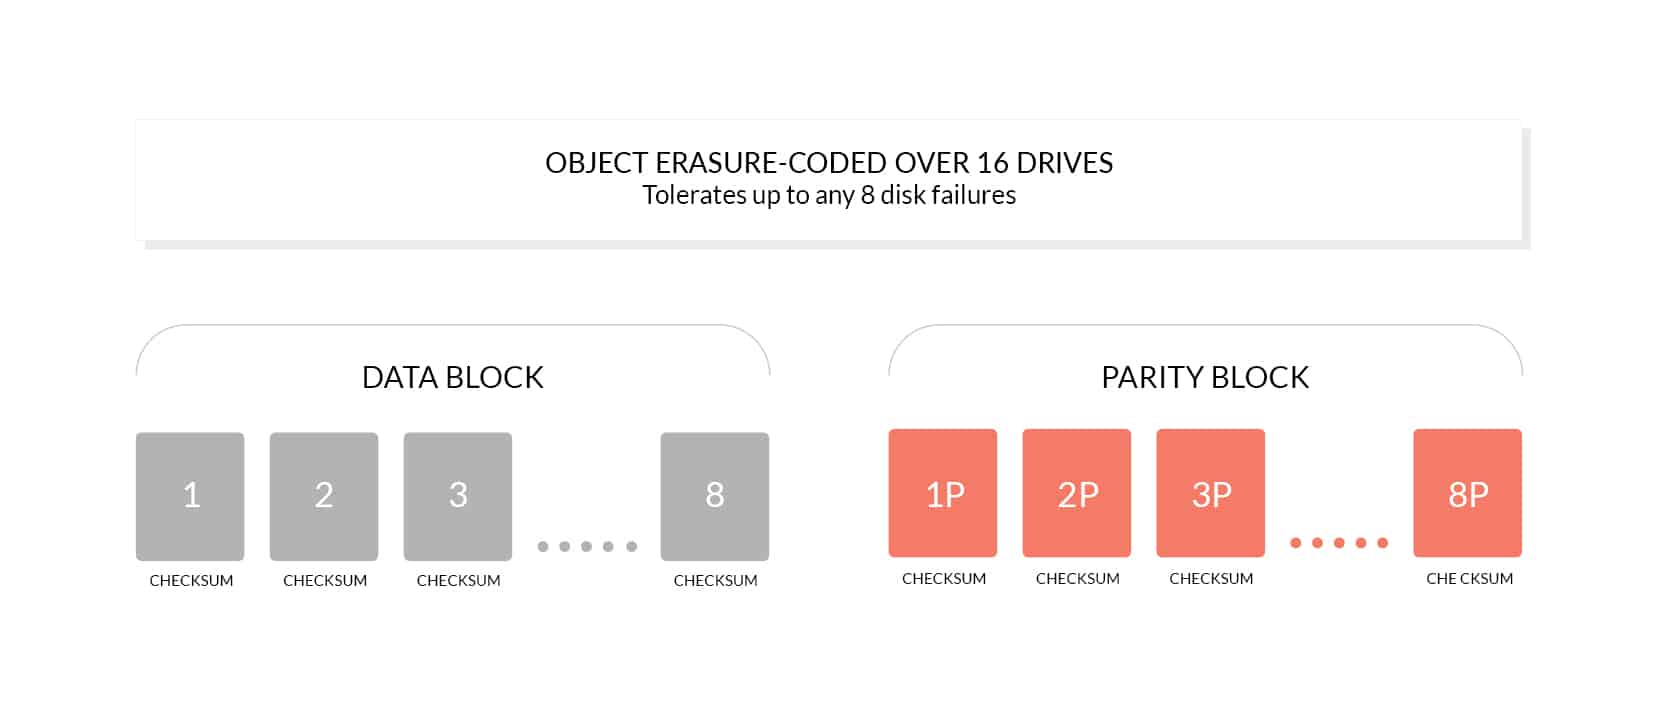
More information can be found here – https://docs.min.io/docs/minio-erasure-code-quickstart-guide.html
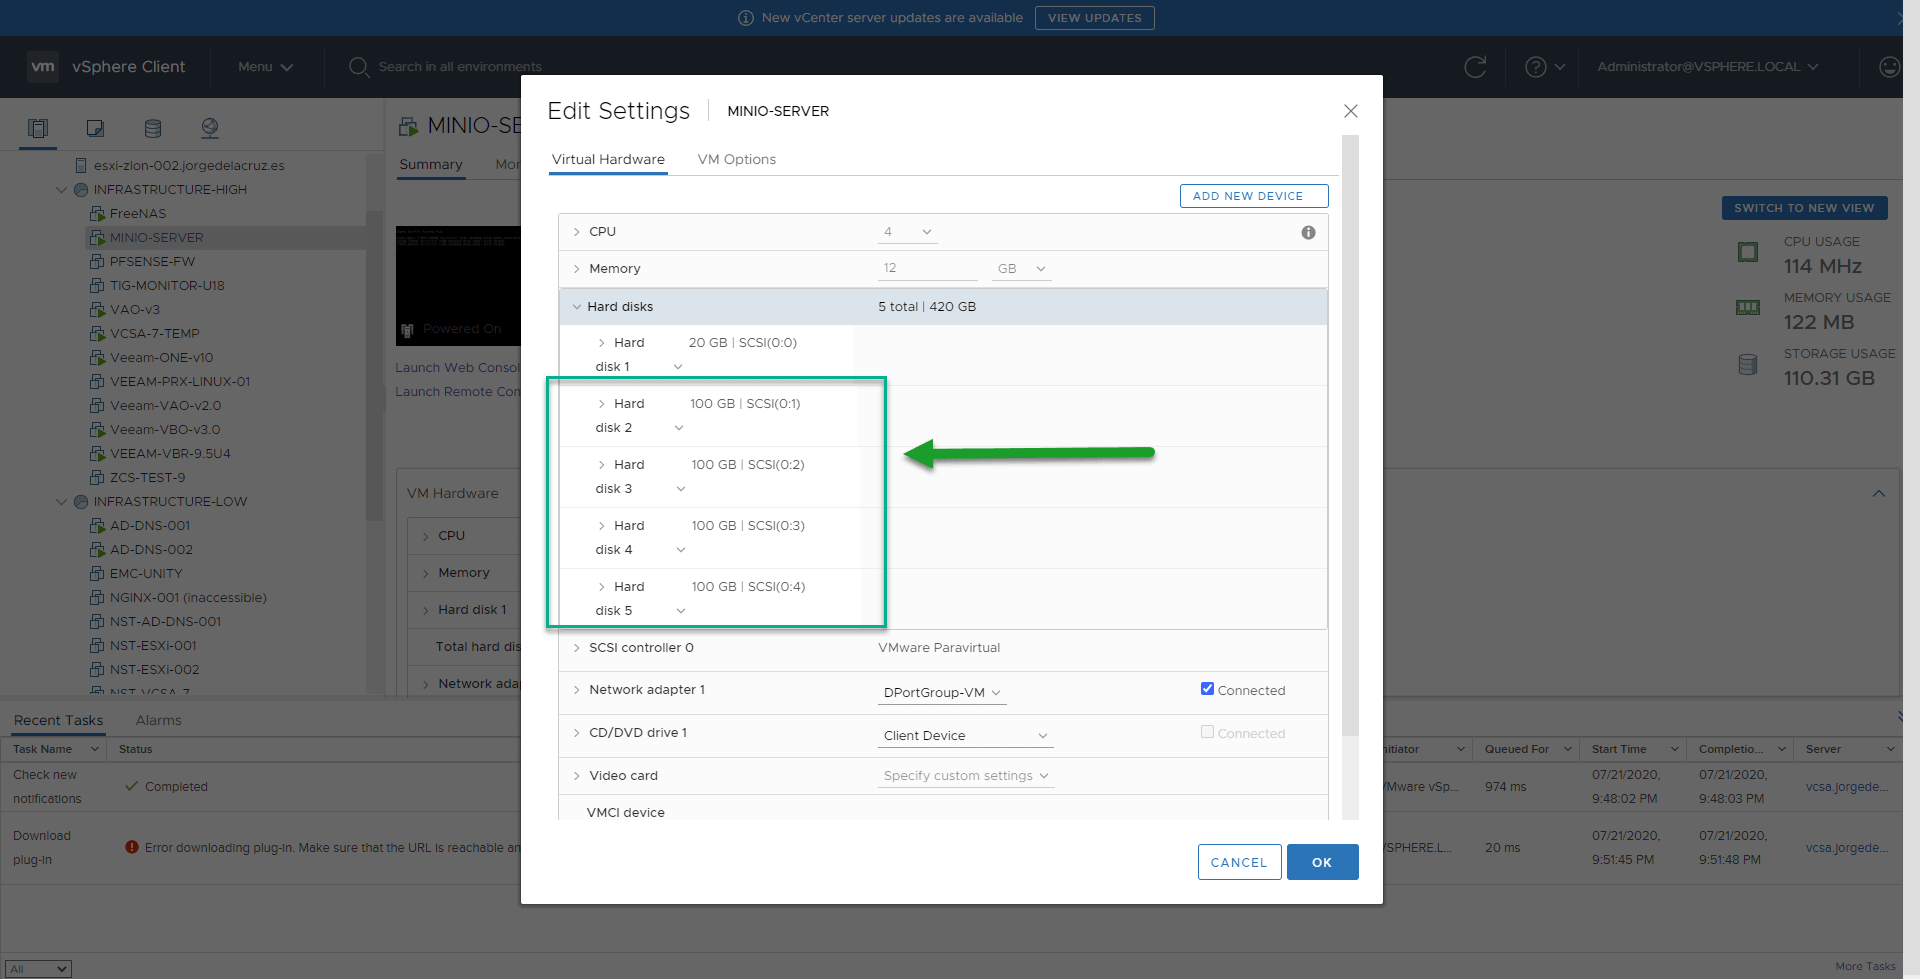
Disk Configuration to use MinIO Erasure Coding
In this lab I am going to use 4 disks for my MinIO server, 100GB each, using of course THIN in VMware, so as not to consume all the space of my VSAN, the VM configuration looks like this:
 Once we have all the records, we will have to do the next steps for each record, I leave you the steps with the sdb, but you will have to do it with sdc, sdd, and sde:
We’ll start by partitioning the disk:
fdisk /dev/sdb
We will have to press n to create a new one, using all the space, and of type 8e, which is LVM to be able to handle it better later in case we want to grow:
Welcome to fdisk (util-linux 2.31.1).
Changes will remain in memory only, until you decide to write them.
Be careful before using the write command.

Device does not contain a recognized partition table.
Created a new DOS disklabel with disk identifier 0xab657906.

Command (m for help): n
Partition type
   p   primary (0 primary, 0 extended, 4 free)
   e   extended (container for logical partitions)
Select (default p): p
Partition number (1-4, default 1):
First sector (2048-209715199, default 2048):
Last sector, +sectors or +size{K,M,G,T,P} (2048-209715199, default 209715199):

Created a new partition 1 of type 'Linux' and of size 100 GiB.

Command (m for help): t
Selected partition 1
Hex code (type L to list all codes): 8e
Changed type of partition 'Linux' to 'Linux LVM'.

Command (m for help): w
The partition table has been altered.
Calling ioctl() to re-read partition table.
Syncing disks.
We will now proceed to create the LVM, with all its settings, as follows:
pvcreate /dev/sdb1
vgcreate vg_xfs_minio_1 /dev/sdb1
lvcreate -L +99G -n xfs_minio_1 vg_xfs_minio_1
mkfs.xfs /dev/vg_xfs_minio_1/xfs_minio_1
We’ll end up creating a new directory and mounting that new partition:
mkdir /root/xfs_minio_1
mount /dev/vg_xfs_minio_1/xfs_minio_1 /root/xfs_minio_1/
If we want to check that everything went well, with this command we can see everything:
df -hT /root/xfs_minio/
Filesystem                         Type  Size  Used Avail Use% Mounted on
/dev/mapper/vg_xfs_minio-xfs_minio_1 xfs    99G  134M   99G   1% /root/xfs_minio_1
Repeat this for each record, you should have something like this:
df -h
Filesystem                              Size  Used Avail Use% Mounted on
udev                                    5.9G     0  5.9G   0% /dev
tmpfs                                   1.2G  1.2M  1.2G   1% /run
/dev/mapper/ubuntu--vg-ubuntu--lv        19G  4.9G   13G  28% /
tmpfs                                   5.9G     0  5.9G   0% /dev/shm
tmpfs                                   5.0M     0  5.0M   0% /run/lock
tmpfs                                   5.9G     0  5.9G   0% /sys/fs/cgroup
/dev/sda2                               976M  145M  765M  16% /boot
tmpfs                                   1.2G     0  1.2G   0% /run/user/1000
/dev/mapper/vg_xfs_minio_1-xfs_minio_1   99G   12G   88G  12% /root/xfs_minio_1
/dev/mapper/vg_xfs_minio_2-xfs_minio_2   99G   12G   88G  12% /root/xfs_minio_2
/dev/mapper/vg_xfs_minio_3-xfs_minio_3   99G   12G   88G  12% /root/xfs_minio_3
/dev/mapper/vg_xfs_minio_4-xfs_minio_4   99G   12G   88G  12% /root/xfs_minio_4
Don’t forget to add them to the fstab, to do this remove the UID with blkid /dev/mapper/vg_xfs_minio_3-xfs_minio_3, in my case for example:
echo 'UUID=155b62fb-e7cb-424f-91d7-3e09217d7e7f /root/xfs_minio_1 xfs defaults 1 1' >> /etc/fstab
echo '85f1550b-5459-4427-8a45-8fe139cfaebe /root/xfs_minio_2 xfs defaults 1 1' >> /etc/fstab
echo '0c47b7cd-edc3-4ef9-9b6a-0d3f2dc476db /root/xfs_minio_3 xfs defaults 1 1' >> /etc/fstab
echo '2833348b-7053-49f1-a96d-d00ee8f071ed /root/xfs_minio_4 xfs defaults 1 1' >> /etc/fstab
We are ready, so let’s move on to the next step.
How-to Deploy, and Configure MinIO, including object Immutability, and Let’s Encrypt
Well, well, we’ve come to this part, so let’s not delay any longer, let’s go there, we’ll install the latest version of MinIO using the following command:
wget https://dl.min.io/server/minio/release/linux-amd64/minio
chmod +x minio
Once we have everything downloaded and ready, we could launch a simple instance of MinIO, to see what works, without any Erasure Coding, or anything, just for testing, like this:
./minio server /home/oper/test
Endpoint:  http://192.168.1.185:9000  http://127.0.0.1:9000
AccessKey: minioadmin
SecretKey: minioadmin

Browser Access:
   http://192.168.1.185:9000  http://127.0.0.1:9000

Command-line Access: https://docs.min.io/docs/minio-client-quickstart-guide
   $ mc config host add myminio http://192.168.1.185:9000 minioadmin minioadmin

Object API (Amazon S3 compatible):
   Go:         https://docs.min.io/docs/golang-client-quickstart-guide
   Java:       https://docs.min.io/docs/java-client-quickstart-guide
   Python:     https://docs.min.io/docs/python-client-quickstart-guide
   JavaScript: https://docs.min.io/docs/javascript-client-quickstart-guide
   .NET:       https://docs.min.io/docs/dotnet-client-quickstart-guide
Detected default credentials 'minioadmin:minioadmin', please change the credentials immediately using 'MINIO_ACCESS_KEY' and 'MINIO_SECRET_KEY'
If I access the IP and the port, I see that we can enter a MinIO interface and everything works fine: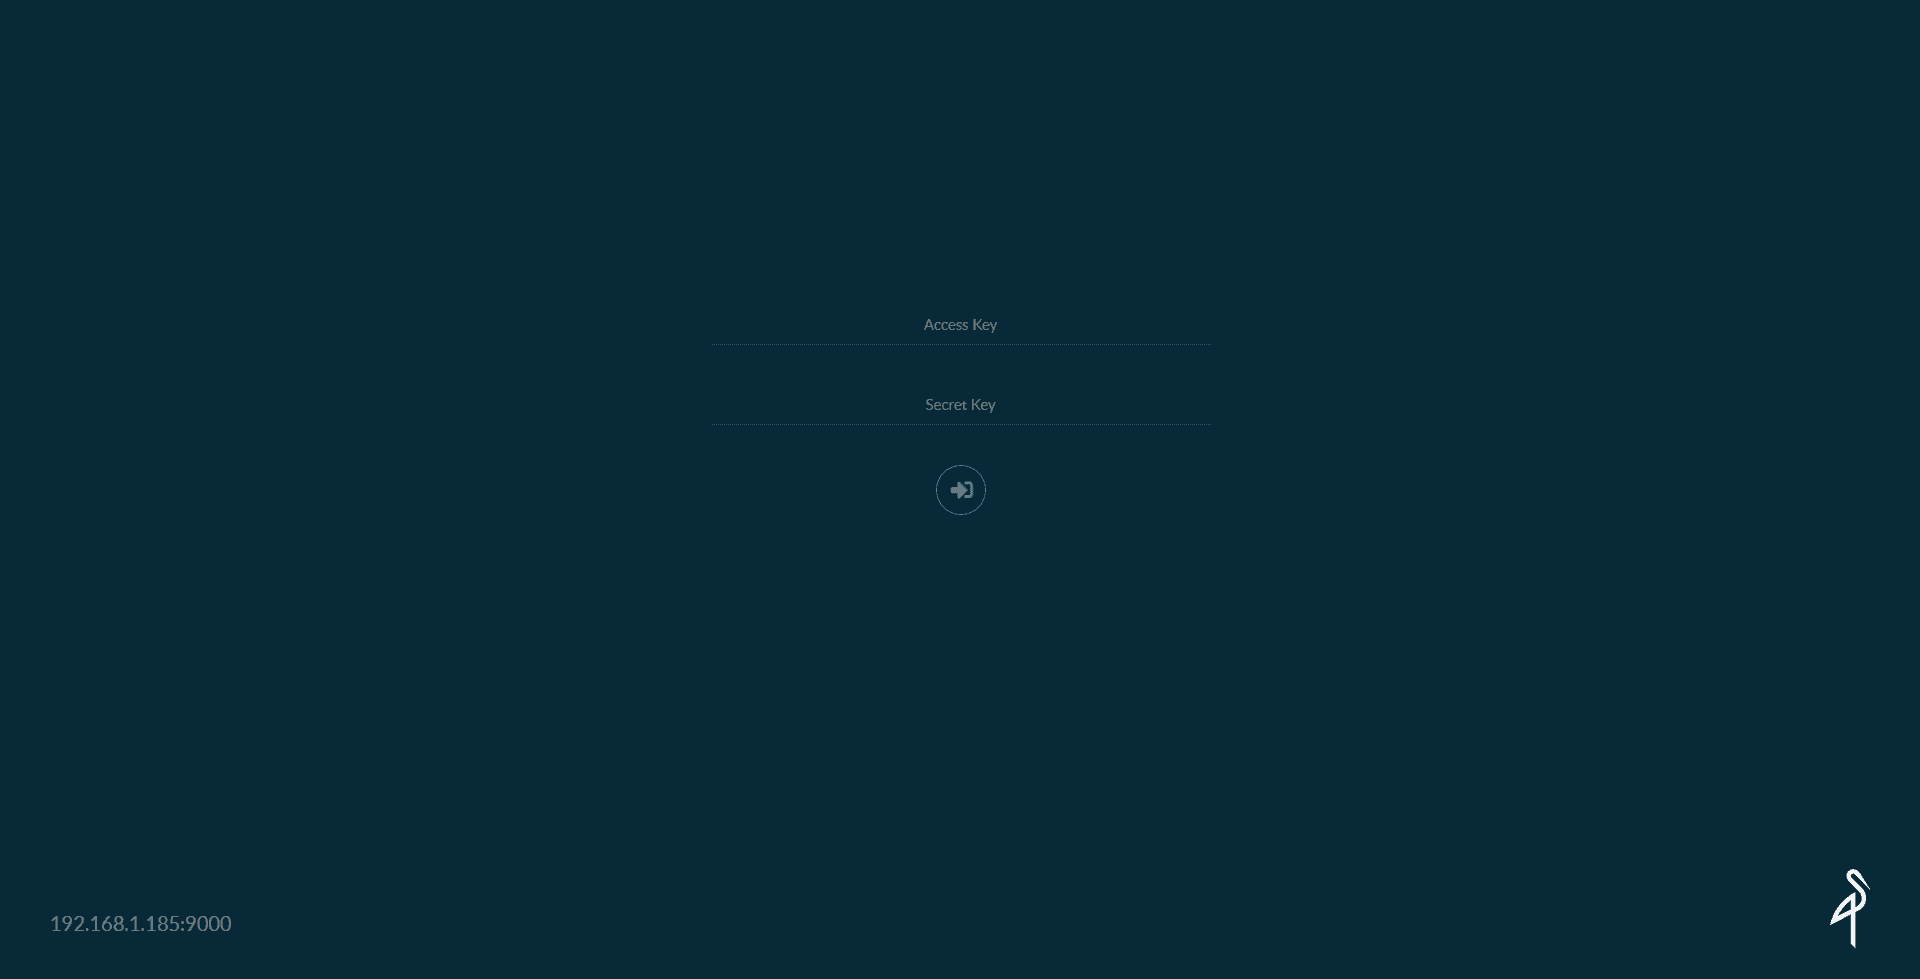
Once I enter the credentials, I will make sure I have a modern version of MinIO, especially superior to the one recommended by Veeam in their HCL: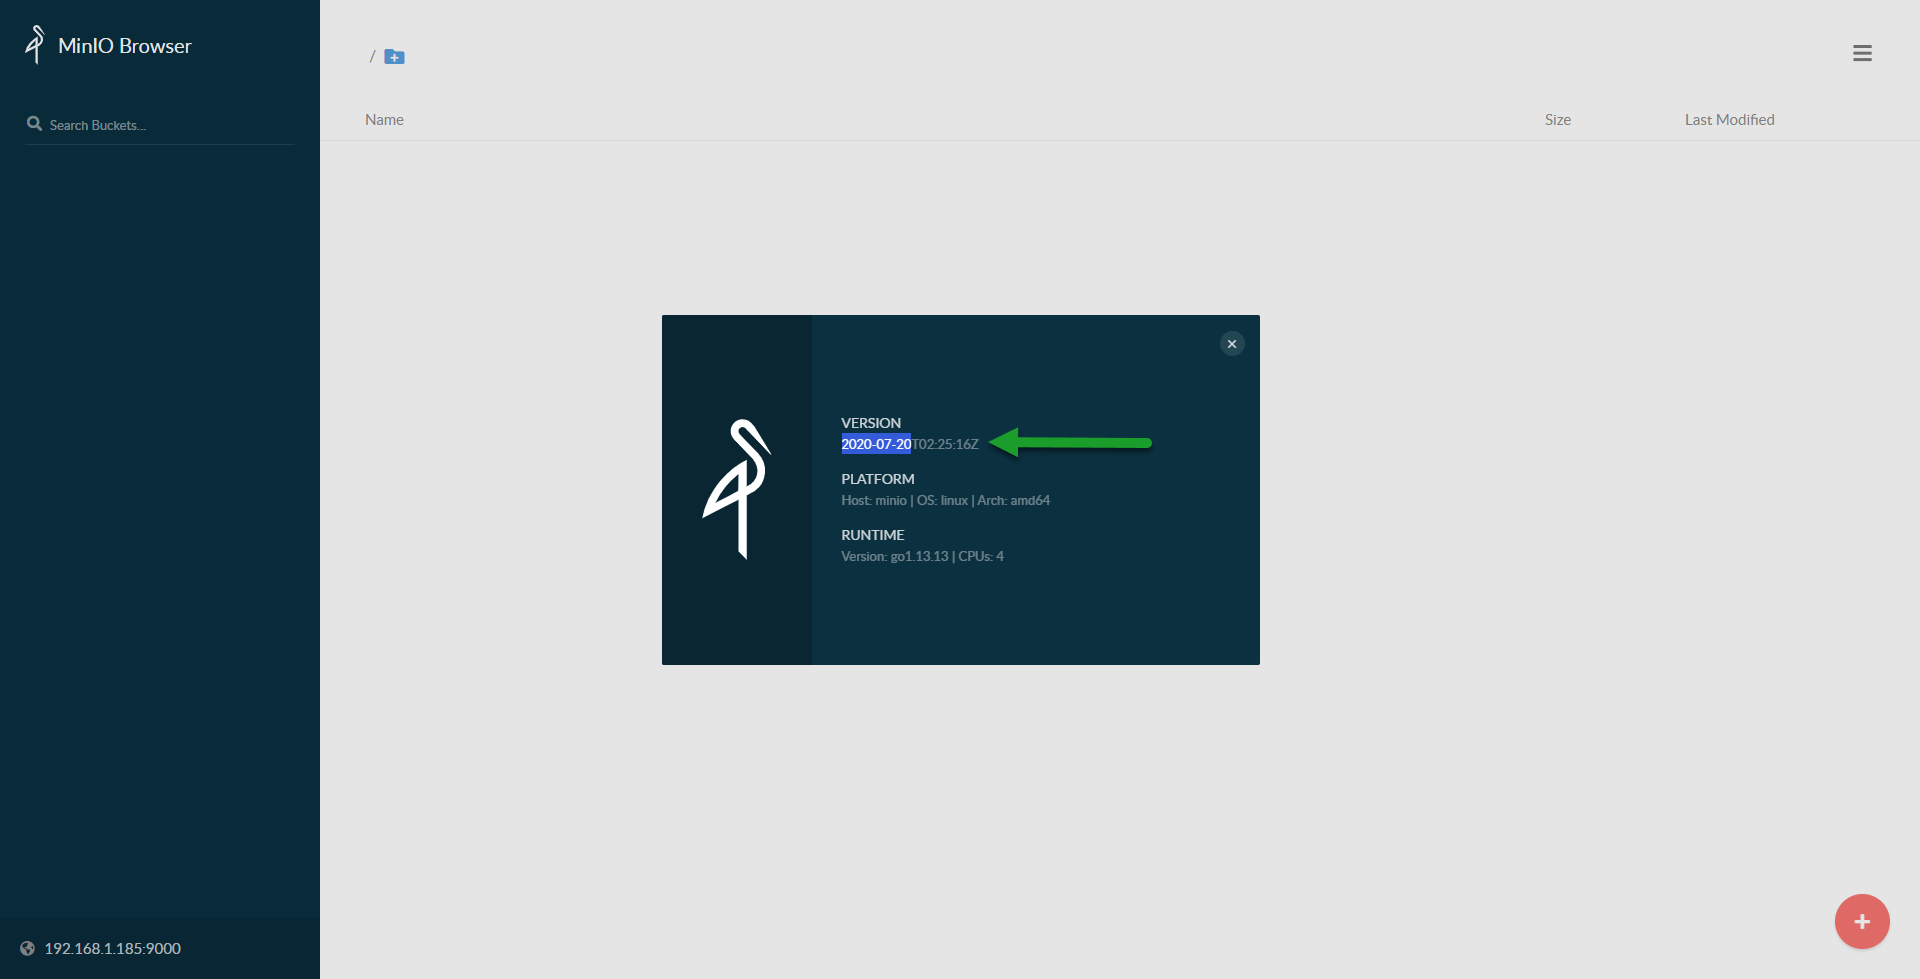 Okay, since everything works fine for me, let’s take the step and set everything up more securely and elegantly using Let’s Encrypt.
How-to Configure Let’s Encrypt for MinIO
As always, we will make use of certbot, which will help us generate the whole process, and validate our Let’s Encrypt certificates, update the system and install certbot:
sudo apt-get install software-properties-common
sudo add-apt-repository universe
sudo add-apt-repository ppa:certbot/certbot
sudo apt-get update
sudo apt-get install certbot
There are several ways to validate our domain, I find the manual DNS mode, in case we don’t have Cloudflare, etc, the easiest one, so I will do it this way:
certbot --manual --preferred-challenges dns certonly -d minio.jorgedelacruz.es --staple-ocsp -m [email protected] --agree-tos
This will launch the next output, which we will have to configure in our public DNS:
Saving debug log to /var/log/letsencrypt/letsencrypt.log
Plugins selected: Authenticator manual, Installer None
Obtaining a new certificate
Performing the following challenges:
dns-01 challenge for minio.jorgedelacruz.es

- - - - - - - - - - - - - - - - - - - - - - - - - - - - - - - - - - - - - - - -
NOTE: The IP of this machine will be publicly logged as having requested this
certificate. If you're running certbot in manual mode on a machine that is not
your server, please ensure you're okay with that.

Are you OK with your IP being logged?
- - - - - - - - - - - - - - - - - - - - - - - - - - - - - - - - - - - - - - - -
(Y)es/(N)o: yes

- - - - - - - - - - - - - - - - - - - - - - - - - - - - - - - - - - - - - - - -
Please deploy a DNS TXT record under the name
_acme-challenge.minio.jorgedelacruz.es with the following value:

OIOLPq0SBAH41d5hKAEL08OueThzMyboRGduxdi5L3c

Before continuing, verify the record is deployed.
- - - - - - - - - - - - - - - - - - - - - - - - - - - - - - - - - - - - - - - -
Press Enter to Continue
Once we put this .TXT entry in our public DNS, we click on Enter and if everything has gone well we’ll see the following:
Waiting for verification...
Cleaning up challenges

IMPORTANT NOTES:
 - Congratulations! Your certificate and chain have been saved at:
   /etc/letsencrypt/live/minio.jorgedelacruz.es/fullchain.pem
   Your key file has been saved at:
   /etc/letsencrypt/live/minio.jorgedelacruz.es/privkey.pem
   Your cert will expire on 2020-10-19. To obtain a new or tweaked
   version of this certificate in the future, simply run certbot
   again. To non-interactively renew *all* of your certificates, run
   "certbot renew"
 - If you like Certbot, please consider supporting our work by:

   Donating to ISRG / Let's Encrypt:   https://letsencrypt.org/donate
   Donating to EFF:                    https://eff.org/donate-le
If we want to check the files, etc, we will do so:
ls -l /etc/letsencrypt/live/minio.jorgedelacruz.es/
total 4
lrwxrwxrwx 1 root root  46 Jul 21 15:43 cert.pem -> ../../archive/minio.jorgedelacruz.es/cert1.pem
lrwxrwxrwx 1 root root  47 Jul 21 15:43 chain.pem -> ../../archive/minio.jorgedelacruz.es/chain1.pem
lrwxrwxrwx 1 root root  51 Jul 21 15:43 fullchain.pem -> ../../archive/minio.jorgedelacruz.es/fullchain1.pem
lrwxrwxrwx 1 root root  49 Jul 21 15:43 privkey.pem -> ../../archive/minio.jorgedelacruz.es/privkey1.pem
-rw-r--r-- 1 root root 692 Jul 21 15:43 README
We are going to copy these files to the MinIO folder of the user from whom we want to run MinIO, in my case, it is root, so as not to complicate it, but in your case to secure it a little more:
cp /etc/letsencrypt/live/minio.jorgedelacruz.es/fullchain.pem /root/.minio/certs/public.crt
cp /etc/letsencrypt/live/minio.jorgedelacruz.es/privkey.pem /root/.minio/certs/private.key
Run MinIO with Erasure Coding
There is not much mystery, since we have the SSL certificate, and we also have our partitions and mount points ready, we will have everything ready to launch MinIO with Erasure Coding, which comes with high availability, etc. Of course, it’s all on a server, but it’s for testing:
./minio server --address ":443" /root/xfs_minio_1/ /root/xfs_minio_2/ /root/xfs_minio_3/ /root/xfs_minio_4/
Formatting 1st zone, 1 set(s), 4 drives per set.
WARNING: Host local has more than 2 drives of set. A host failure will result in data becoming unavailable.
Status:         4 Online, 0 Offline.
Endpoint:  https://192.168.1.185  https://127.0.0.1
AccessKey: minioadmin
SecretKey: minioadmin

Browser Access:
   https://192.168.1.185  https://127.0.0.1

Command-line Access: https://docs.min.io/docs/minio-client-quickstart-guide
   $ mc config host add myminio https://192.168.1.185 minioadmin minioadmin

Object API (Amazon S3 compatible):
   Go:         https://docs.min.io/docs/golang-client-quickstart-guide
   Java:       https://docs.min.io/docs/java-client-quickstart-guide
   Python:     https://docs.min.io/docs/python-client-quickstart-guide
   JavaScript: https://docs.min.io/docs/javascript-client-quickstart-guide
   .NET:       https://docs.min.io/docs/dotnet-client-quickstart-guide

Certificate:
    Signature Algorithm: SHA256-RSA
    Issuer: C=US, O=Let's Encrypt, CN=Let's Encrypt Authority X3
    Validity
        Not Before: Tue, 21 Jul 2020 14:43:33 GMT
        Not After : Mon, 19 Oct 2020 14:43:33 GMT

Certificate:
    Signature Algorithm: SHA256-RSA
    Issuer: O=Digital Signature Trust Co., CN=DST Root CA X3
    Validity
        Not Before: Thu, 17 Mar 2016 16:40:46 GMT
        Not After : Wed, 17 Mar 2021 16:40:46 GMT

Detected default credentials 'minioadmin:minioadmin', please change the credentials immediately using 'MINIO_ACCESS_KEY' and 'MINIO_SECRET_KEY'
It would be nice if you change the username and password to have more security as well. Besides, as I said, MinIO tells us that we have everything on the same server, so it’s not really resistant to physical failures, but it’s ok. If we go via HTTPS, we’ll see good news:
Creating a new Bucket in MinIO with the Immutability attribute
This command will fail you if you are not using a modern version of MinIO, and if you are not using Erasure Coding, we need minio-client, so we will download it quickly:
wget https://dl.min.io/client/mc/release/linux-amd64/mc
chmod +x mc
We’ll set it up quickly by adding a new host, like this:
./mc config host add minio-veeam https://minio.jorgedelacruz.es YOURS3ACCESSKEY YOURSECERTKEY --api S3v4
Now we can launch the following command, which has the -l (–with-lock) attribute
./mc mb --debug -l minio-veeam/veeam-immutable
And if everything went well, we’ll see what happens next:
mc: <DEBUG> HTTP/1.1 200 OK
Content-Length: 0
Accept-Ranges: bytes
Content-Security-Policy: block-all-mixed-content
Date: Tue, 21 Jul 2020 17:53:15 GMT
Location: /veeamimmutable
Server: MinIO/RELEASE.2020-07-20T02-25-16Z
Vary: Origin
X-Amz-Request-Id: 1623D601B41CBFAE
X-Xss-Protection: 1; mode=block

mc: <DEBUG> Response Time:  99.203176ms

Bucket created successfully `minio-veeam/veeamimmutable`.
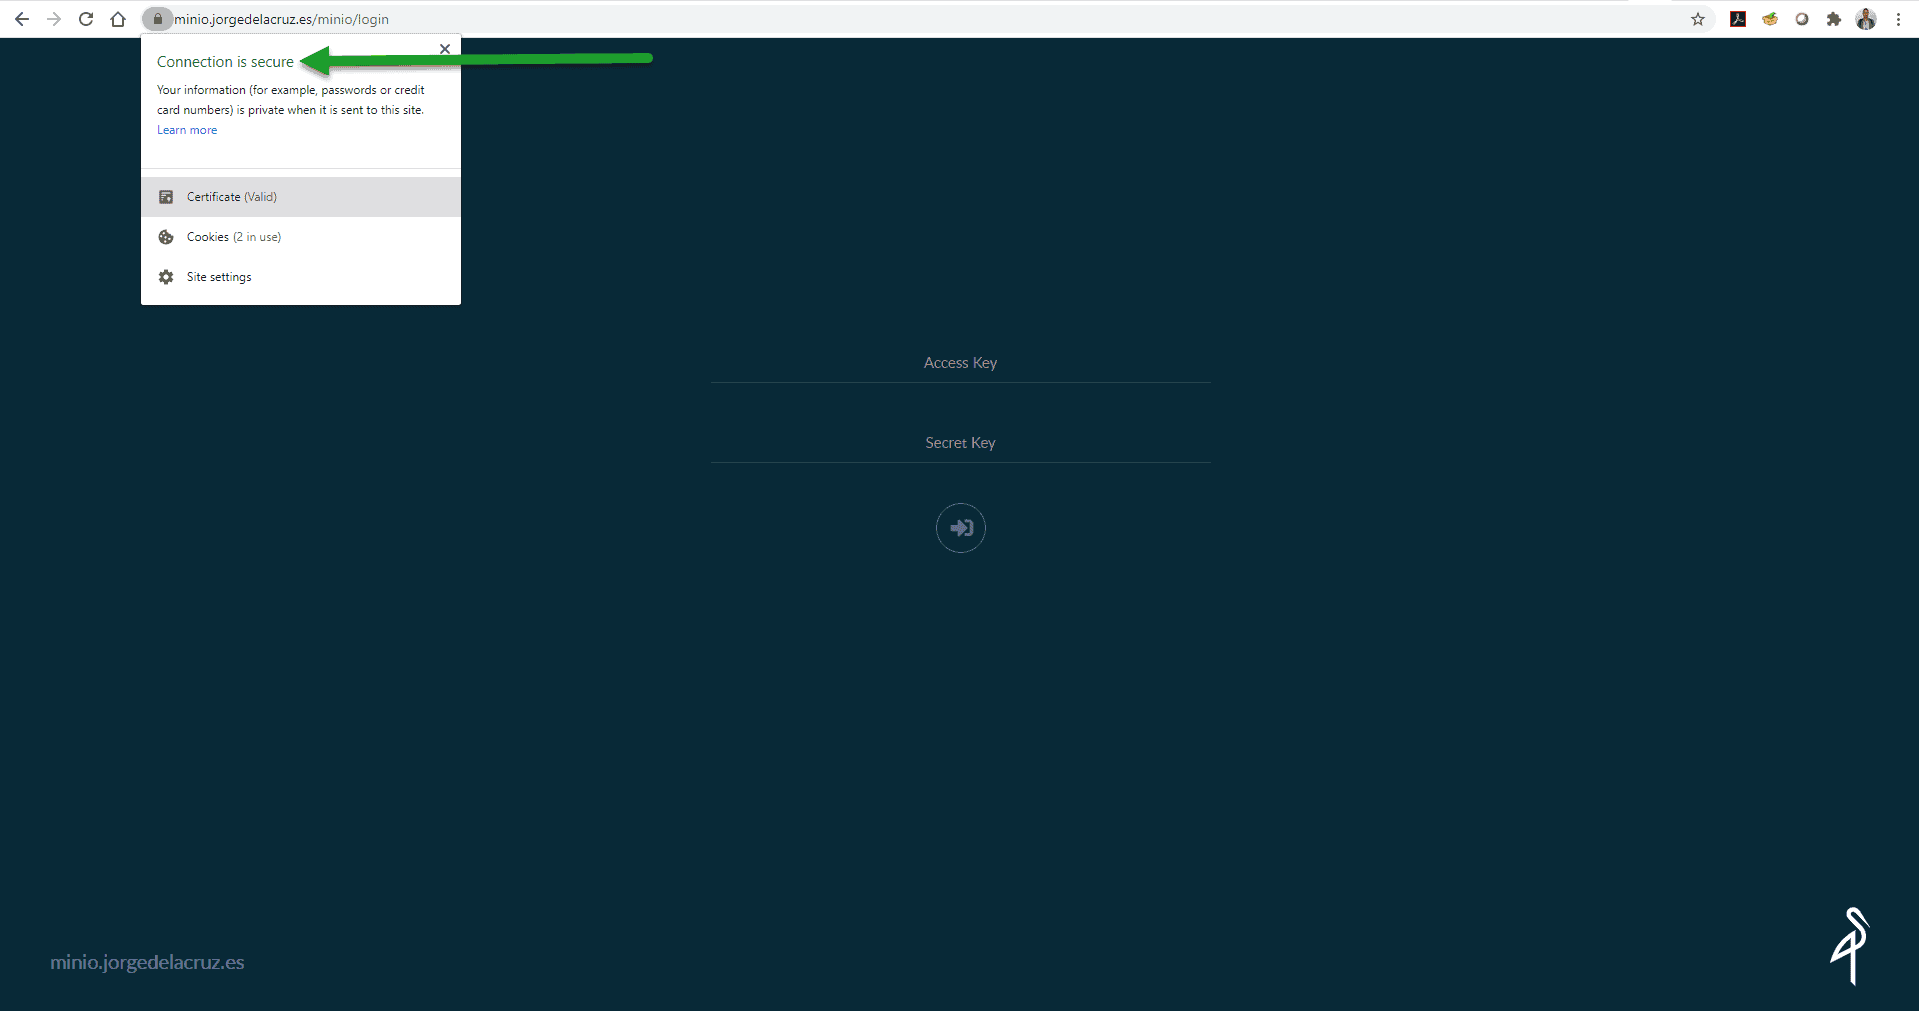
And of course, by HTTPS, we’ll see the following in the client:
 Congratulations! We have everything ready, our particular MinIO, ready, with HTTPS, and using immutable Storage. Let’s go to the last step, the configuration of Veeam Backup & Replication.
Veeam Backup & Replication Configuration with Immutable Storage
Backup Repository Creation – Object Storage
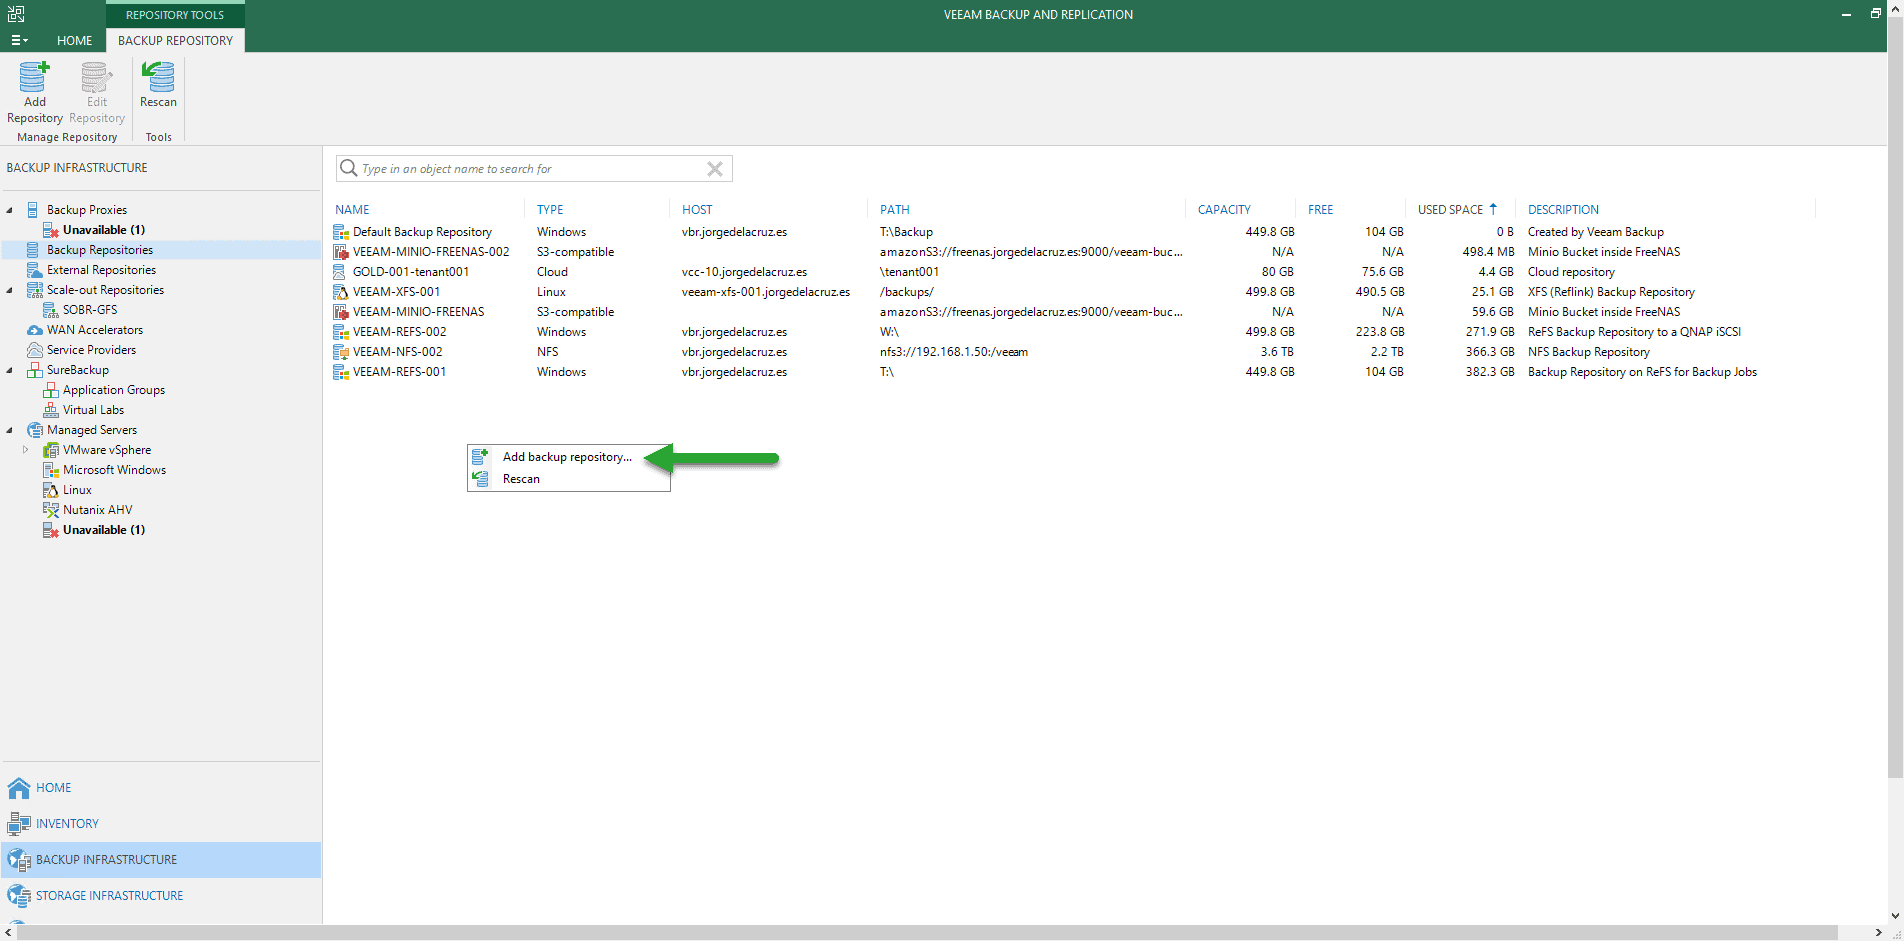
We have everything ready, we will have to be using Veeam Backup & Replication v10 to be able to use MinIO with immutability, we will go to the Backup Infrastructure – Repositories part, and we will create a new one:
 We will select Object Storage type:
 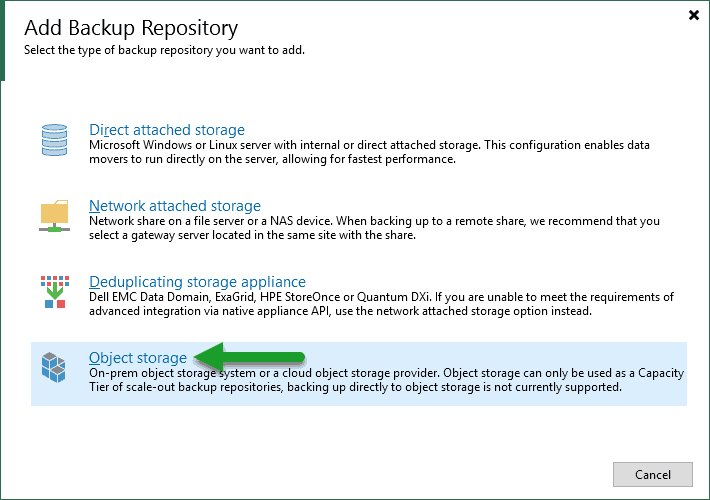 We will select the type S3-Compatible, and once inside we will introduce a name and description for this new Object Storage:
 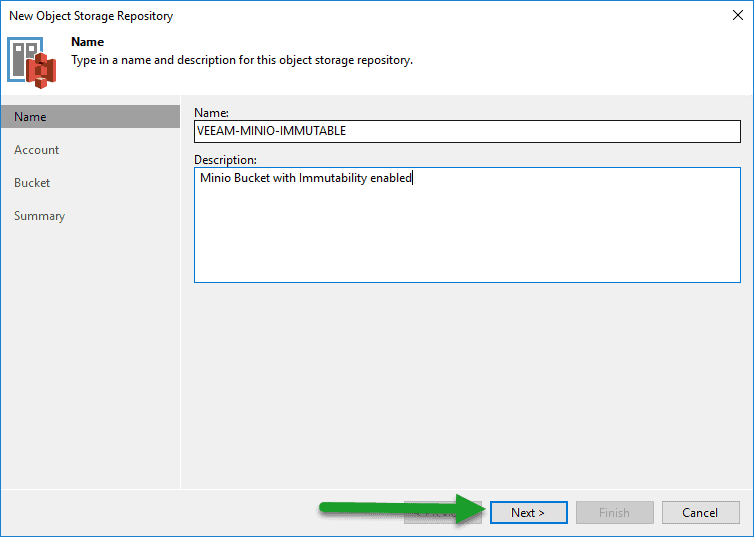 We will select the server, which we have with HTTPS and a valid FQDN and the credentials we have:
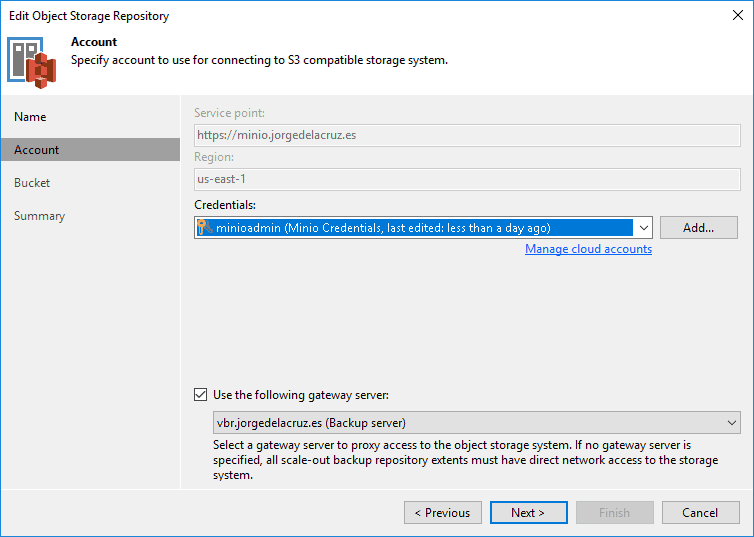 We’ll select the bucket, which in my case is the one we’ve previously created as immutable, as well as entering a folder where we want to save the copies, and the number of days we want to make our immutable backups:
 Finally, if we are happy with everything, we will click on Finish:
 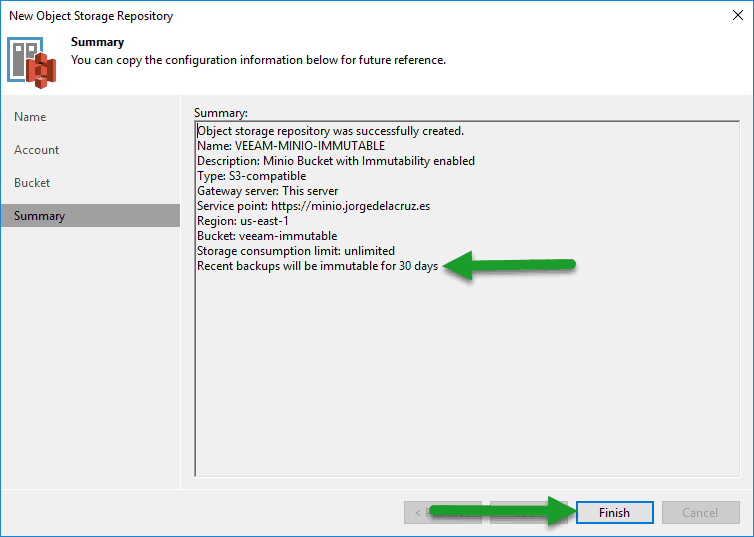 We are now ready to move to the next step.
Scale-out Backup Repository Creation – with MinIO Immutable as Capacity Tier
We’ll go to Scale-out Backup Repositories, and create a new one: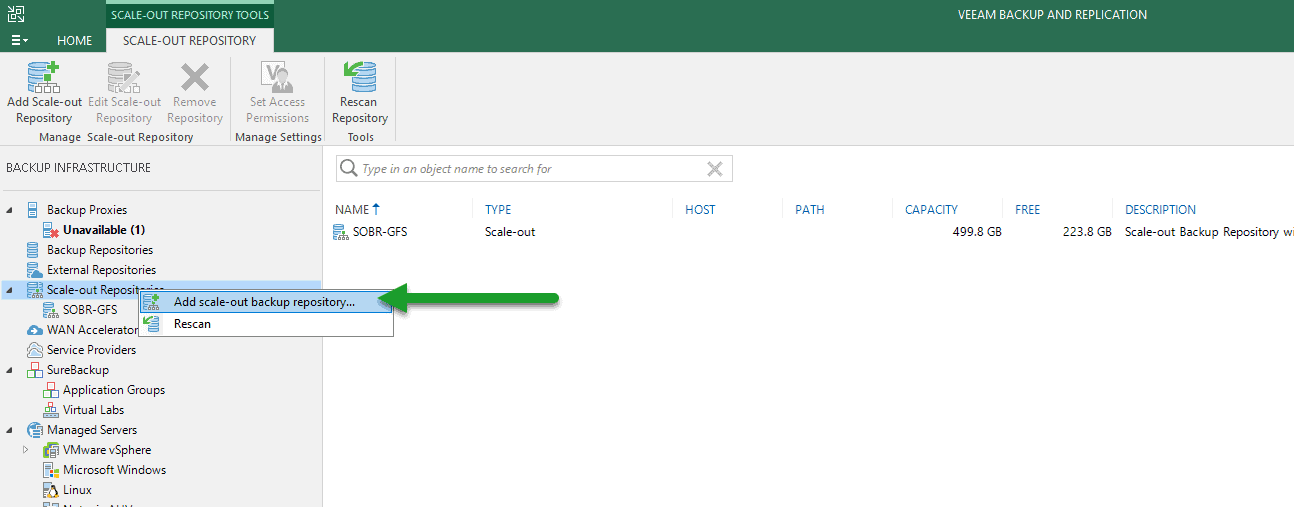 We will enter a name and description that we want:
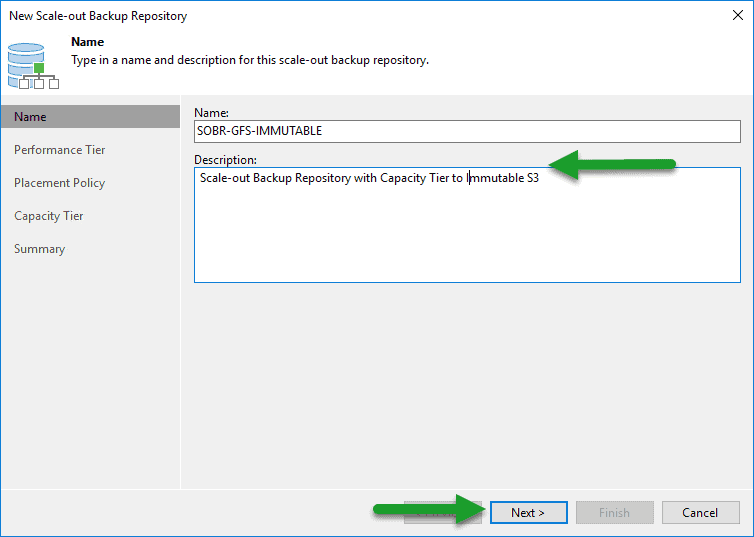
As Performance Tier, we will select a local disk where we already have copies, or where we want to launch copies, be it daily, or the GFS, etc: In the part of Capacity Tier, we will select the new Object Storage to MinIO that already had Immutable configured, and we will select what we want to send, in my case I have selected the copies, besides moving the backups that are complete also, as they are weekly, monthly, etc:
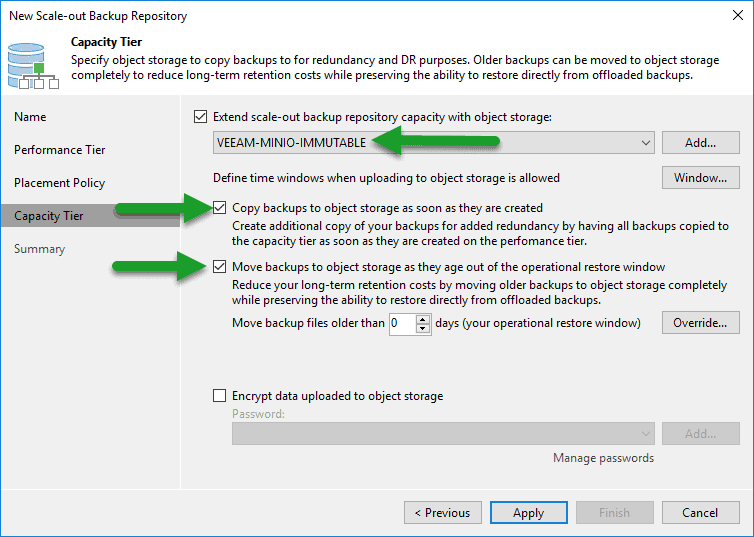
Backup Copy Job creation, pointing to this new SOBR with Immutability
We will create a new Backup Copy job, I prefer pruning as it gives us more reports and visibility: We will select the VM, or the job or jobs that we want to make a copy to this Object Storage repository with Immutability:  We will select the Backup Repository, as well as the restore points to be saved:
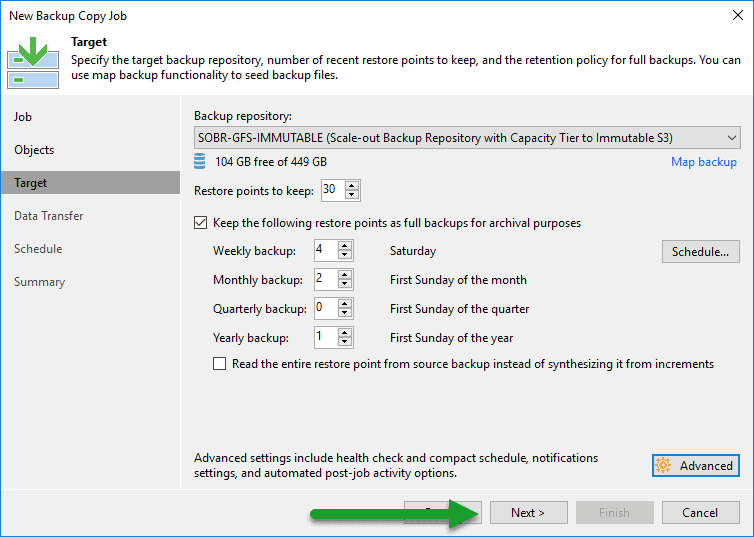 The Backup Copy job will start and continue to be launched every day to copy the new restore points from one location to another:
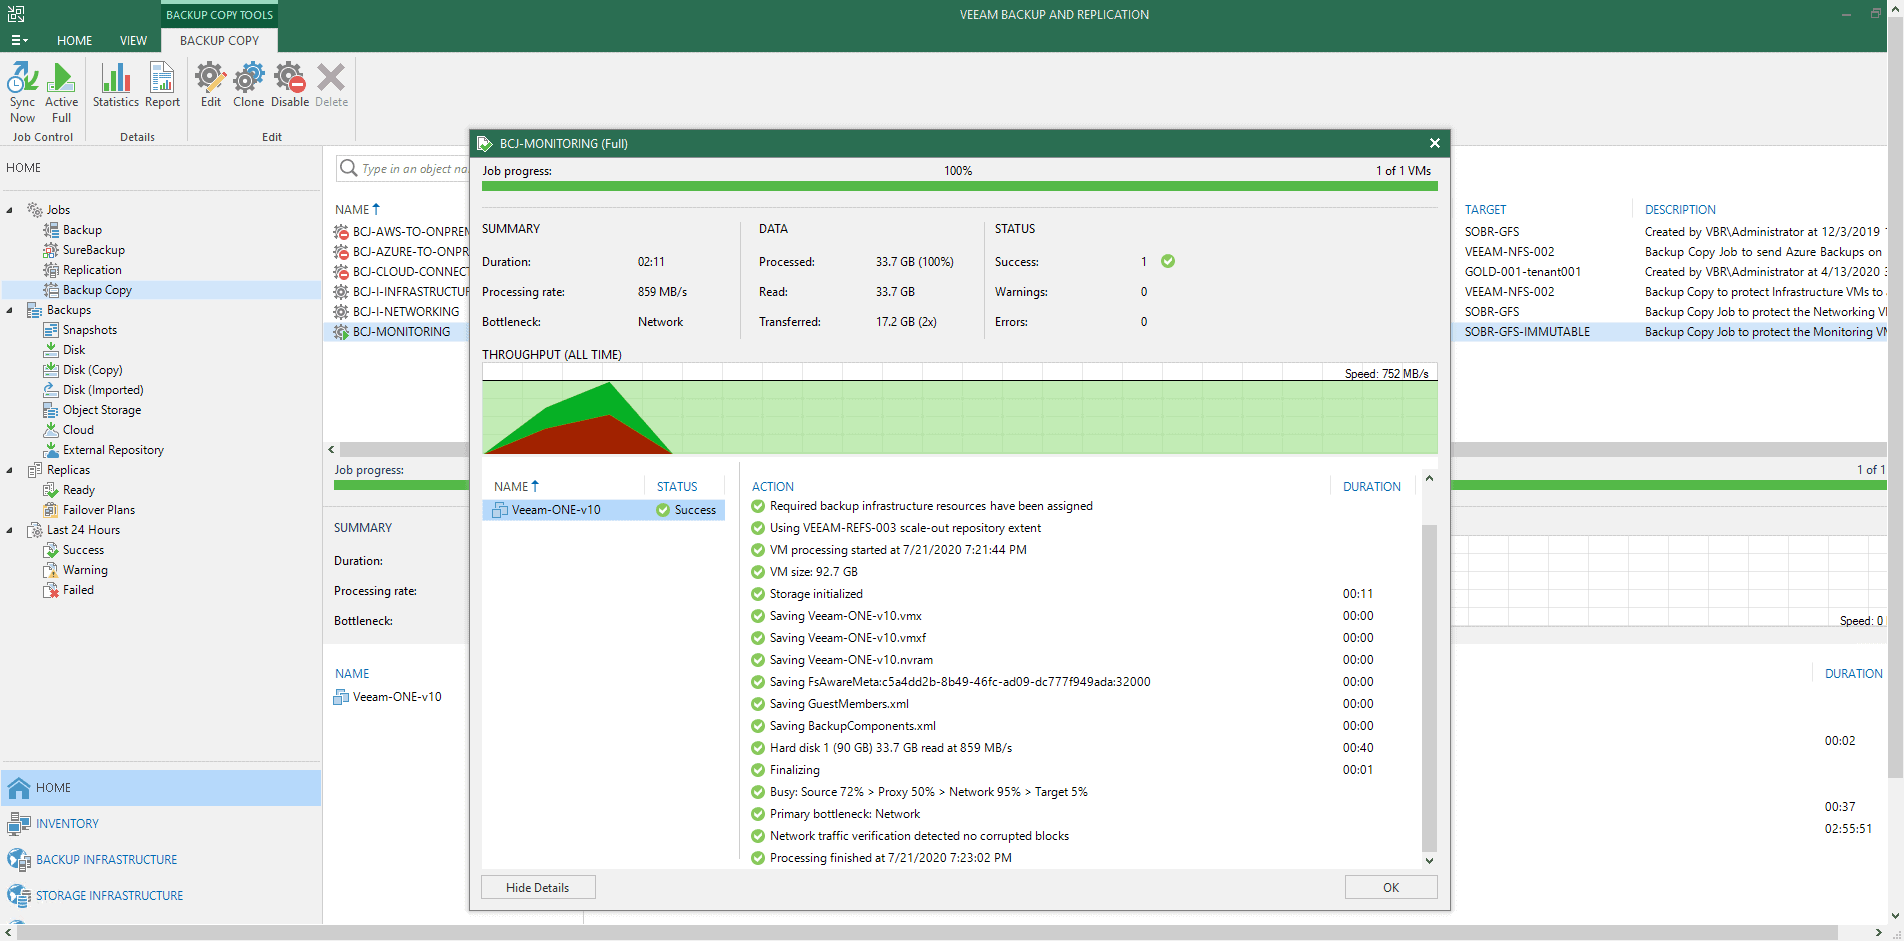
Trying to delete Backups from an Object Storage with Immutability Enabled
If we go to our Object Storage in Veeam, and we want to remove restore points that are in this Object Storage, this is the error that we will get: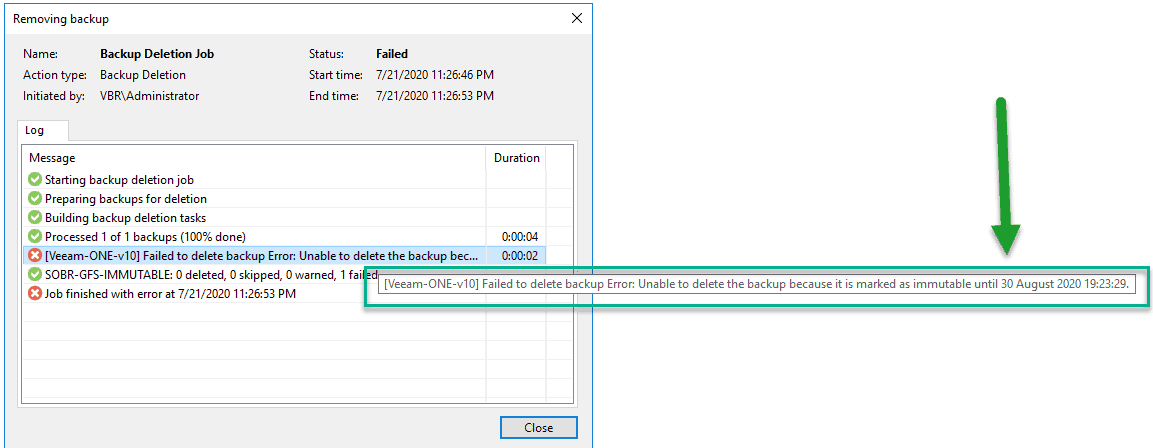 That’s all friends, I hope you liked this blog post so detailed and long, more than 2500 words, I hope it serves you.
Can’t create a lockable bucket… “A header you provided implies functionality that is not implemented” with Minio Server v. RELEASE.2020-07-27T22-43-05Z and Minio Client v. RELEASE.2020-07-17T02-52-20Z. https://forums.veeam.com/object-storage-f52/unoffizial-compatibility-list-for-veeam-cloud-tier-t56956.html indicated MinIO (2020-07-12 or later) supports immutability.
I have exactly the same problem (not implemented with object locking enabled) on version 2020-08-10T22:04:32Z
Hello,
I’ve helped Bill by email, and what it happened was he didn’t followed all the steps, meaning, start MinIO with multiple disks, etc. You NEED to start minio that way in order to enable immutability, as that enables erasure coding.
Super, thanks. Would it be possible to show the same without a domain to create a certificate for? I have tried for hours to create a self signed certificate but to no avail.
Thank you.
Hello Dimitris,
You can create the minio without any SSL, and then it will be presented on http 🙂
For self-signed, I guess first you will need to create a valid self-signed, etc.
https://docs.min.io/docs/how-to-secure-access-to-minio-server-with-tls.html#generate-use-self-signed-keys-certificates
Hi Jorge,
Very nice article, can Minio run automatically without using the manual command line method ?
thanks
Hello Pedro,
Yes, it can, will create another article for it.
Hi Jorge,
Cool, I was searching for this and came across with this github scripts https://github.com/minio/minio-service, I’ll be looking to play with this later.
regards
Yep, exactly that, will create a new blog just covering the step by step.
Best regards
It’s worth noting MinIO is not usable as a capacity repo, since HDD-only hardware doesn’t work well with Veeam – mainly because Veeam stored 4KB of metadata for every 1GB of storage, causing an explosion of random IO after just a few days.
You can edit how Veeam stores the data in object storage, even if there is a regedit that goes up to 8MB/block. Also, there are a few recommendations for hardware – https://www.veeam.com/sys229
Not only is MinIO very usable and a choice I saw in production without issues, but there are also others like Cloudian or now Object First that are HDD-based Object Storage, and they work all very nice too.
If you encountered issues, have you reported them to MinIO or Veeam Support?
Thanks for taking the time to comment!
We switched everything to Hardened Linux Repositories, also to leverage the benefit of Fast Block Cloning via XFS – it feels like it’s a bit more powerful even space-saving wise than using ReFS.
We have been in close contact with both MinIO and Veeam, but MinIO was mainly interested in licensing to provide support and Veeam confirmed the 4KB behaviour and didn’t point at the registry, mainly stating supporting 3rd party solution was out of the scope of support.
Hello Alfonso,
Would you mind to elaborate a bit more how can I help mate?
Thanks!