
 Greetings friends, some time ago I wrote about how to enable these notifications for Veeam Backup for Microsoft 365, it was a success, and very simple until Microsoft, and Google, disabled the normal SMTP on TLS, so many people ended with these notifications broken due the force of OAuth.
Since Veeam Backup for Microsoft 365 v7, you can configure OAuth on the Console, for regular email notifications. But the Audit Email Settings configuration API wasn’t that trivial andeasy to setup, until today. We will go step by step, so you can have those Audit operations working again. Let’s go.
Recommended – All Automated!
Please come here to find everything automated:
You will find there two scripts to make your life easier with this
Audit Diagram in Veeam Backup for Microsoft 365
Before we start with the subject, I think a diagram about how all these works can help us better understand what we are going to do, and activate: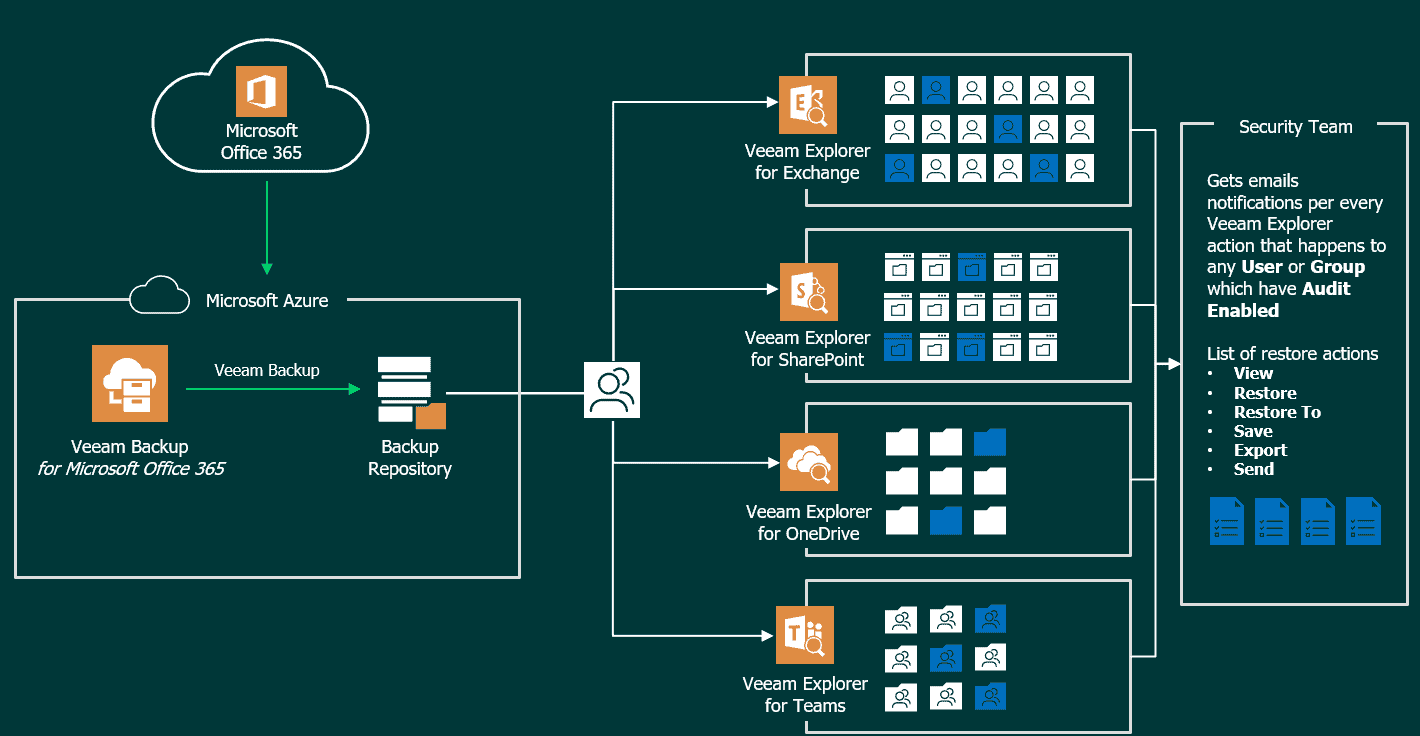
How to Enable the Email Notification of the Audited items – OAuth
We will do the tricky part first. Which is configure the Audit Email Notification. We will use Microsoft 365, because I think it is very standard in conjuction with Veeam Backup for Microsoft 365, but Google OAuth should be very similar.
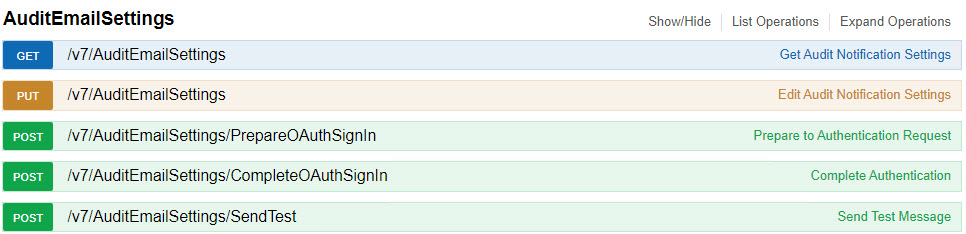
Veeam Backup for Microsoft 365 Swagger – Audit Email Settings
First step: PrepareOAuthSignIn
This configuration is done through RESTful API, once we got Bearer and we are authorized. We will go now to AuditEmailSettings, and we will see the next operations, we will select the first POST, PrepareOAuthSignIn:
 We will need to paste the next payload in the textbox, and click Try it out!
{
  "authenticationServiceKind": "Microsoft365",
  "redirectUrl": "http://localhost/"
}
The result of the query, if all goes well should be Response Code: 200 with the next Body:
{
  "requestId": "VERYLONGREQUESTID",
  "signInUrl": "https://login.microsoftonline.com/YOURTENANTID/oauth2/v2.0/authorize?client_id=YOURCLIENTID&response_type=code&redirect_uri=http%3A%2F%2Flocalhost%2F&response_mode=query&prompt=consent&nonce=SOMELONGSTUFF&scope=openid%20offline_access%20email%20Mail.Send&state=VERYLONGREQUESTID"
}
Great! That worked. So at least we know that PrepareOAuthSignIn is working.
Second step: CompleteOAuthSignIn
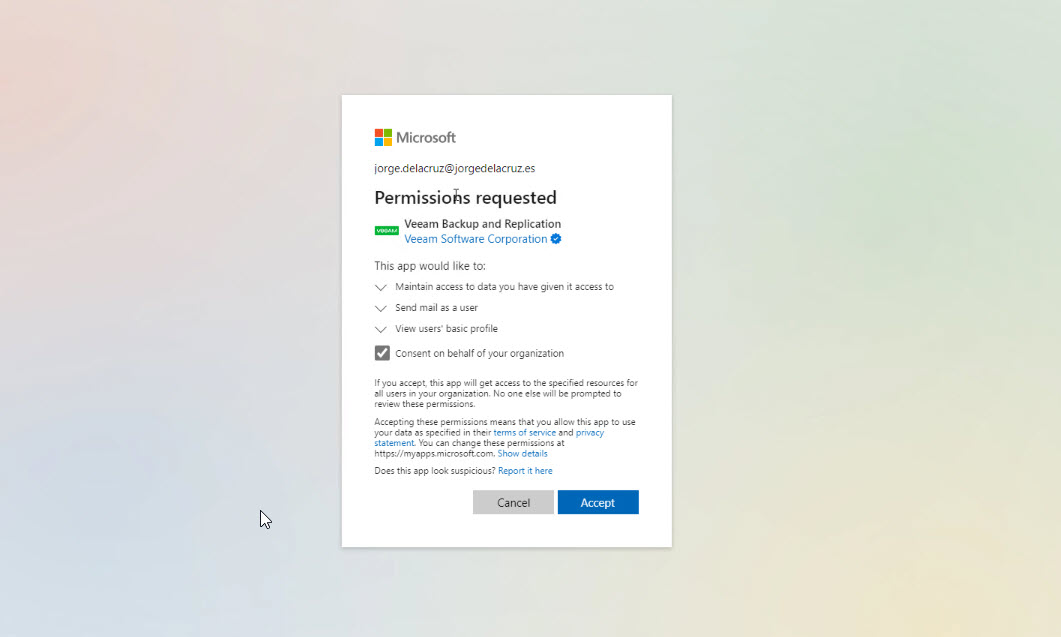
We are close to the end, but now we need to take that signInUrl from the previous response and open it on a web browser, it will ask us to login with an user that has privileges in our tenant, very traditional procedure:
As we have selected localhost as URL, after succesful login it will redirect to a 404 page, which URL is the next:
http://localhost/?code=0.EXTREMELYLONGSTUFF&state=NOTTHATLONGBUTLONGSTUFF&session_state=SOMELESSLONGSTUFF#
It is very simple for you to see here the different values, but on the real-world, this URL it will be extremely long, so I recommend you to take it to a notepad and look for the character &, so basically we need from this URL the next:
- code: 0.EXTREMELYLONGSTUFF
- state: NOTTHATLONGBUTLONGSTUFF
Alright, we are ready to finally open the endpoint and pass the next payload:
{
  "code": "0.EXTREMELYLONGSTUFF",
  "state": "NOTHTATLONGBUTLONGSTUFF"
}
The result of the query, if all goes well should be Response Code: 200 with the next Body:
{
  "requestId": "VERYLONGREQUESTGOODSTUFF",
  "userId": "[email protected]"
}
Take note of those two values, we will need them. Very great work so far!
Third and final step: PUT AuditEmailSettings
That was long, hopefully you are still here, as the last thing to do is open the PUT AuditEmailSettings and pass the next payload. I will recommend the TO: to be a DL where multiple Audit Operators receive everything happening in the VB365 Restore Operations, very simple at the end, right:
{
  "enableNotification": true,
  "from": "[email protected]",
  "to": "[email protected]",
  "subject": "VBO Audit - %StartTime% — %OrganizationName% - %DisplayName% - %Action% - %InitiatedByUserName%",
  "authenticationType": "Microsoft365",
  "userId": "[email protected]",
  "requestId": "VERYLONGREQUESTGOODSTUFF"
}
The result of the query, if all goes well should be Response Code: 200, and no content. But on your destination TO: email address you will receive the next email:
 All good, for now! At least the email traffic flow configuration is working.
LEGACY: But I am using normal SMTP!
Good, then you just need to do the next on the PUT AuditEmailSettings:
{
 "enableNotification": true,
 "smtpServer": "smtp.office365.com",
 "port": 587,
 "useAuthentication": true,
 "username": "[email protected]",
 "userPassword": "YOURPASS",
 "useSSL": true,
 "from": "[email protected]",
 "to": "[email protected]",
 "subject": "VBO Audit - %StartTime% — %OrganizationName% - %DisplayName% - %Action% - %InitiatedByUserName%"
}
How to Enable Auditing of protected items with Veeam Backup for Microsoft 365
We have all the help and official information in the following link, but it is really very simple, if we look at the diagram above, we will see that to receive notifications, we must first select the items we want to audit. We have two types that we can audit, the Users (Exchange Mailboxes, Shared Mailboxes, OneDrive for Business, etc.), and the Groups (SharePoint and Teams).
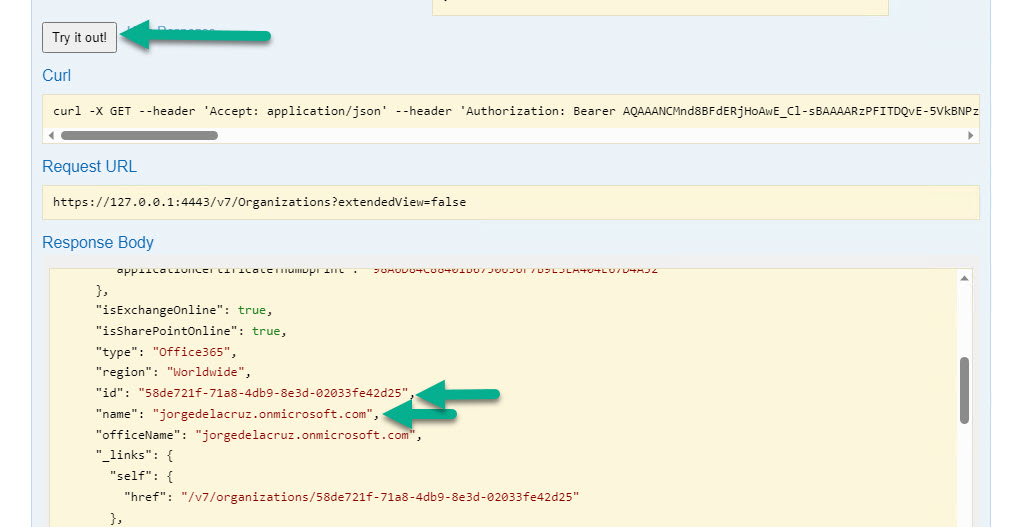
To start making a deeper visualization of what happens of one or the other, we have to know the ID, and the name of what we want to audit, we will see the example with a User, we will have to go first to Organizations, since we need to know our Organization ID, from our swagger – https://YOURVB365:4443 and you do the Auth at the end of the page to obtain the token, then on the top to login, then you go to Organizations, expand the GET, and click on Try it out, you will see something similar to this:
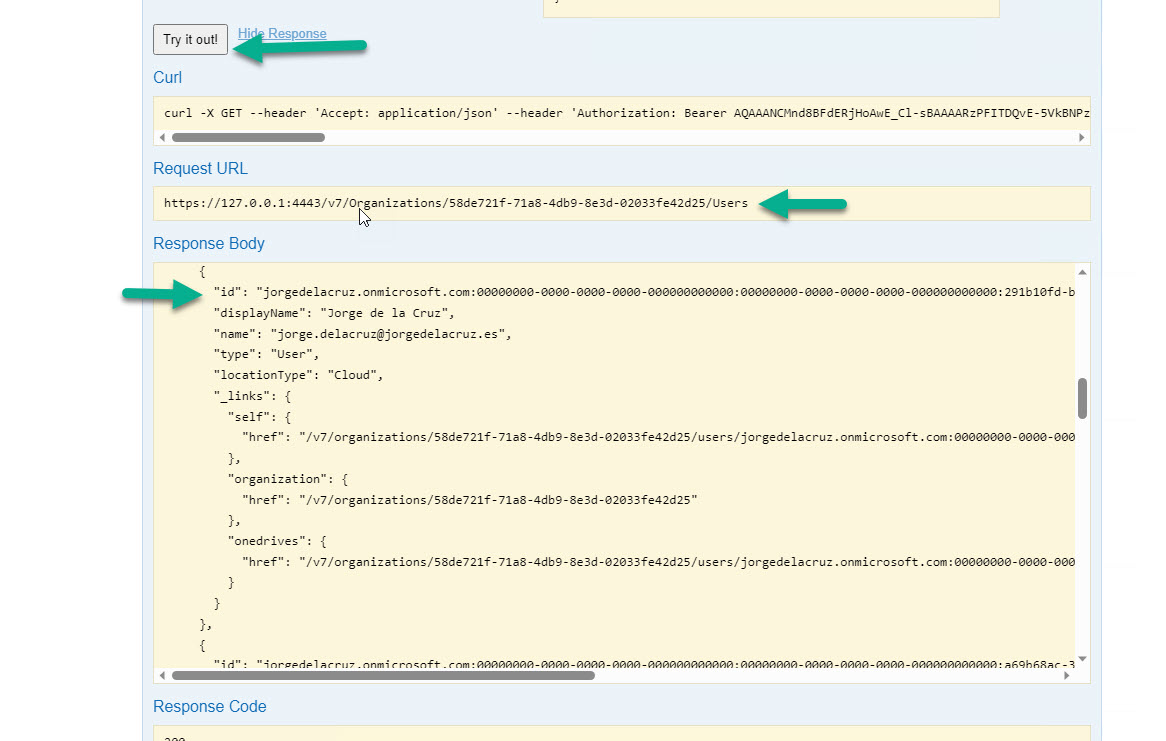
Now that we know our Organization ID, we will go to OrganizationUser and expand the GET, where we ask for the Organization ID, once we paste it we give Try it out!
This will give us back all the users, in my case in which I want to enable the audit is Jorge de la Cruz, so the relevant data are the following: ID, displayName, and name
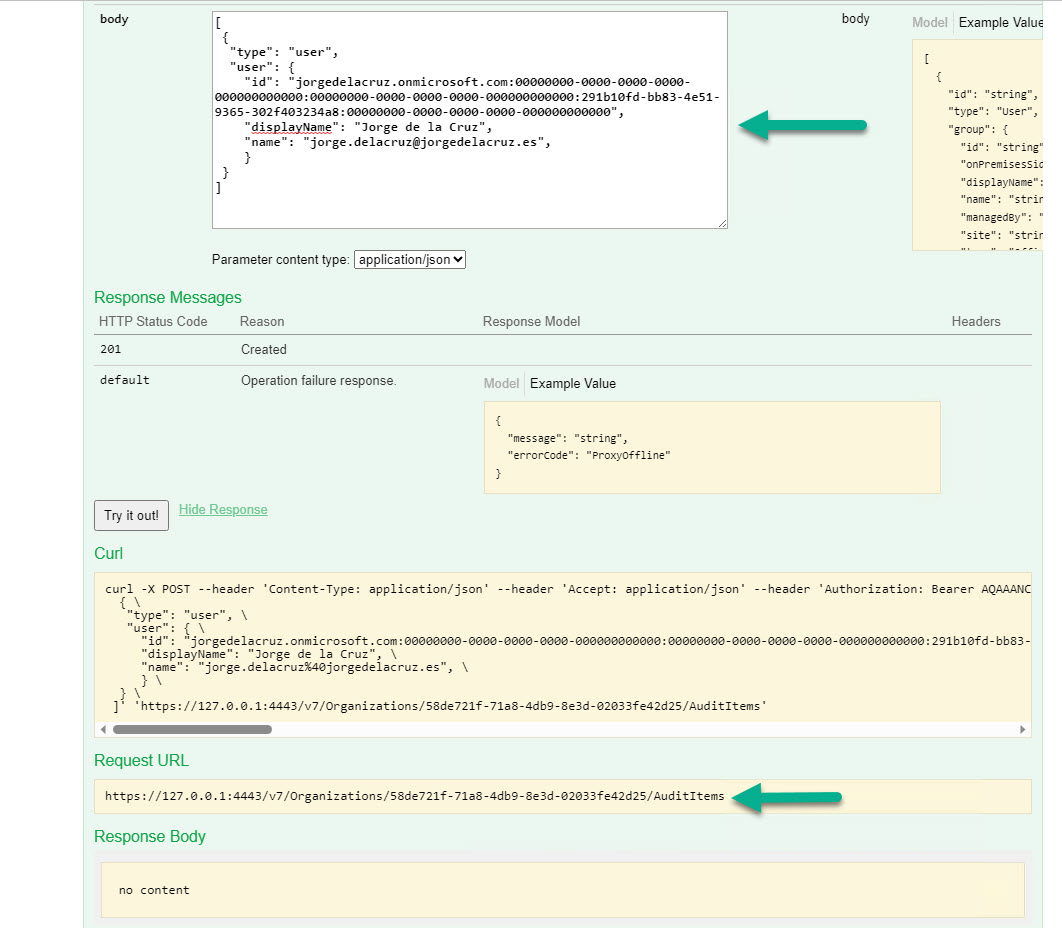
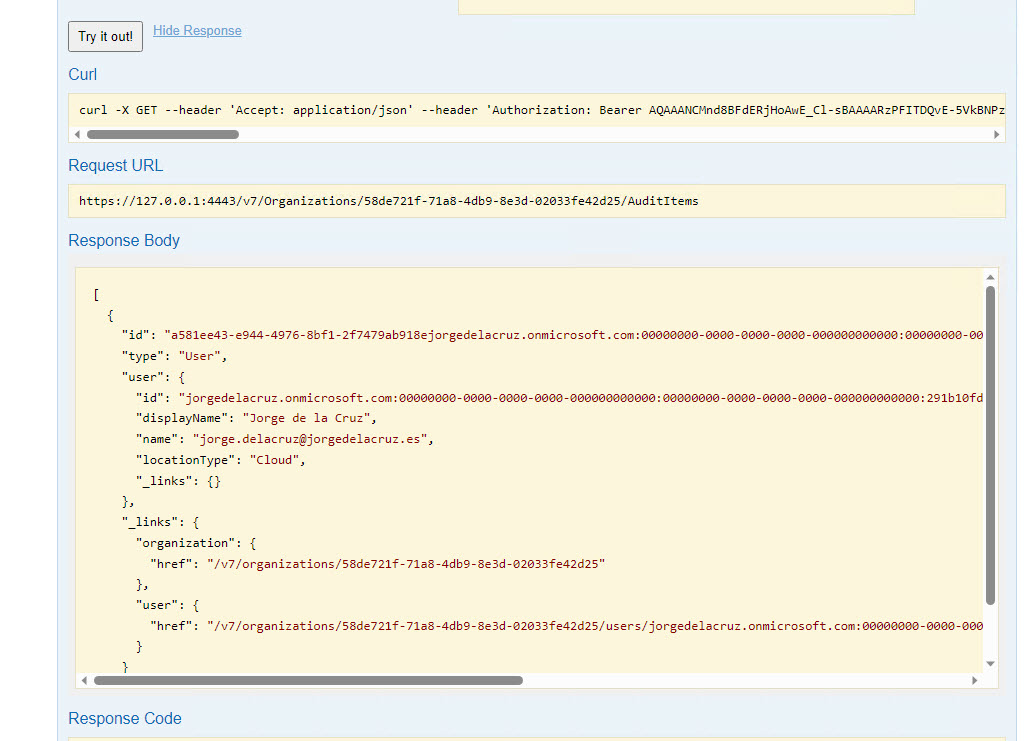
We are almost there! We will finally go to OrganizationAudit, and in the AuditItems POST, we will introduce our Organization ID, and the following code with the user, or users, or groups. It is a .json, so at once we can add as many components as we want:
[
 {
  "type": "user",
  "user": {
    "id": "jorgedelacruz.onmicrosoft.com:00000000-0000-0000-0000-000000000000:00000000-0000-0000-0000-000000000000:291b10fd-bb83-4e51-9365-302f403234a8:00000000-0000-0000-0000-000000000000",
    "displayName": "Jorge de la Cruz",
    "name": "[email protected]",
    }
 }
]
The result would have to be something like this, we will hit the Try it out button as always, we will have to receive a 200 to know that everything has gone well:
If we wanted to check that everything has been added in a satisfactory way, very quickly we go to the GET of AutidItems, and check what we have:
We see that everything has gone well and we have our users, this would help us to check which users and groups we are auditing.
We already have everything ready. What is left for us? Open the Veeam Explorers and start playing.
A Real-Life Example of Audit being sent in Real-Time
As I say, no matter if we open the Explorer from the server, or from a Tenant, or from another PC, any element that we open, restore, or export, the relevant security email will be sent so that everything is audited, for example:
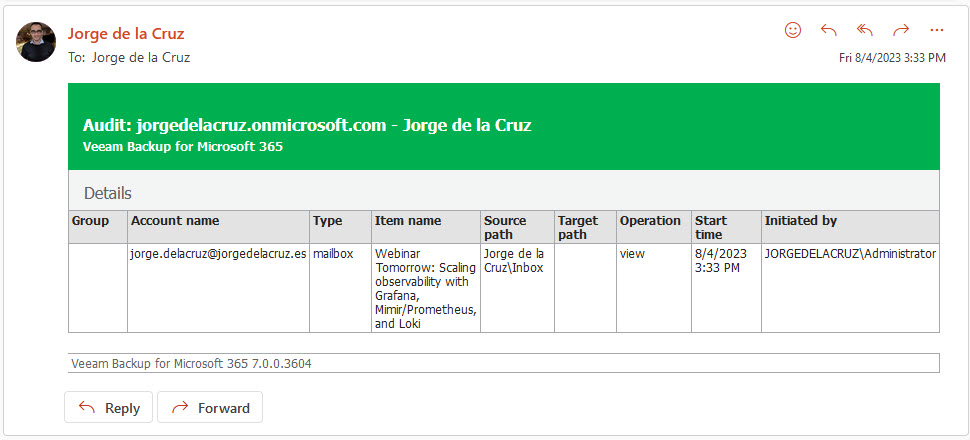
I have opened an Exchange Explorer, and in a user where the audit is enabled I have View an email to browse it:
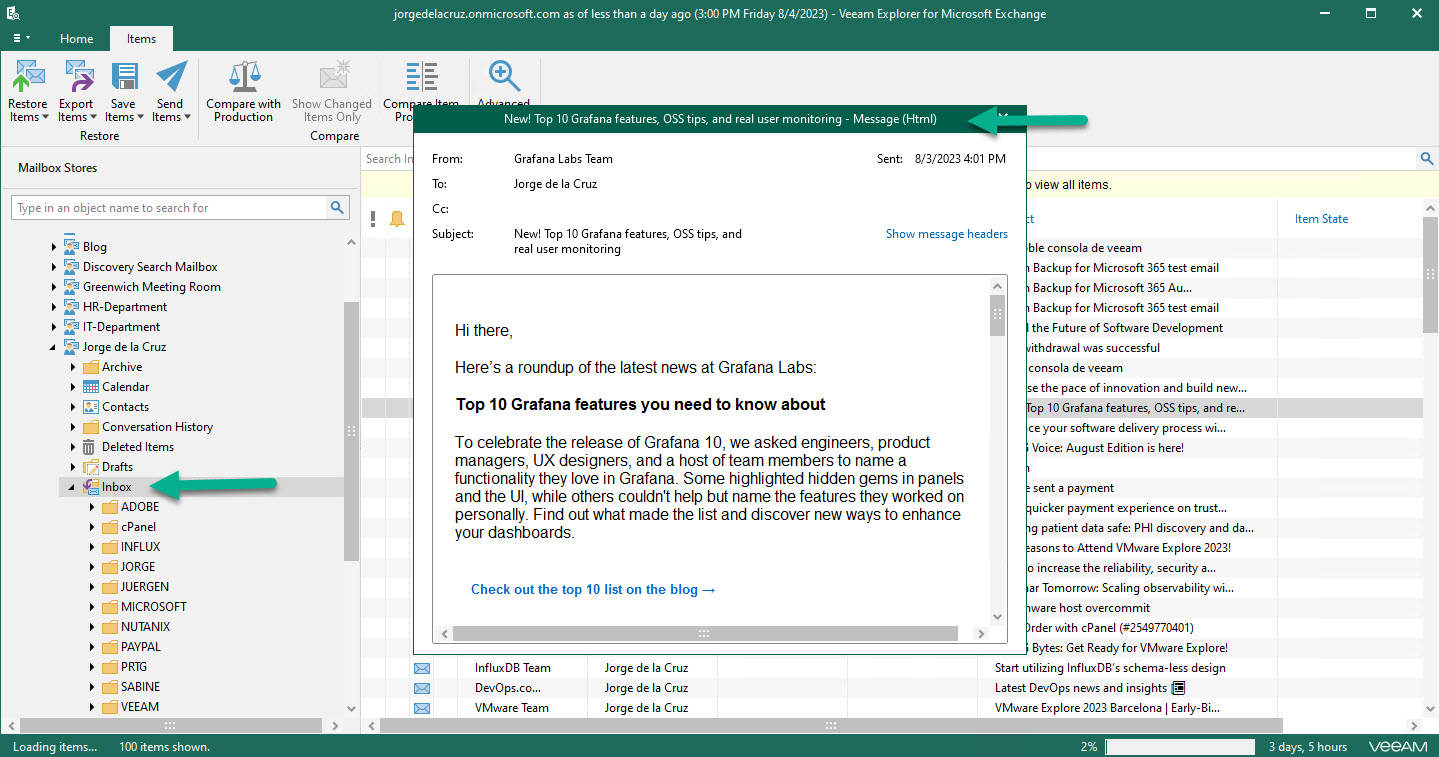
I immediately received this message on my security account where I am auditing who does what and when:
 Now I have decided to export an email to my computer as .msg:
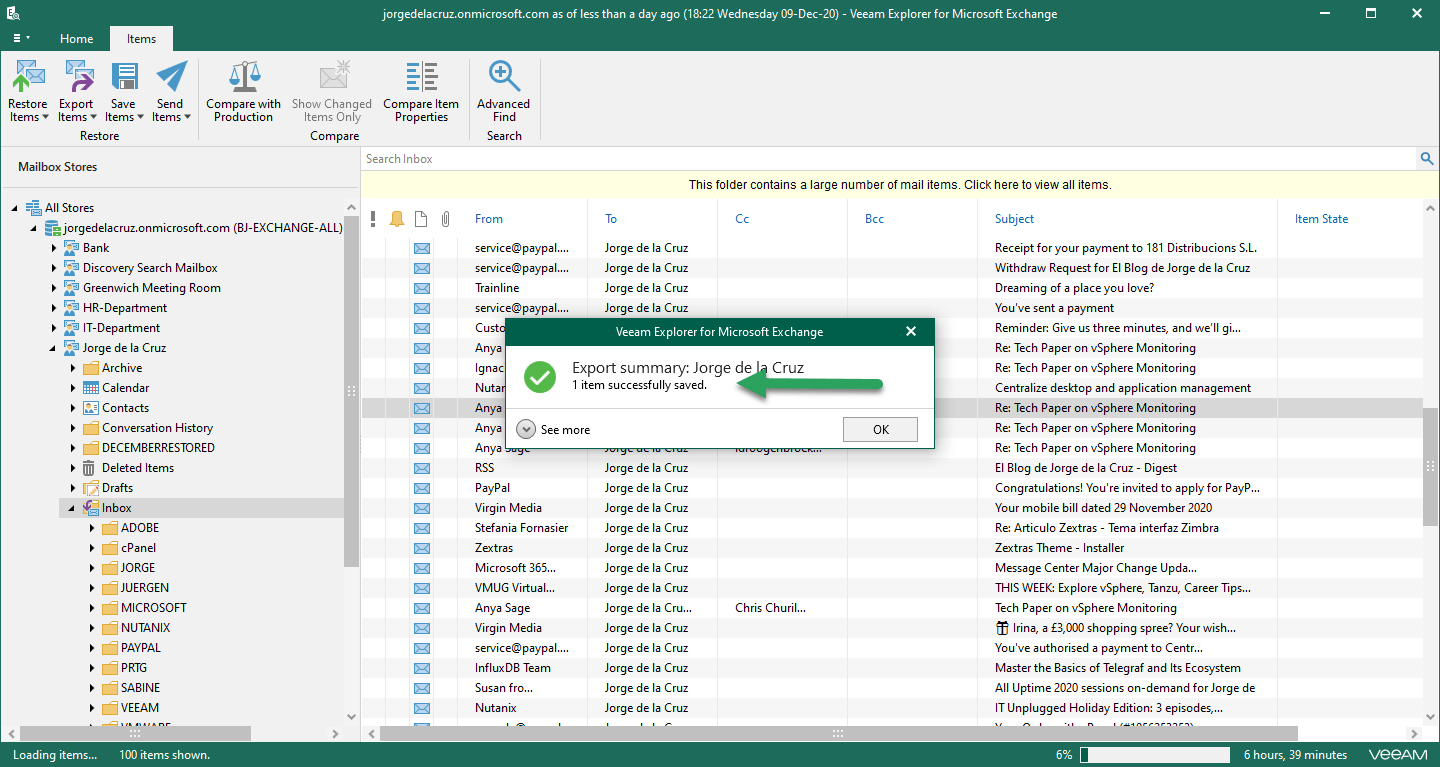
I have immediately received this message in my security account where I am auditing who does what and when, and in this case where I have exported the item: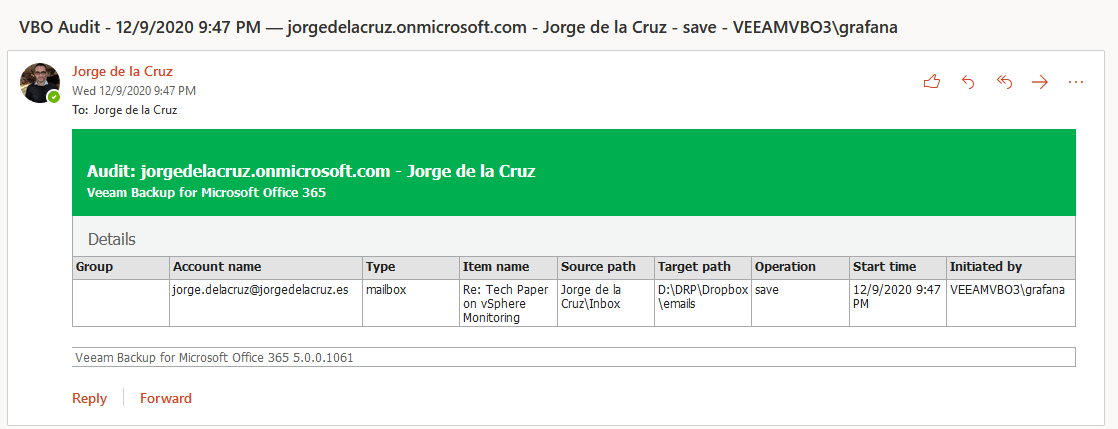
I leave you another example, this time of restoration of OneDrive for Business: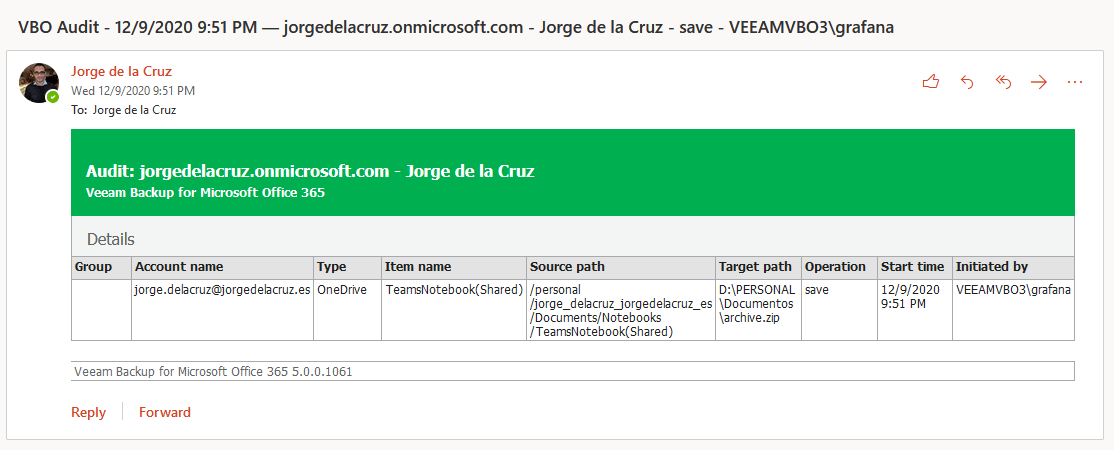
This is very, very powerful, and will surely give us a lot of play in the near future. I hope you find it useful, thank you very much for reading.
Leave a Reply