
 Greetings friends, today I bring you a very interesting blog post for Service Providers, but not limited to these.
Today I bring you a step further, and it’s about taking advantage of the functionality of being able to launch Backups from cPanel users to a Cloud Connect Provider that includes Veeam Agent for Linux 2.0, each backup assigned to its tenant, etc..
As this Blog post has been a little long for me, I leave you the menu so that you can jump to where it is more interesting for you:
- 1.- Topology and brief explanation of the Infrastructure
- 2.- Installing Veeam Agent for Linux 2.0
- 3.- Quick overview of Veeam Agent for Linux 2.0 CLI commands
- 4.- Add the different tenants of Cloud Provider for each tenant
- 5.- Creation of the pre-freeze and post-thaw scripts with cPanel Backup
- 6.- Creating and programming the copy jobs of Veeam Agent for Linux 2.0
- 7.- Launch the copy jobs of Veeam Agent for Linux 2.0
- 8.- Checking as Service Provider that the Backups have been executed
- 9.- Access as tenant to the Backup files using Veeam Agent FLR Linux (File-level-recovery)
1.- Topology and brief explanation of the Infrastructure
As always, I would like to leave you with a diagram of how this Infrastructure and the data flow between cPanel, Veeam Cloud Connect and the tenants will look like:
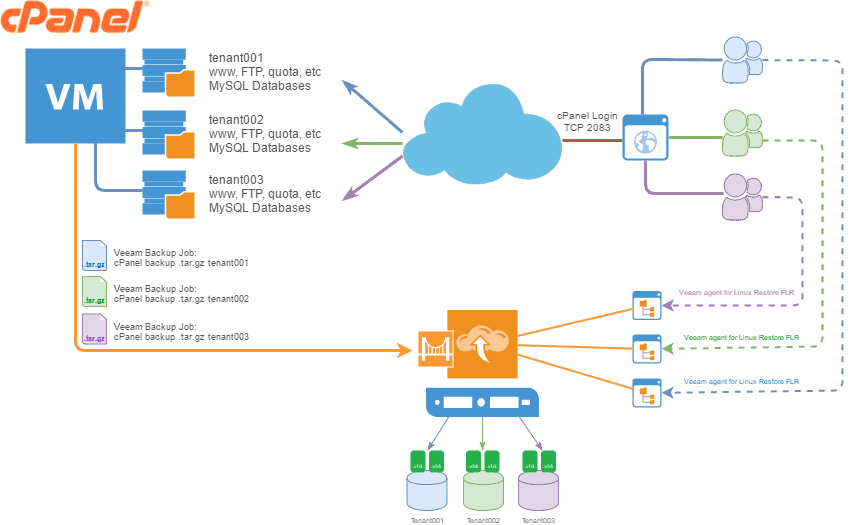 To make this whole environment work we’ll have to have the following:
- A cPanel WHM license, and root access to shell. (We could also extra polarize this to a LAMP server with multiple workloads, etc, but it would be more manual)
- Veeam Agent for Linux 2.0 Server Edition – We will use the Server version as we want to create multitasks, one for each tenant, and of course make use of the pre-freeze and post-shaw scripts that will generate the backup of each tenant.
- A provider, or Veeam Cloud Connect providers, you can have a look at the list here – https://www.veeam.com/find-a-veeam-cloud-provider.html
Once we have everything ready, we can move on to the next point.
2.- Installing Veeam Agent for Linux 2.0
The installation process is very simple following these steps, as my cPanel runs on CentOS 6.x, I will use the GitHub binary file to download the corresponding version:
wget https://download2.veeam.com/veeam-release-el6-1.0-1.x86_64.rpm --2018-05-03 18:38:19-- https://download2.veeam.com/veeam-release-el6-1.0-1.x86_64.rpm Resolving download2.veeam.com... 52.85.71.171 Connecting to download2.veeam.com|52.85.71.171|:443... connected. HTTP request sent, awaiting response... 200 OK Length: 7863 (7.7K) [application/octet-stream] Saving to: veeam-release-el6-1.0-1.x86_64.rpm 100%[===============>] 7,863 --.-K/s in 0s 2018-05-03 18:38:19 (371 MB/s) - veeam-release-el6-1.0-1.x86_64.rpm saved [7863/7863]
Once we have downloaded the file, we will install it in the following way and update the packages:
rpm -ivh ./veeam-release* && yum check-update
Preparing...                ########################################### [100%]
   1:veeam-release-el6      ########################################### [100%]
Loaded plugins: fastestmirror, universal-hooks
Loading mirror speeds from cached hostfile
epel/metalink                                                                                                                                     |  25 kB     00:00
 * EA4: 85.13.201.2
 * cpanel-addons-production-feed: 85.13.201.2
 * base: mirror.ams1.nl.leaseweb.net
 * epel: ftp.nluug.nl
 * extras: mirror.ams1.nl.leaseweb.net
 * updates: mirror.ams1.nl.leaseweb.net
EA4                                                                                                                                               | 2.9 kB     00:00 ...
cpanel-addons-production-feed                                                                                                                     | 2.9 kB     00:00 ...
MariaDB101                                                                                                                                        | 2.9 kB     00:00
base                                                                                                                                              | 3.7 kB     00:00
digitalocean-agent                                                                                                                                | 3.3 kB     00:00
epel                                                                                                                                              | 4.7 kB     00:00
extras                                                                                                                                            | 3.4 kB     00:00
influxdb                                                                                                                                          | 2.5 kB     00:00
updates                                                                                                                                           | 3.4 kB     00:00
veeam                                                                                                                                             | 3.3 kB     00:00
veeam/primary_db                                                                                                                                  | 5.8 kB     00:00

veeam-release-el6.x86_64                                                                  1.0.5-1                                                                   veeam
root@lonhst01 [~]# yum install veeam
Loaded plugins: fastestmirror, universal-hooks
Setting up Install Process
Loading mirror speeds from cached hostfile
 * EA4: 85.13.201.2
 * cpanel-addons-production-feed: 85.13.201.2
 * base: mirror.nforce.com
 * epel: mirror.vorboss.net
 * extras: mirror.nforce.com
 * updates: mirror.nforce.com
Resolving Dependencies
--> Running transaction check
---> Package veeam.x86_64 0:2.0.0.400-1.el6 will be installed
--> Processing Dependency: veeamsnap = 2.0.0.400 for package: veeam-2.0.0.400-1.el6.x86_64
--> Running transaction check
---> Package kmod-veeamsnap.x86_64 0:2.0.0.400-1.el6 will be installed
--> Finished Dependency Resolution

Dependencies Resolved

=================================================
 Package                    Arch     Version     Repository     Size
=================================================
Installing:
 veeam                    x86_64     2.0.0.400-1.el6     veeam     29 M
Installing for dependencies:
 kmod-veeamsnap           x86_64     2.0.0.400-1.el6     veeam     100 k

Transaction Summary
=================================================
Install       2 Package(s)

Total download size: 29 M
Installed size: 77 M
Is this ok [y/N]:
The process will then ask us if we want to install the two packages and dependencies, which we will say AND, the wizard will also ask us if we want to install the Veeam repository key, we will say AND also, the installation process takes just a few seconds:
Downloading Packages:
(1/2): kmod-veeamsnap-2.0.0.400-1.el6.x86_64.rpm                                                                                                  | 100 kB     00:00
(2/2): veeam-2.0.0.400-1.el6.x86_64.rpm                                                                                                           |  29 MB     00:00
----------------
Total                                                                                                                                     40 MB/s |  29 MB     00:00
warning: rpmts_HdrFromFdno: Header V4 RSA/SHA1 Signature, key ID 8aaddc66: NOKEY
Retrieving key from http://repository.veeam.com/keys/RPM-GPG-KEY-VeeamSoftwareRepo
Retrieving key from file:///etc/pki/rpm-gpg/VeeamSoftwareRepo
Importing CA key 0xFBF8A590:
 Userid : Veeam Software Repository key <[email protected]>
 Package: veeam-release-el6-1.0-1.x86_64 (installed)
 From   : /etc/pki/rpm-gpg/VeeamSoftwareRepo
Is this ok [y/N]:
GPG key signature verified against CA Key(s)
Retrieving key from http://repository.veeam.com/keys/VeeamSoftwareRepo
Retrieving key from file:///etc/pki/rpm-gpg/VeeamSoftwareRepo
GPG key signature verified against CA Key(s)
Running rpm_check_debug
Running Transaction Test
Transaction Test Succeeded
Running Transaction
  Installing : kmod-veeamsnap-2.0.0.400-1.el6.x86_64                                                                                                                 1/2
  Installing : veeam-2.0.0.400-1.el6.x86_64                                                                                                                          2/2
Starting veeamservice: [  OK  ]
  Verifying  : veeam-2.0.0.400-1.el6.x86_64                                                                                                                          1/2
  Verifying  : kmod-veeamsnap-2.0.0.400-1.el6.x86_64                                                                                                                 2/2
Installed:
  veeam.x86_64 0:2.0.0.400-1.el6
Dependency Installed:
  kmod-veeamsnap.x86_64 0:2.0.0.400-1.el6
Complete!
We already have Veeam Agent for Linux 2.0 installed, let’s now quickly install the license using CLI too, as simple as running the following command, remember that we need the license from Server for this case of use:
root@lonhst01 [~]# veeamconfig license install --path /root/veeamlicense.xml --server
License was installed successfully.
License information:
  License source: Local license
  Expiration date: 2019/03/25 (326 days left)
  Status: License is valid.
  Mode: Server
  Issued to: Jorge de la Cruz
  Email: [email protected]
3.- Quick overview of Veeam Agent for Linux 2.0 CLI commands
For this tutorial we are going to configure everything using the Veeam Agent for Linux 2.0 CLI, so we get used to the commands and can later create simple scripts to automate the creation of more copy jobs for other tenants, etc. In the end it is what makes a Service Provider more efficient, to automate tasks like these.
Of all the commands that we have that start with veeam*, we are going to put special emphasis on veeamconfig, that if we launch a help it returns us the following:
veeamconfig --help
Veeam Agent for Linux
(c) Veeam Software AG
  Usage: veeamconfig [command]
Commands:
  repository               - Backup repositories management
  vbrserver                - Veeam Backup and Replication servers management
  job                      - Backup jobs management
  backup                   - Backups management
  point                    - Restore points management
  license                  - License management
  config                   - Import/export configuration
  schedule                 - Jobs schedule configuration
  cloud                    - Cloud provider management
  mode                     - Operation mode
  session                  - Sessions management
  ui                       - User interface
  version, --version, -v   - Product version
  help, --help, -h         - Short help
As we can see, some of the most basic commands would be the version command and the help command, for example:
veeamconfig -v
v2.0.0.400
If we go to the license that we have used previously we can see the installed license, as well as delete it, etc.:
veeamconfig license --help
Veeam Agent for Linux
(c) Veeam Software AG
  Usage: veeamconfig license [command]
Commands:
  show               - Display information about license
  install            - Install license
  remove             - Remove local license
  help, --help, -h   - Short help
In my case this is the license:
veeamconfig license show
License information:
  License source: Local license
  Expiration date: 2019/03/25 (325 days left)
  Status: License is valid.
  Mode: Server
  Issued to: Jorge de la Cruz
  Email: [email protected]
If we already jump to the other more advanced values, we can see that we have cloud, job, schedule, repository that at the end are the most important, each one of them can be added the -help to know more information, we will see the most important and its help below.
4.- Add the different tenants of Cloud Provider for each tenant
If we remember the diagram in point 1, we want each tenant to have the backup of his cPanel account in his own Veeam Cloud Connect Repository using his own VCC tenant, so we will use the command veeamconfig cloud to create the different tenants, we will start with the help:
veeamconfig cloud --help
Veeam Agent for Linux
(c) Veeam Software AG
  Usage: veeamconfig cloud [command]
Commands:
  add                - Add Cloud Connect provider
  edit               - Edit Cloud Connect provider
  resync             - Resync (refresh) available repositories list
  delete             - Delete Cloud Connect provider from database
  list               - List all Cloud Connect providers
  help, --help, -h   - Short help
Quite simply the command that we will have left will be something similar to this one, that we will have to launch as many times as tenants have, apart from changing the name, URL and credentials of course:
veeamconfig cloud add --name tenant001 --address cloud.veeam.tech --port 6180 --login tenant001 --password Veeam123
Cloud provider certificate information:
   Issuer: /CN=cloud.veeam.tech
   Subject: /CN=cloud.veeam.tech
   Version: 2
   Fingerprint: 708128F99AAB7393A279B7895D6CA79FEC5E6DED
Is this information correct? (yes/no) yes
Cloud Connect provider has been added successfully.
This way we are adding the different Cloud providers that we can use later to create the backup jobs.
If we want to list the Cloud providers, and the tenant user we are using, we can use the following command:
root@lonhst01 [~]# veeamconfig cloud list
Name        ID                                      Address                  Gate servers  Username
tenant001   {74187486-5683-4e01-b731-5ebfd20b604d}  cloud.veeam.tech:6180                tenant001
tenant002   {abc662a4-29ca-4832-868f-a661b601538e}  cloud.veeam.tech:6180                tenant002
tenant003   {403483f4-6d99-4607-9bf0-531ca6214c0c}  cloud.veeam.tech:6180                tenant003
Once we have all the Veeam Cloud Connect, it is interesting to know the name and ID of the Repositories that these providers have assigned to us, for this as simple as a veeamconfig repository list, where we can see for each cloud provider and having the repository assigned to them, remember the name of them:
root@lonhst01 [~]# veeamconfig repository list
Name                                             ID                                      Location    Type   Backup server
[CLOUD.VEEAM.TECH][tenant001]CC-REPO-100       {8d3068fb-c48c-4678-ac6c-d2605324c242}  tenant001   cloud
[CLOUD.VEEAM.TECH][tenant002]CC-REPO-REFS-002  {1a958292-2510-4fd5-8ca2-d1308f849b05}  tenant002   cloud
[CLOUD.VEEAM.TECH][tenant003]CC-TENANT-003     {98a9574f-f5b7-4911-92aa-dc9a859803ff}  tenant003   cloud
5.- Creation of the pre-freeze and post-thaw scripts with cPanel Backup
cPanel includes a native utility to perform the complete backup, or incremental if we want, of each cPanel account, this allows us to create a script for each user for the pre-freeze and for the post-thaw, which I have created are quite simple and I have placed them in /backupveeam/, so that would be something like this:
root@[/backupveeam/veeamscripts]# ls -la
total 16
drwxr-xr-x  2 root root 4096 May  4 00:51 ./
drw-r----- 24 root root 4096 May  4 01:47 ../
-rwxr-xr-x  1 root root  154 May  4 00:26 post-thaw-tenant001.sh*
-rwxr-xr-x  1 root root  214 May  4 00:51 pre-freeze-tenant001.sh*
-rwxr-xr-x  1 root root  154 May  4 00:28 post-thaw-tenant002.sh*
-rwxr-xr-x  1 root root  214 May  4 00:52 pre-freeze-tenant002.sh*
Let’s remember that for each tenant, I have their pre and post scripts, surely with a little good work you can use them in a more advanced way, but let’s see what the pre-freeze content is:
#!/bin/bash
##
## Script to protect an user cPanel account
## Author: Jorge de la Cruz
## Version: 0.1
##
/scripts/pkgacct cPaneltenant001 --compress --userbackup --use_backups --backup /backupveeam/tenant001/ 2>/dev/null
What this command will do is a full backup, SQL, files, cPanel emails from that account, FTP accounts, quotas, etc, and save it to a.tar.gz file located at /backupveeam/tenant001
And this would be the content of the post-thaw that basically is to delete all the backup so as not to consume disk space:
##
## Script to delete an user cPanel account backup after Veeam Backup Job
## Author: Jorge de la Cruz
## Version: 0.1
##
rm -Rf /backupveeam/tenant001/*
Once we have the files created, don’t forget the execution permission:
chmod +x /backupveeam/*
Note: In my particular case I had to increase the timeout time of the pre-freeze post-thaw jobs as it was over 10 minutes that Veeam Agent for Linux 2.0 comes by default, for this we will edit the file /etc/veeam/veeam.ini and comment the following and put 6000 seconds, which is 100 minutes:
[scripts]
# Ignore freeze and thaw scripts result
# ignoreFreezeThawFailures= false
# Timeout for freeze and thaw scripts
 timeoutFreezeThaw= 6000
# Timeout for pre- and post-backup scripts
 timeoutPrePost= 6000
Then we’ll have to perform the typical reboot of the Veeam Agent for Linux 2.0 services:
/etc/init.d/veeamservice restart
And now we can move on to the next point.
6.- Creating and programming the copy jobs of Veeam Agent for Linux 2.0
We already have the Cloud Repositories ready for each tenant, as well as the scripts for cPanel to make a backup before making the snapshot and delete it later to avoid consuming disk, it’s time to create our copy job, the syntax of the copy job is simple, we can always use the -help to help us, for example:
veeamconfig job create --help
Veeam Agent for Linux
(c) Veeam Software AG
  Usage: veeamconfig job create [options] [command]
Commands:
  help, --help, -h   - Short help
  fileLevel          - Create new file-level backup job
Options:
  --name <value>                    - Job name
  --repoName <value>                - Repository name
  --compressionLevel <0...4>        - Compression level
  --blockSize <256|512|1024|4096>   - Block size (Kb)
  --maxPoints <value>               - Number of restore points to keep on disk
  --setEncryption                   - Enable backup file encryption
  --prefreeze <value>               - Pre-freeze command (executed before snapshot creation)
  --postthaw <value>                - Post-thaw command (executed after snapshot creation)
  --prejob <value>                  - Pre-job command (executed on job start)
  --postjob <value>                 - Post-job command (executed on job finish)
  --indexAll                        - Index all files and directories selected for backup
  --objects <value>                 - Comma-separated list of objects to backup (device file in /dev, filesystem mountpoint, LVM volume group name or LVM logical volume name)
  --backupAllSystem                 - Backup all system
  --indexOnly <value>               - List of all paths to be indexed, separated by comma
  --indexExcept <value>             - List of all paths to be excluded from indexing, separated by comma
As in our case we want it to be a file-level copy job, we would have something like the following, as you can see I have indicated that the job is a file-level copy, the name of the job to know what it is, the repository where we want to send the backup, restore points, as well as the pre-freeze and post-thaw jobs, finally the directory we want to protect:
veeamconfig job create filelevel --name BCJ-tenant001 --repoName '[CLOUD.VEEAM.TECH][tenant001]CC-REPO-100' --maxPoints 7 --prefreeze /root/veeamscripts/pre-freeze-tenant001.sh --postthaw /root/veeamscripts/post-thaw-tenant001.sh --includedirs /backupveeam/tenant001
Job has been created successfully.
It is also quite simple to list the jobs, it is important to remember the ID of the jobs in order to add them to a schedule:
veeamconfig job list
Name          ID                                      Repository
BCJ-tenant001 {b6735f06-0acc-4902-b4b8-de961327a9da}  [CLOUD.VEEAM.TECH][tenant001]CC-REPO-100
Now that we have the copy job created, we want to program it of course, for that we will use the command veeamconfig schedule:
veeamconfig schedule --help
Veeam Agent for Linux
(c) Veeam Software AG
  Usage: veeamconfig schedule [command]
Commands:
  enable             - Enable schedule
  disable            - Disable schedule
  show               - Show schedule
  set                - Set schedule
  help, --help, -h   - Short help
Basically the command we want is the following, a daily copy, or as often as the tenant requires, with the Backup job ID, and the frequency in days:
veeamconfig schedule set --jobId b6735f06-0acc-4902-b4b8-de961327a9da --daily --at 00:15
Job schedule applied successfully.
Everything is ready and we can move on to the next point, good job! Remember that this step must be executed for each Backup Job to be programmed for each tenant.
7.- Launch the copy jobs of Veeam Agent for Linux 2.0
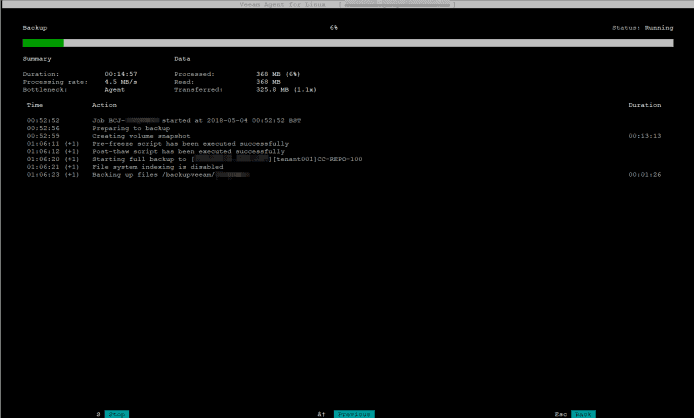
The copy jobs will of course run automatically on your schedule, in case we want to force the job and see it on the Linux UI, we will run the veeam command and select the job we want to launch:
 We will be able to see how the work to be executed begins, and the first thing that is done are the scripts that we have configured previously:
 If we do a ps -efa we can see that the cPanel backup is running:
root@lonhst01 [~]# ps -efa | grep pkgacct
root     22404 22400 23 00:08 ?        00:00:14 pkgacct - tenant001- av: 4 - write compressed stream
tenant00122439 22404  1 00:09 ?        00:00:00 pkgacct - teannt001- av: 4 - create tar stream
root     22453 32438  0 00:09 pts/2    00:00:00 grep pkgacct
After a few minutes, depending on your bandwidth to the Cloud provider, as well as the size of the cPanel tenants, we will be able to see the result of the copy:
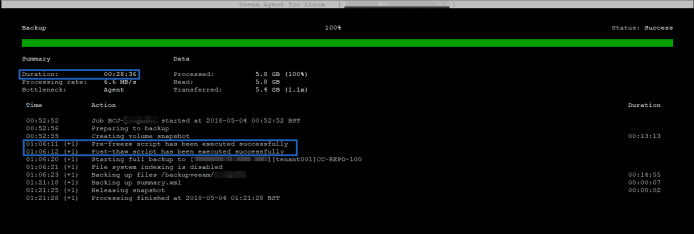 Some points to note, the scripts have worked perfectly, and have taken 13 minutes for this tenant, as well as the total work time, not bad.
In another example of another tenant where the web is smaller, the backup was done in just 2 minutes:

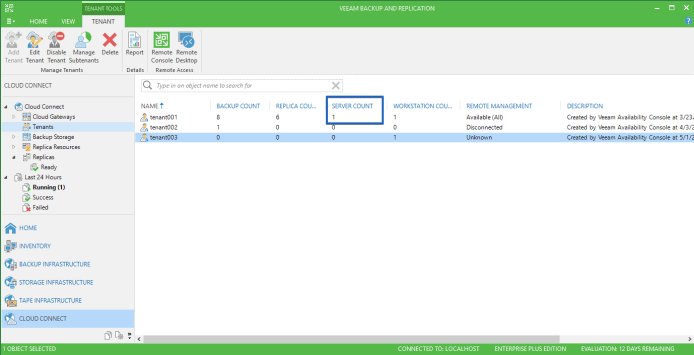
8.- Checking as Service Provider that the Backups have been executed
The Service Provider will be able to verify that each tenant who has sent the backup from Veeam Agent for Linux 2.0 counts as a Server, as it is the license that the Veeam Agent for Linux has:
 If the Provider scans the Repository where the Backups are stored, it will be able to find the .vbk file with the cPanel copy inside it.
 Now that we have everything on the provider side, let’s see how a tenant can view and recover his files.
9.- Access as tenant to the Backup files using Veeam Agent FLR (File-level-recovery)
We already have Backups, we have restore points, we have tenants, we have everything, we will see how to restore these backups, for that we will use Veeam Agent FLR, which allows us to restore in a granular way the files, mounting them in our Linux, or in the Linux of the tenants in case they have lost the original server, or are restoring to a new server.
We will use the veeamconfig point command which gives us multiple options:
veeamconfig point --help
Veeam Agent for Linux
(c) Veeam Software AG
  Usage: veeamconfig point [command]
Commands:
  mount              - Mount filesystem(s) from restore point
  restore            - Restore data volume(s) from restore point
  list               - List all points for backup
  export             - Export restore point data to virtual disks
  help, --help, -h   - Short help
The first thing is to know the Backups, with their Ids that we have for each tenant, etc:
veeamconfig backup list
Job name                                Backup ID                               Repository                                  Created at
cPanel.veeam.tech BCJ-tenant001 {0775ab21-cc98-445f-b32d-e3a59c253ace}  [CLOUD.VEEAM.TECH][tenant001]CC-REPO-100  2018-05-04 00:07
We see that we have a Backup Job that we have created before, that belongs to tenant001, let’s see what restore points it has:
veeamconfig point list --backupId 0775ab21-cc98-445f-b32d-e3a59c253ace
Job name                                OIB ID                                  Type  Created at        Is corrupt
cPanel.veeam.tech BCJ-tenant001  {e9b55e40-5976-4ac0-92a2-90f427c47c17}  Full  2018-05-04 01:06  false
Everything is correct, besides not being corrupted or anything, we will proceed to mount this backup in our system, or the tenant from his own Veeam Agent for Linux could do this restore, if we are the ones who restore the backup to the tenant, we can always restore it to your cPanel folder so you can see the file, if it is the tenant can restore for example in tmp
veeamconfig point mount --id e9b55e40-5976-4ac0-92a2-90f427c47c17 --mountDir /tmp
Restore point is mounted.
Session ID: [{fa98618f-f470-4593-8b52-33c429ed3646}].
Logs stored in: [/var/log/veeam/Mount/Session_20180504_023017_{fa98618f-f470-4593-8b52-33c429ed3646}].
Once the restore point has been mounted, the contents of the backup can be viewed, as simple as making a ls -la to the next folder:
ls -la /tmp/FileLevelBackup_0/backupveeam/tenant001/
total 6046400
drwxr-xr-x 2 root root       4096 May  4 01:05 ./
drwxr-xr-x 3 root root       4096 May  4 00:02 ../
-rw------- 1 root root 6185447473 May  4 01:05 tenant001.tar.gz
From here the tenant can unzip the file and perform the relevant tasks, or even import it into a new cPanel as the file is.
Interesting links
I have already told you about Veeam Agent for Linux in the past, you can find much more information about installation, etc., here:
- Veeam: Veeam Agent for Linux 2.0 is now available – Backups to Cloud Connect and much more!
- Veeam: Veeam Agent para Linux repositorio con enlaces rápidos de descarga
- Veeam: Grabación del Webinar Nuevos Agentes Veeam para Linux y Windows, protegiendo tus cargas de trabajo físicas o en Cloud
- Veeam: Instalando Veeam Agent para Linux, Backup gratuito para Servers Linux
- Veeam: Vistazo rápido a Veeam Agent for Linux, Backup para Servers Linux
I hope you like this post, it’s a pretty interesting use case that I haven’t seen applied out there yet but it sure gives you ideas. A greeting.
Can replace “Veeam Cloud Connect providers” with VPN Client – Site for backup?
Yes of course. But this was simpler as Agents have an specific repository that allow this backup without VPN. If VPN, yes, just configure the agent to send backup to a VBR Repository.